Method to Change Lock Screen Time Format in Windows 10 Using PowerShell with steps. – You find different options to customize Lock screen in Windows 10 OS. For example. you can hide email id, make users invisible, Show notifications, and many others. But have you ever imagined to change the time format on Lock Screen? If you notice carefully, the time format in Windows 10 is a 24-hour clock which also incorporates Taskbar. In contrast, the time format for the Lock Screen remains 12-hour clock in this latest OS.
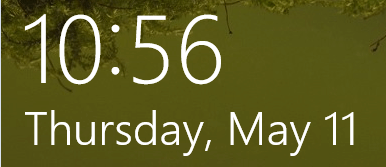
So, in this guide, we will present the instructions to Change Lock Screen Time Format in Windows 10 Using PowerShell. When you run the script and execute a command line, the time format will instantly get changed. Well, you can also read Windows 10 – How to Personalize Lock Screen. The below picture displays 12-hour time format in the Lock Screen after Creators Update.
This screenshot clearly shows 24-hour time format in the Lock Screen following Creators Update.

Change Lock Screen Time Format in Windows 10 Using PowerShell
Let us look into the steps and see how this script works in Windows 10.
Step 1 – To Change Lock Screen Time Format in Windows 10 Using PowerShell, you have to first download the script by visiting this page. Once the download is over, extract the script.
Step 2 – Press the combinations of Win&X keys and select Windows PowerShell (Admin) from the list of items.
Also know more ways to Open Elevated PowerShell on Windows 10 After Creators Update.
Step 3 – Agree to the UAC prompt and type the below command in the exact form.
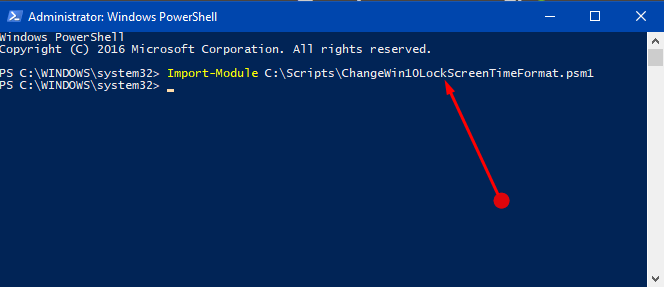
Import-Module <Script Path>
Note – Replace <Script Path> with the actual path of the script that you have downloaded in Step 1.
For example – The entire command will be something like this – Import-Module C:\Scripts\ChangeWin10LockScreenTimeFormat.psm1
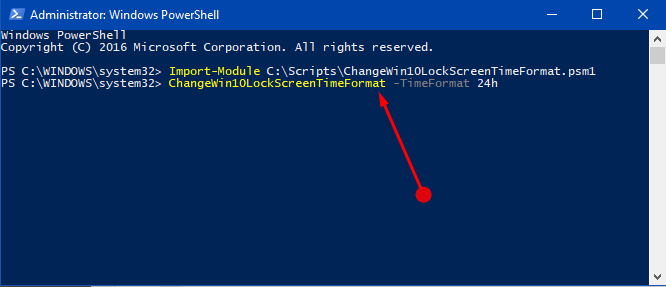
Step 4 – After entering the command with the script path, press Enter. Now, depending on what time format you need, type any of the below commands accordingly. Again, press Enter.
ChangeWin10LockScreenTimeFormat -TimeFormat 24h
OR
ChangeWin10LockScreenTimeFormat -TimeFormat 12h
Step 5 – Finally, press Win+L keys altogether to verify the modification.
See our guide on How to Customize Date and Time Formats on Windows 10.
Fix error while running the script on PowerShell
While attempting to run the script on PowerShell, many users are complaining about an error. The error reads as Import-Module : File <Script Path> cannot be loaded because running script is disabled on this system.
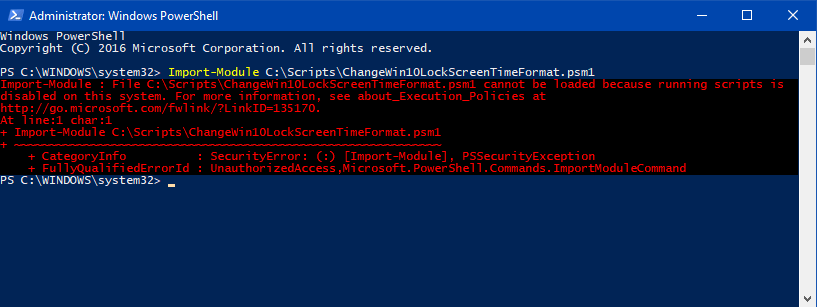
This error note happens to appear as the scripts are by default Restricted to run. This is the execution policy of PowerShell which you can edit anytime. To do so, pursue the below steps.
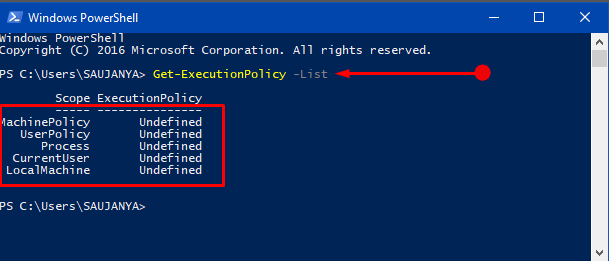
Step 1 – Press Win+X keys jointly and choose Windows PowerShell from the items that come into view. On the PowerShell, type the below command to review the policy.
Get-ExecutionPolicy -List
Step 2 – The default policy is Undefined (means Restricted) as you can see in the below image.
Step 3 – To Change Lock Screen Time Format in Windows 10 Using PowerShell for the current user, type the below command. The command reviews the policy of Current User and sets it as RemoteSigned.
Set-ExecutionPolicy RemoteSigned -Scope CurrentUser
Step 4 – Press Enter to continue and if any warning appears, press Y key.
Step 5 – After editing the policy, try running the script by following the above methods. Hopefully, without any further errors, you can Change Lock Screen Time Format in Windows 10 Using PowerShell.
For reference, also read How to Set Backgrounds Wallpapers HD Images as Lock Screen in Windows 10.
Conclusion
Hence, by pursuing the above steps you can effortlessly Change Lock Screen Time Format in Windows 10 Using PowerShell. Also, this process is very simple as you have to execute one command only. Moreover, advanced users will enjoy modifying their lock screen by just running a script on PowerShell. In the end, if you have any tips on this script, don’t forget to share them.