Procedures to Change Proxy Settings in Chrome Web Browser with steps. – A Proxy server is commonly a mediator that exists between your browser and the main server. Its basic functionality is hiding location and allowing to access the blocked web pages. Chrome including all important browsers of the modern age provides its user the facility to modify proxy settings. You can see an article in this concern – Windows 10 – How to Customize Proxy Server Settings.
So, in this guide, you will learn the steps to Change Proxy Settings in Chrome Web Browser. All you need to have is the IP of the proxy server and Port number before you move with the steps.
Ways to Change Proxy Settings in Chrome
Step 1 – Start the procedure by opening Chrome browser so, double click its icon from the desktop.
You simplify the browser’s accessibility with the instructions in – Windows 10 – How to Create Site Shortcut Pin Using Chrome.
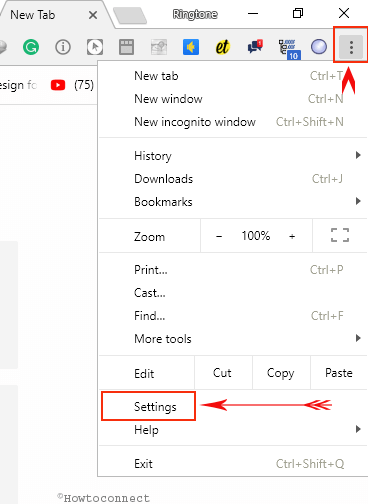
Step 2 – Now, when the browser shows up, click its three little dots on the upper right corner. A drop down comprising various options will appear, select Settings.
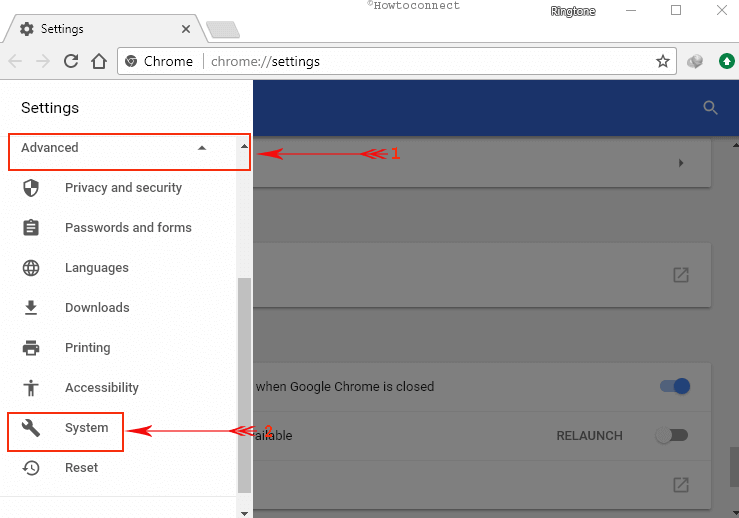
Step 3 – Next, click Settings in the upper left corner and from the menu, click Advanced and then System as indicated in the image below. As an alternative, you can also scroll down to the end until you notice an option “Advanced“, click it.
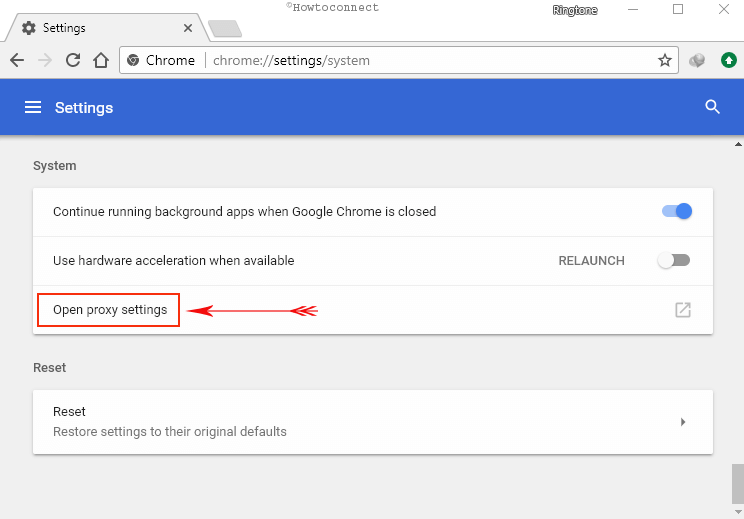
Step 4 – Moving ahead, click on Open proxy settings option, located under System.
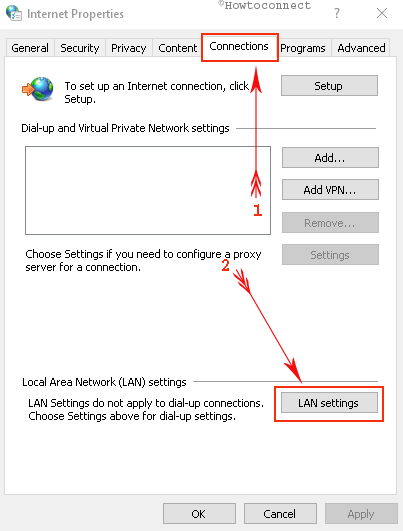
Step 5 – This will launch Internet Properties on the PC screen with few tabs. By default, Connections tab will be open. Inside that tab, you will notice a button LAN settings at the bottom, select it.
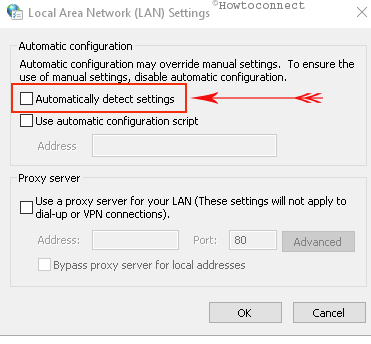
Step 6 – Proceeding on, a small Local Area Network (LAN) Settings window will prompt up. Now, ensure to unmark the first option on the dialog box, Automatically detect settings.
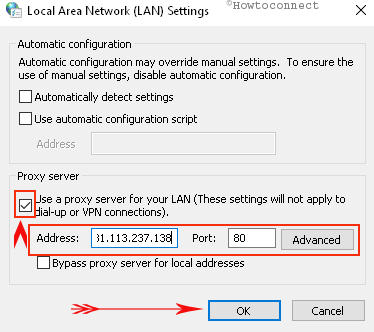
Step 7 – The second section of the box is the Proxy server. Firstly, put a tick mark on the option “Use a proxy server for your LAN” and secondly, then enter the IP and Port numbers in the respective fields. Finally, select OK button to successfully Change Proxy Settings in Chrome browser.
Revert Back the Changes
Now, in case, if there arises a need that you have to revert back the settings, means if you want to browse without using a proxy, then observe these steps.
Step 1 – Follow the first 5 steps from the above section and then remove the IP and Port number from the respective boxes.
Step 2 – Unselect “Use a proxy server for your LAN“. This option is located in the lower part of the Local Area Network (LAN) Settings dialog box.
Step 3 – Lastly, select Automatically detect settings box and click OK to save and implement the modifications. Now, use Chrome and surf without using any proxy.
Conclusion
So, to Change Proxy Settings in Chrome Web Browser is pretty much easy. After you change the settings, you can try opening the websites. If you are successful in changing it, then the targeted web page will open up. When you ever want to surf without using the proxy, simply revert back the modifications. If you have more information on Change Proxy Settings in Chrome, please do write to us in the comments form below.