Cache stored on Windows 10 retards your PC from working with its efficiency. PC starts showing various kinds of issues due to this like it becomes slower, hangs time and again, starts in a longer period of time, the browser shows web pages opened in the last session, and even more.
You can clear cache on Windows 10 PC after putting a small effort to run your PC with perfection. So we are writing here How to Clear Cache on Windows 10.
How to Clear Cache on Windows 10 PC
On any operating system like Windows 10, Many types of cache exist. It is distributed on your PC in two different environments desktop and the Modern UI. We call them Desktop app cache, Modern UI App cache which is found in Internet Explorer, Windows Store cache, File Explorer History, Location History. In these Windows 10 tips, we would elaborate to clear cache on Windows 10 one by one.
1. How to Remove Desktop Apps Cache on Windows 10
Via Ccleaner
1. Firstly, I like to introduce the desktop app cache. You can clear cache on Windows 10 in the easiest and dexterous way by utilizing CCleaner software which wipes out browser cache, thumbnail cache, font cache, DNS cache, and many more on applying only a single click. Instead of doing it manually one by one, you can simply Clear Cache on Windows 10 using CCleaner at once.
You can download CCleaner software by visiting the link above CCleaner which is free of cost.
Through Disk Cleanup
2. If you want to clear cache on Windows 10 manually then you have also an option other than CCleaner to clear cache in Windows 10, but it would be manual. The best thing to know that all the methods are applicable to Windows 10 as it was in Windows 7 and 8. You can use Disk Cleanup instantly to clear the thumbnail, temp files, and all types of recyclable cache.
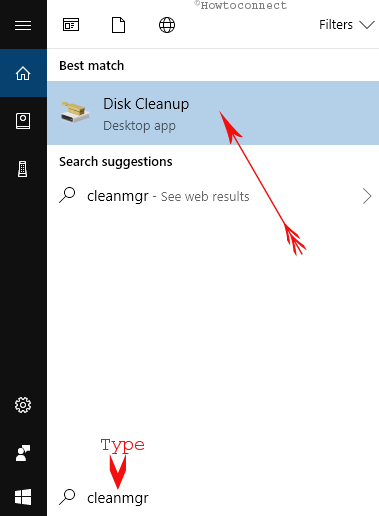
3. To open Disk Cleanup, write the text cleanmgr in the Taskbar search box below the Start Menu and select disk cleanup from the search results. Disk Cleanup will be opened and you can now scan your files as you want in different drives on your PC.
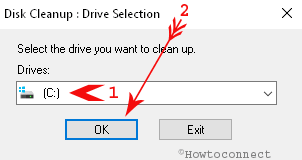
4. Select drive one by one and click OK.
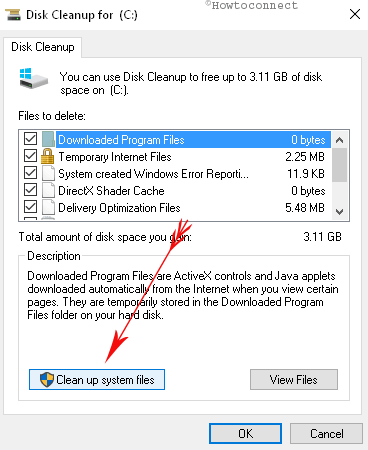
5. Check all boxes and press Clean up System Files after scanning the files.
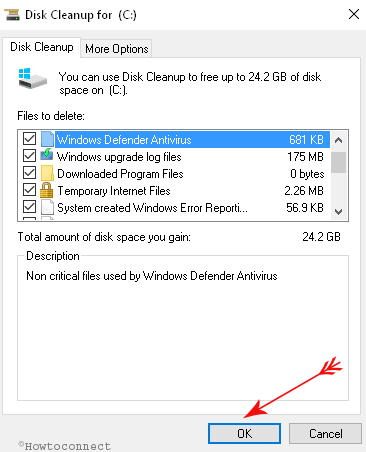
6. In the next window select the drive in which you have stored your system files and click OK.

After a short span of time, the utility will calculate which are the files you can delete and a window like below screenshot will present. Check all the boxes and click OK.
Read in Detail: Windows 10 – How to Open and Use Disk Cleanup
7. Sometimes, you need to flush DNS cache while you will find browsing problems. To do this, open command prompt through the search box below the start menu and copy the following command and paste in it.
ipconfig /flushdns
8. Hit Enter.
In the Modern UI, you would also see many types of cache like Internet Explorer, Windows Store, File Explorer History and Live Tile caches. So, let us start with Internet Explorer, the Modern UI version of the browser.
How to Clear File Explorer History in Windows 10
When you browse and open different folders and files on Windows 10 the action generates cache which affects the PC execution. So to Clear Cache on Windows 10, it is very relevant to clear file explorer history.
a. Click File Explorer icon on the taskbar.
![]()
b. On Open File Explorer Window click View menu at the top followed by the Options icon on the extreme right on the ribbon.
![]()
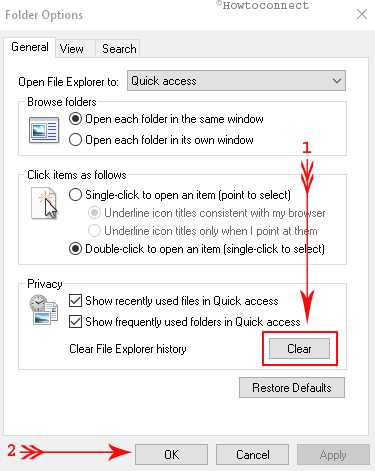
c. A Folder Options wizard opens up. Go to the lower part and click Clear button.
How to clear Internet Explorer / IE Cache
a. Open Internet Explorer by writing down Internet Explorer in the search space. Soon, you will notice Internet Explorer as the Best match on top, click on it.

b. Once the browser opens up, click on the Tools button at the extreme top right. A menu will appear with various choices, click on Internet options.
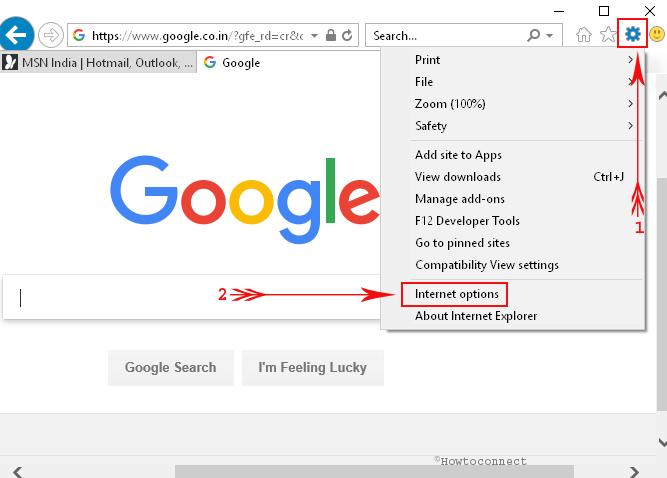
c. An Internet Properties box will pop up, focus on the General tab, and locate the section that reads as Browsing history.
d. Finally, click the Delete button that appears in the section.

e. The above action will make another box pop-up on the screen. Various options with checkboxes are listed out. Hence, select all the boxes and then as the last thing, click on Delete.

How to Clear Microsoft Store Cache
Evidently, you will form more cache of the Windows store on your computer than earlier. So If you want to Clear Cache on Windows 10 you must have to clear Microsoft store cache.
a. First of all, open the run dialog box by clicking Window key with R. Copy and paste the following command in the run box.
WSReset.exe
b. Press Enter. 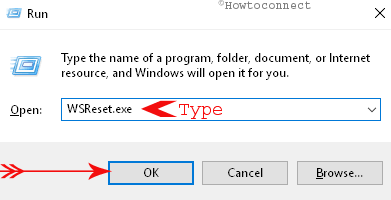
I am sure you would not get more problems later after using the above different tips to reset the Cache on Windows 10. That’s it.
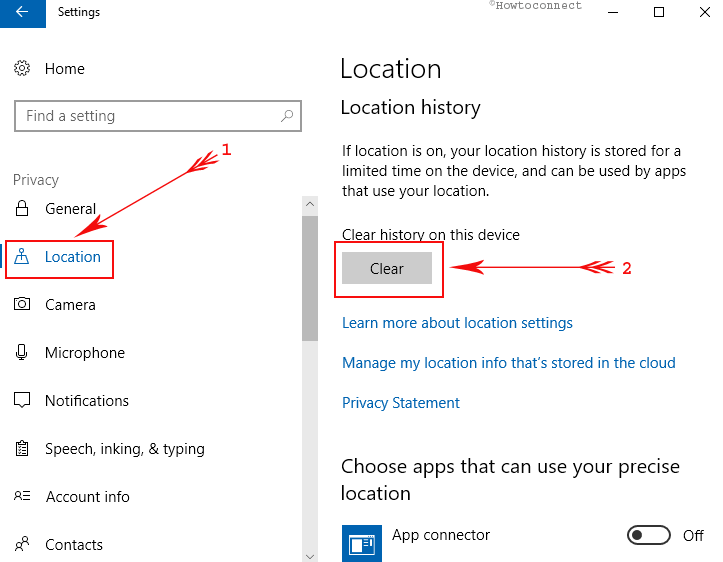
Delete Location History
- Click to go into the Settings app.
- Choose Privacy.
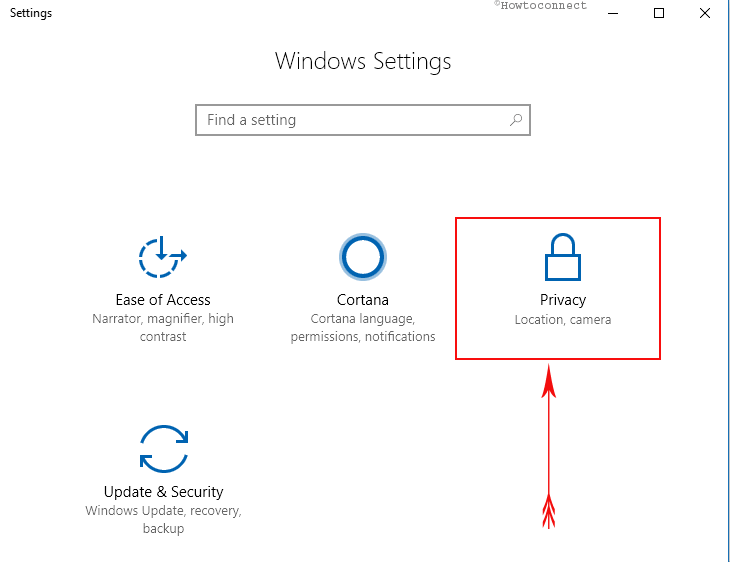
- Click Location in the left sidebar. Press Clear button under Location History.
Additional ways to Clear Cache on Windows 10
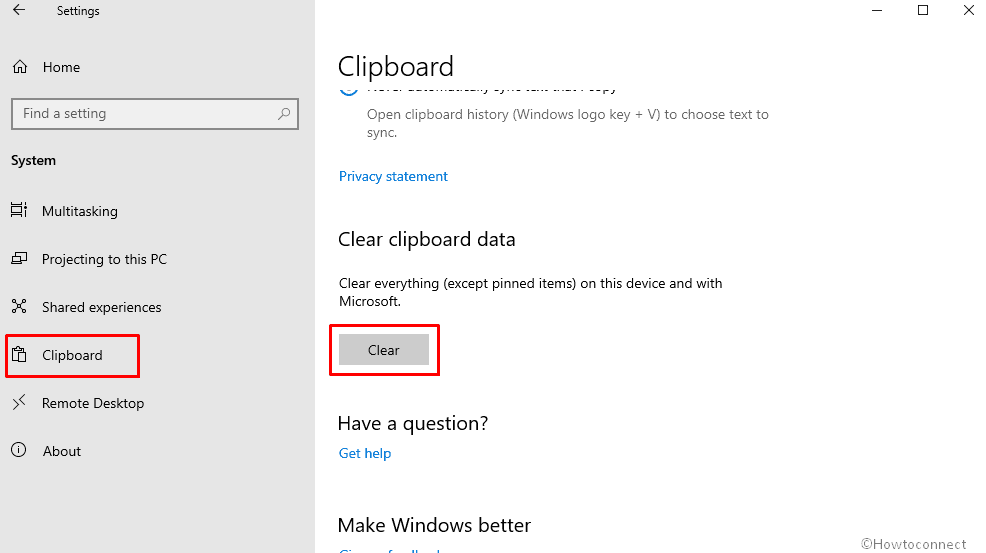
Clear Clipboard data
Windows 10 stores the data when a user copy or cut something in Clipboard. As long you continue working on your PC then this is being loaded. This may affect your PC performance so in order to Clear Cache on Windows 10 you need to delete the data in Clipboard.
- Open Windows Settings (Win +I)
- Select System.
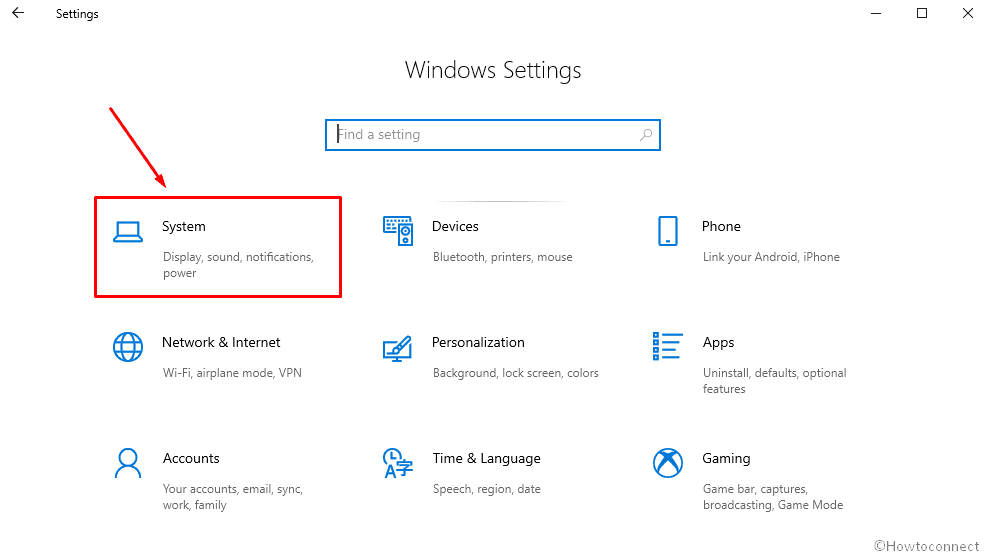
- Go to the left pane and click on Clipboard. Move to the adjacent right and scroll down and choose Clear.
See the methods here – How to Enable Save Clipboard Data, Clear and Sync in Windows 10.
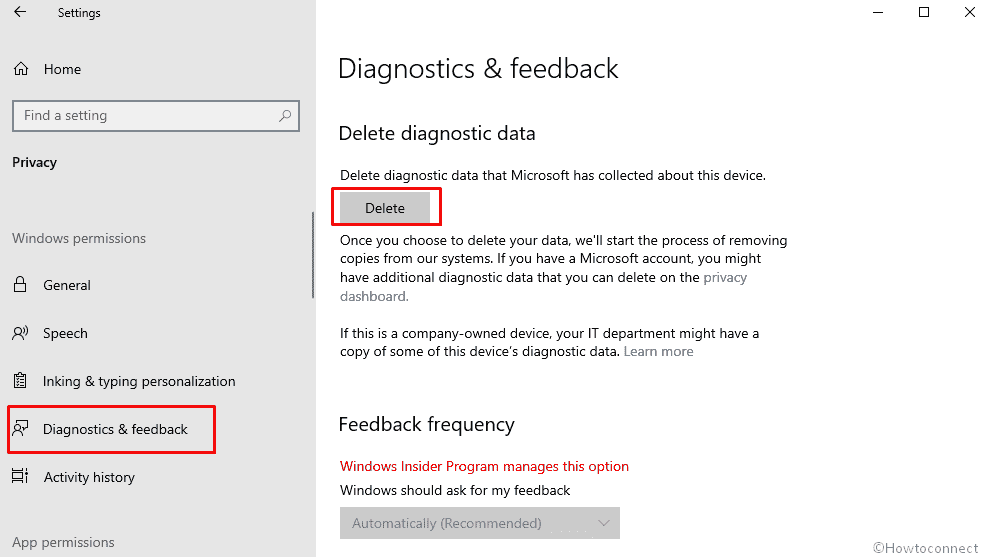
Delete Diagnostic Data
Microsoft collects diagnostic data and accumulates this on your System. To clear cache on Windows 10 you need to delete the collected copies from your device.
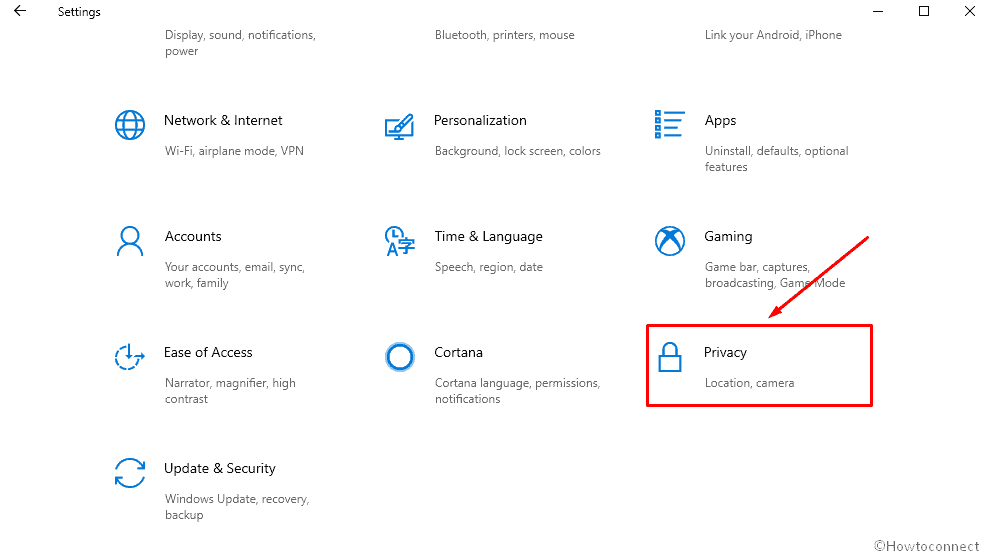
- Open Settings (Win+I) and select Privacy.
- Click on Diagnostic and Feedback from the left pane and jump to the right. Scroll down and click on the Delete button in the Delete diagnostic data section.
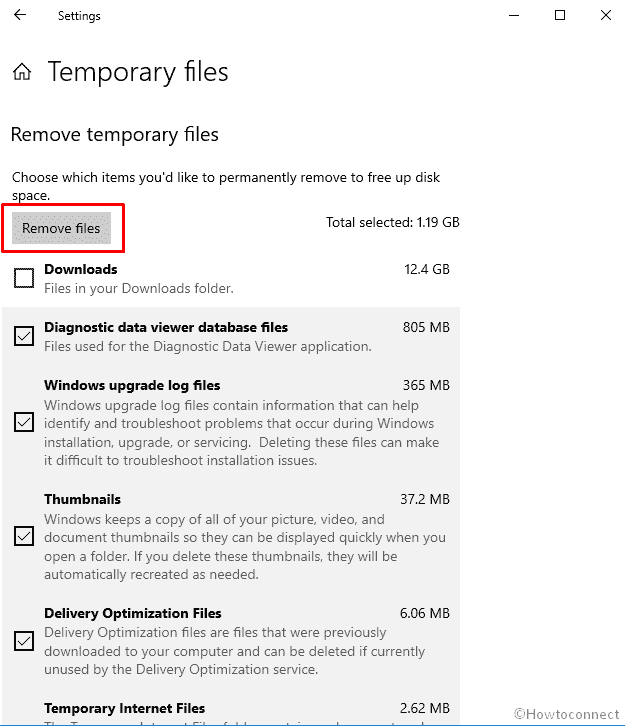
Delete Temporary Files
When you manage tasks Windows 10 creates garbage such as thumbnails, delivery optimization files, temporary internet files, error reporting files, and several other. If you want to clear cache on Windows 10 then delete the temporary files from storage settings.
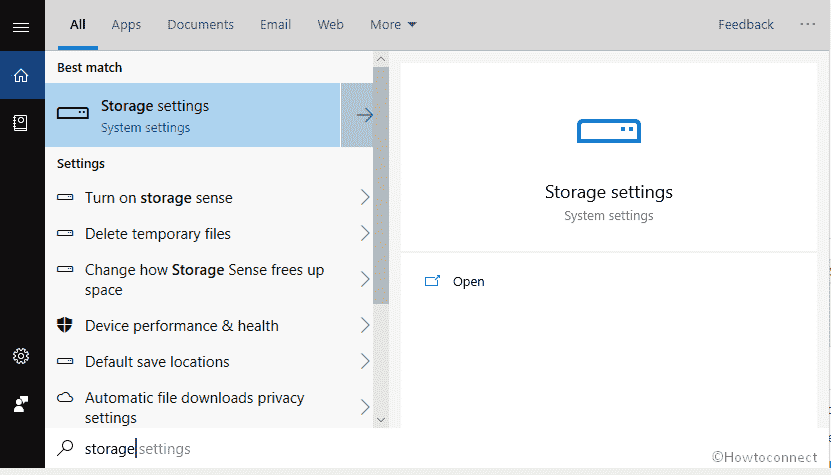
- Press Windows key, type Storage and hit Enter.
- Click on Temporary files from the right side of the page.
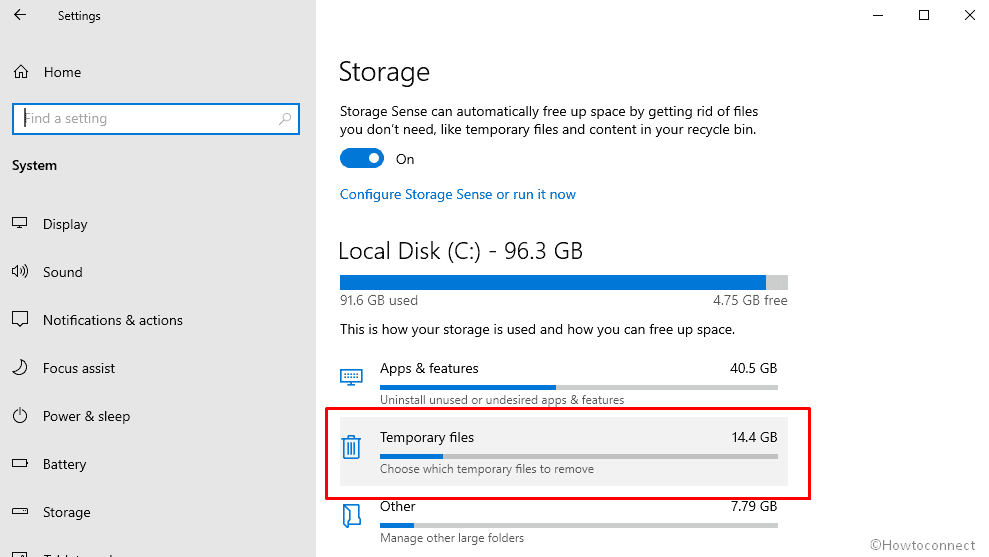
- Select the items as per your preference and click on Remove files.
Alternatively, you can follow the instructions here – 4 Ways to Delete Temp Files in Windows 10.
Update –
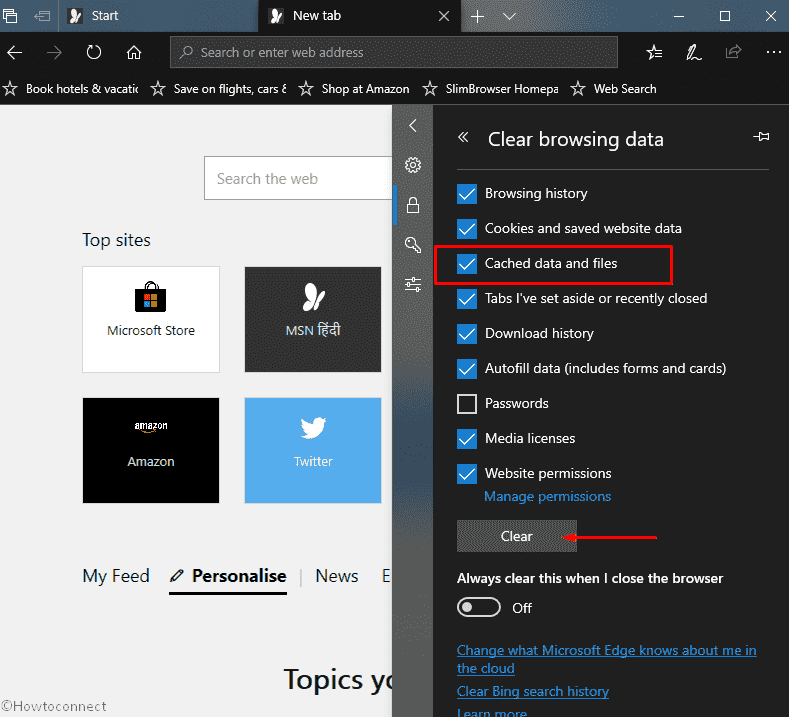
Clear Microsoft Edge browser cache Cache on Windows 10
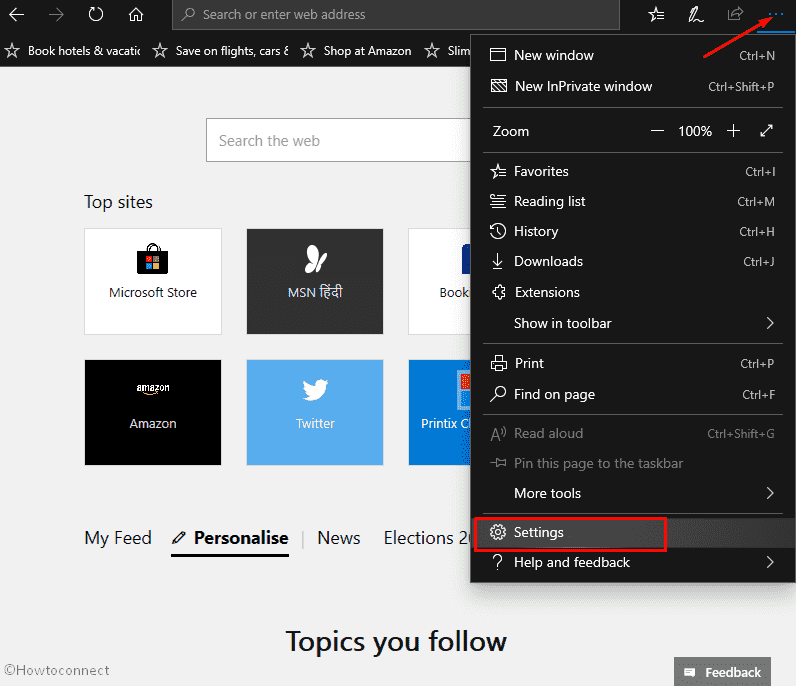
- Open Edge browser from either the taskbar or Start menu.
- Press 3 dots in a horizontal line from the top right portion. Alternatively, you can use Alt+X hotkey.
- Select Settings from the dropdown.
- Click on “Privacy & Security” from the left-hand side of the Settings pane.
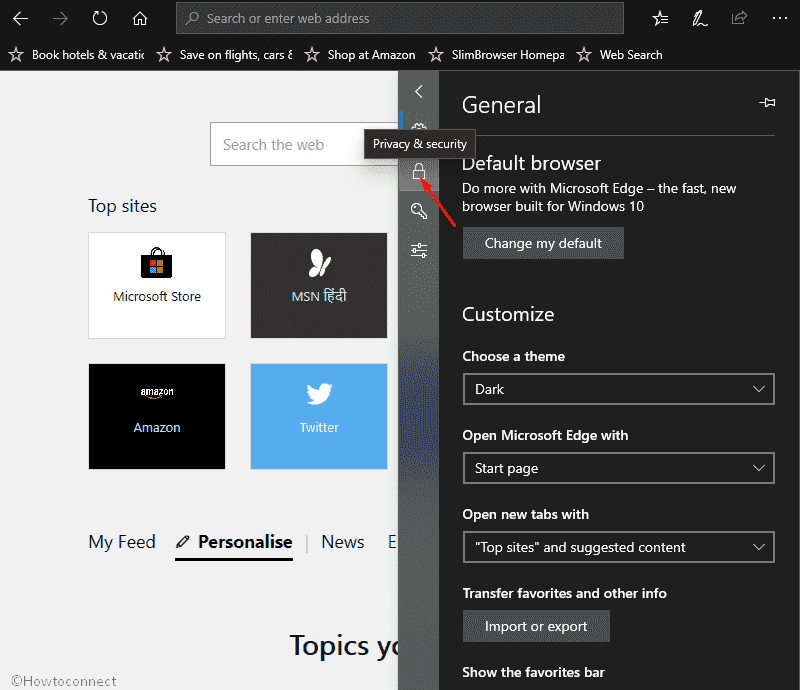
- Choose What to clear button.
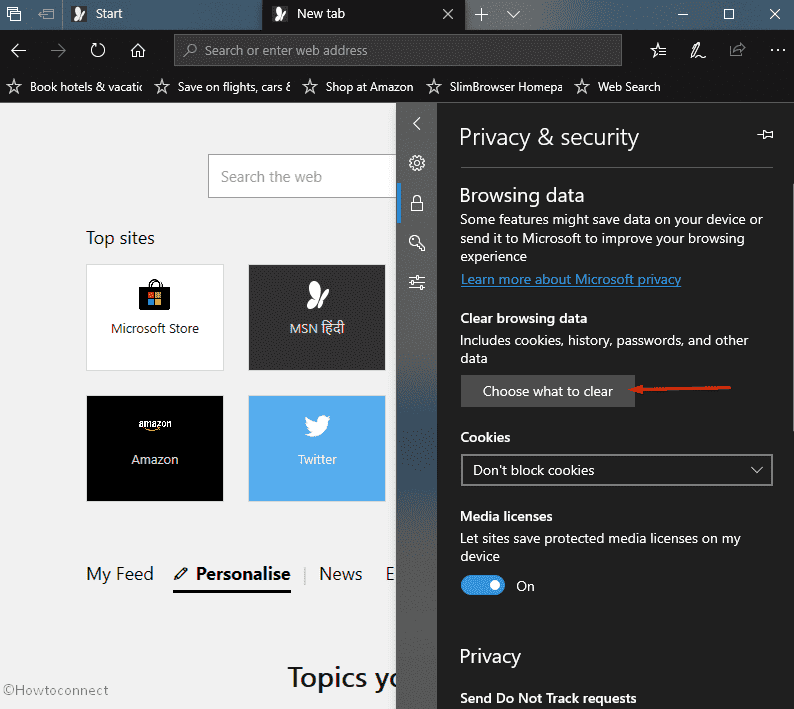
- Check the box that refers to Cache data and files.
- Click on Clear.
How to Clear Start menu live tile cache on Windows 10
To Clear Cache on Windows 10, you should wipe out all the data from different segments. Start menu live tiles also creates cache files which prevent showing fresh content on the menu. Once you delete them you can get changing apps here.
- First of all, press Windows logo key, type regedit.exe, and subsequently hit Enter.
- Select Yes to give your consent when a UAC dialog prompts up locking your screen.
- Navigate to the path
HKEY_CURRENT_USER\Software\Microsoft\Windows\CurrentVersion\ImmersiveShell\StateStore- You will find here 2 DWORDS – ResetCache and ResetCacheCount.
- Double click on ResetCache and set its value 1.
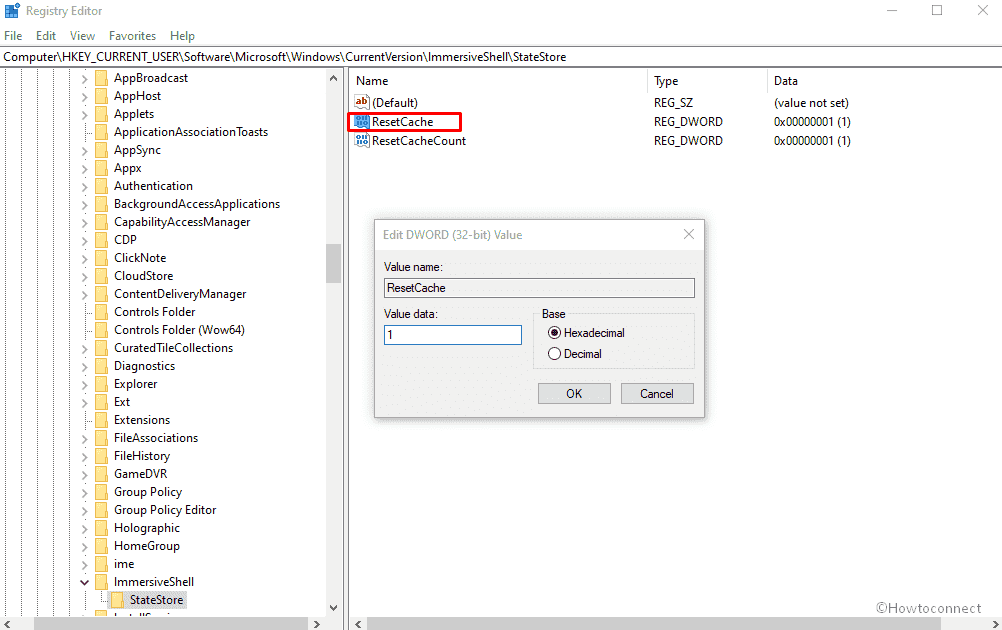
- Reboot your computer to make the changes effective.
How to Clear Outlook Cache in Windows 10
Outlook Stores data you use to access this in the future in an easier way. But many files after getting old become of no use requires deletion. Furthermore, Outlook fetches contacts from the cache file so instead, you delete a name in the list you find this here.
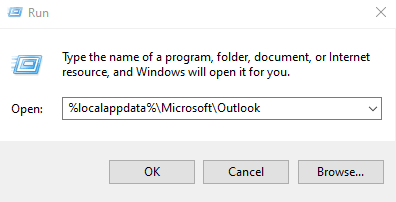
- Save ongoing work and close Outlook.
- Press Windows key & R simultaneously.
- Copy “%localappdata%\Microsoft\Outlook”, paste into the Run window, and hit Enter.
- You can see RoamCache folder in the running directory.
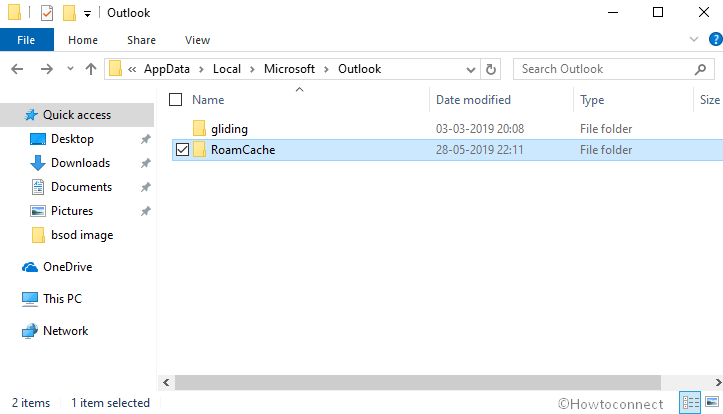
- Open RoamCache folder and take a look at the cache files.
- To wipe out all the cache of Outlook, select entire items existing here, input a right-click and then choose Delete.
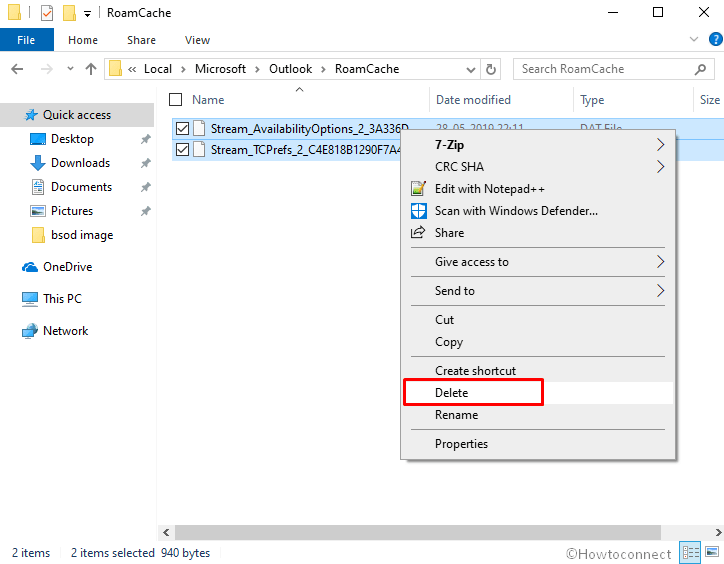
- Whenever you will launch the Outlook it will create fresh cache files in the “RoamCache” folder.
Erase Auto-Complete Cache in Outlook
By default Setting, Outlook provides autocomplete feature but it accumulates cache which slows down the speed of the email client. Fortunately, you can delete the list easily in a few clicks –
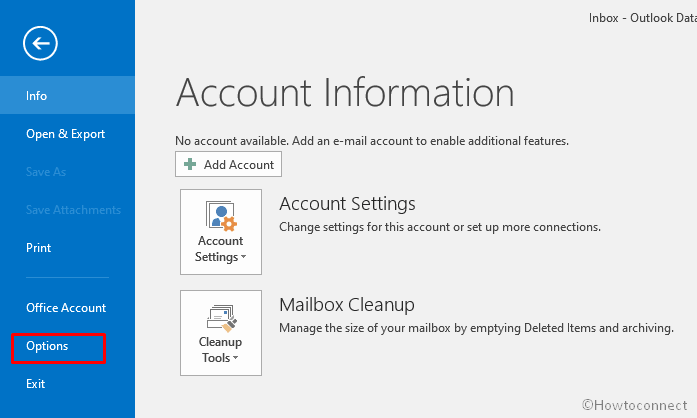
- Go to Files => Options and let the Outlook Options window appear.
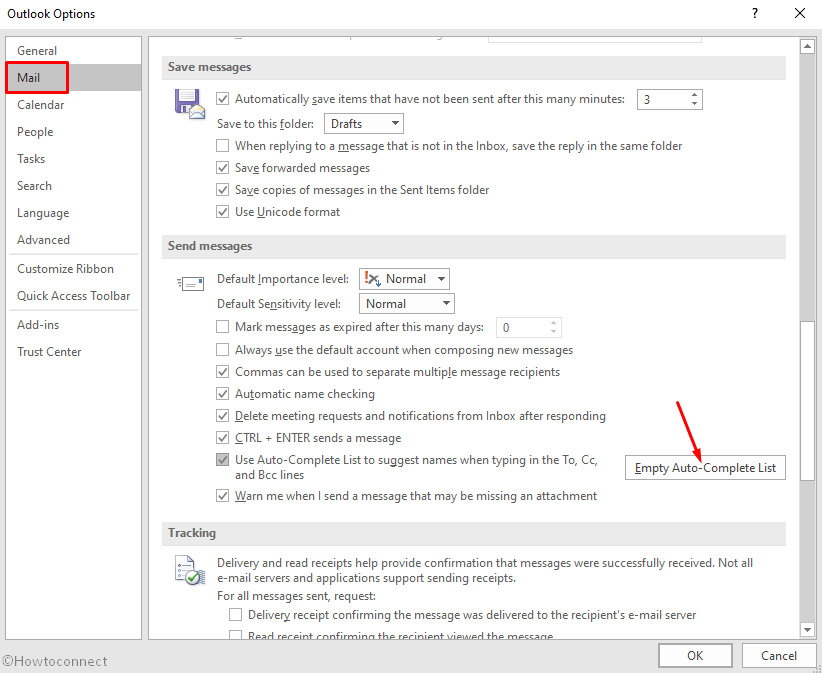
- Now select Mail from the right side pane.
- Go to the right and scroll down until you reach the Send messages section.
- Click on “Empty Auto-Complete List” to clear cache in Windows 10.
That’s all!!!
Welcome Anne, I am at presently using CCleaner to Clear Cache on Windows 10 pretty effectively. After the release of Windows 10 the software was not performing at all but also creating issues. We had written an article in this regard Struggling with WiFi Issue in Windows 10? Check Ccleaner First But now no issue and working quite well.
thanks for the info, however, just an update on ccleaner. I have used this for a long time but with the latest update of windows 10 this free app is no longer compatible.
thanks for the detailed information
Wow thnks a lot. God bless you on this very detailed and well explained article. I noticed that even thou I delete all history on MS Edge when I type some old address in the address bar what Edge does then is that it still pops-up the old pages I visited even thou I cleaned the history records. Somehow Edge still keeps the history records in some hidden folder.