Customize Communication Tab In Sound On Windows 10. – Communications tab in sound settings is essentially built for the feature of disabling other sounds in the PC when a particular call/communication is being placed through the PC. This tab allows particularly to enhance the existing sound features and deliver excellent user experience. Here, in this post, we will discuss the method to customize Communication Tab In Sound On Windows 10.
Assume you are playing a lyrics in either Groove music or VLC or WMP or variant software. In the middle, Skype call comes. Then the role of the settings under communication tab starts. This tab provides 4 options, for example, decrease the sound of playing music to 80% as the Skype call arrives. If you have chosen this option then the sound level of running music comes down to 80% when Skype call comes.
Ways To Customize Communication Tab In Sound On Windows 10
Using Personalization Settings
Step 1 – To start with, hit Win+I keys on the keyboard to open up the Settings application.
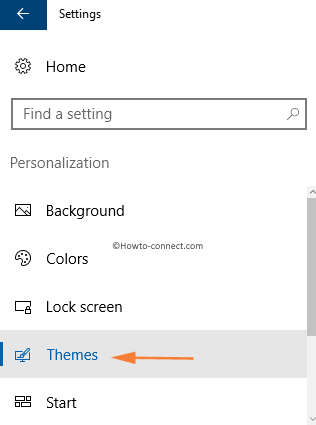
Step 2 – On the home page of Settings application, hit or click Personalization icon.
![]()
Step 3 – Click on Themes in the menu on the left panel of the Personalization interface.
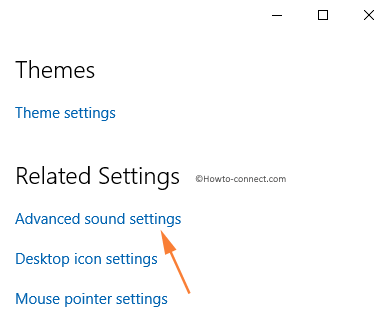
Step 4 – Scroll down to the Related Settings on the right pane and click on the link titled Advanced sound settings.
Step 5 – A dialog box with the name Sound opens up.
Step 6 – Switch over to the Communications tab. You can see a list of options.

- Mute all other sounds: Give zero priority to the other sounds compared to the communication sounds in the PC.
- Reduce the volume of other sounds by 80%: To lower the priority of other sounds in the device by 80 percent when making other communications.
- Reduce the volume of other sounds by 50%: This third option minimize other sounds by 50 percent when using the device for making communication. It is specifically for keeping equal priority of other sounds compared to the communication sounds.
- Do nothing: To retain the sound quality without any reference to the communication via PC.
Step 7 – Click on the option that you want to select. A black circle should appear in the empty circle that is selected.

Note: This black circle is called a radio button which permits to select just one option out of the number of preferences. Hence, you cannot choose multiple options in Communication Tab.
Step 8 – Click on OK to Customize Communication Tab In Sound In Windows 10.
Using Speakers Icon on Taskbar
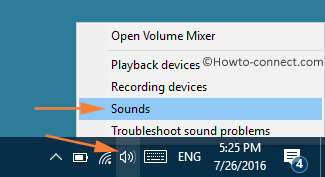
Step 1 – Right-click on the Speakers icon placed on the bottom right corner of the screen, just beside the date and time display.
Step 2 – A context menu appears on the screen, click on Sounds.
Step 3 – Once done, the Sound settings window pops up on the screen.
Step 4 – The focus is on the Sounds tab. Switch over to the Communications tab by clicking on it.
Step 5 – Choose from the list of options available by clicking on the empty circle beside the corresponding text.
Step 6 – A black circle should appear in the given empty circle corresponding to the option selected.
Step 7 – As the last step, click on OK and implement the changes.
With the above-written ways, you can easily Customize Communication Tab In Sound In Windows 10 and can pick up the required option to balance the other sounds while making communication.
Hello Sven, follow – Sound Not Working after Windows 10 April 2018 Update 1803
I do not get the communications tab on my windows any idea, why?