The process like wermgr.exe in Windows 10 intends to give you an enhanced experience and bring positive changes to Operating System. But sometime the same may annoy you with unexpected behavior like high bandwidth usage. However, this .exe file is not a virus itself but hackers or developers use this executable file to inject malware in your computer. As a result, you need to look for different ways to disable or fix wermgr.exe process.
The legitimate wermgr.exe is an error reporting service of Windows 10. It collects and sends error logs from your system to Microsoft. Furthermore, the executable alerts while any issue occurs either in the operating system or a program. The notification window prompts in the middle of the screen to send the info about the error to Microsoft. Mostly, it shows up because of the corrupt file. When the details of any problem are sent to the company, they use that information to develop future updates and make Windows more stable.
Related – How to Disable and Fix wuauclt.exe in Windows 10
wermgr.exe in Windows 10 Solutions
When your computer has any issue associated with Windows Error Reporting Manager, the main problem that you may experience is high bandwidth usage. Unlimited data users can somehow neglect this fact but if you are restricted to do something, you will definitely feel irritated. It doesn’t only consume all gigabytes but also starts automatically every time when you activate the internet connection. Sometimes, wermgr.exe is responsible for high CPU usage too. If you are having similar issues, don’t get frustrated. Instead, learn the optimum way to get rid of it. Here is How to Disable and Fix wermgr.exe in Windows 10 –
Stop wermgr.exe through Services
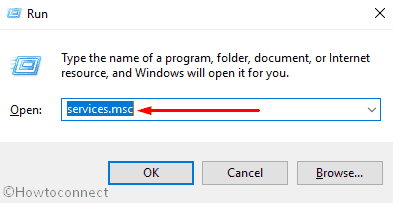
Whenever you encounter any error with an executable file, the first thing you should do is Stop the service. Here’s how –
Step-1: Hold down the Windows key + R together in order to open Run dialogue box. Type services.msc in the void space and press Enter.
Step-2: Once the Services Window appears, find out the Windows Error Reporting Service in the list, right-click on it and select Properties.

Step-3: Now, next to the Startup type, open the drop-down menu and choose Disabled.
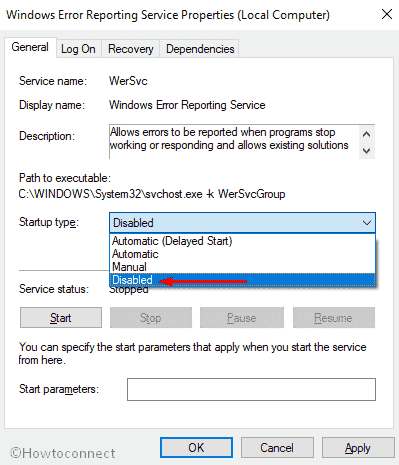
Note – Some users fail to select it because of the inactive drop-down menu in their system. They should reopen the services as an administrator or log-out and again login with admin privilege.
Step-4: At last, Click on Apply or OK to make the changes effective.
Disable wermgr.exe through Registry Editor
If you love to follow difficult paths, this fixation method is for you. Yes, you can disable wermgr.exe in Windows 10 via Registry Editor also. Follow the below-mentioned procedure to do so –
Type regedit in Cortana and when the result turns up, Press Enter –

If a UAC prompts up, click on Yes to give consent.

Once the Registry Editor comes into the sight, Navigate the following path –
HKEY_LOCAL_MACHINE\SOFTWARE\Microsoft\Windows\Windows Error Reporting
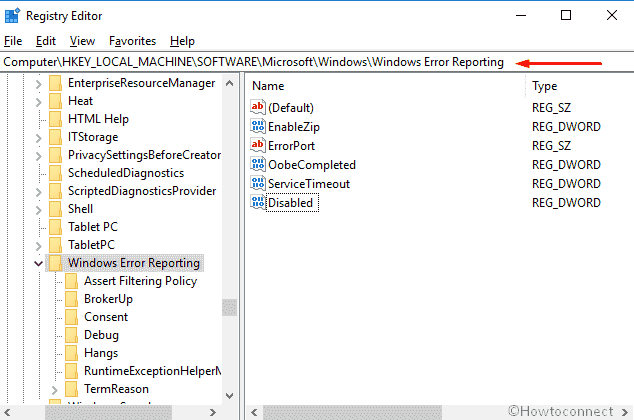
Now, shift to the right pane and locate Disabled. In case it doesn’t exist, create a new DWORD value with the same name.
Double-click on the Disabled DWORD key and change value from 0 to 1. Then save it by clicking the OK button.

Scan you Full system
wermgr.exe is virus prone because of its executable nature. Nowadays maximum viruses are configured to mimic system processes so that it can easily pass away from security threats. And most of the time, you don’t notice as it enters in your computer with almost the same term. In order to check if wermgr.exe in Windows 10 is a virus or legitimate one, follow the below process –
Make a simultaneous Press of Ctrl+Shift+Esc to open Task Manager.
Click on More details if it’s not expanded already.
In Processes tab, locate wermgr.exe. Make sure the name it exactly same.
Now, do a right-click on it and Select Open file location.
If the location is C:\Windows\System32 then there is nothing to worry about.
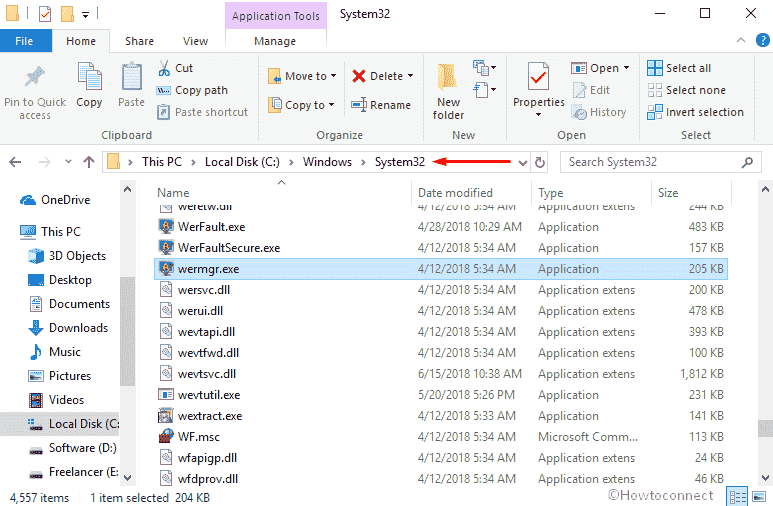
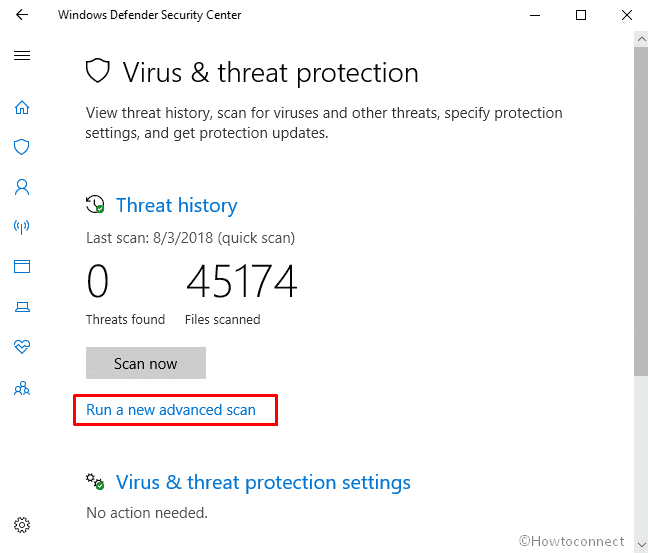
But if it’s not, the possibility is very high that you are already infected with a virus that is causing high bandwidth usage. In that case, you have to scan your full system with Windows Defender. Here is the process –
- Click on the Shield icon from the Notification bar.
![]()
- Hereafter, Select Virus & threat protection.

- Click on Run a new advanced scan located under Threat history.
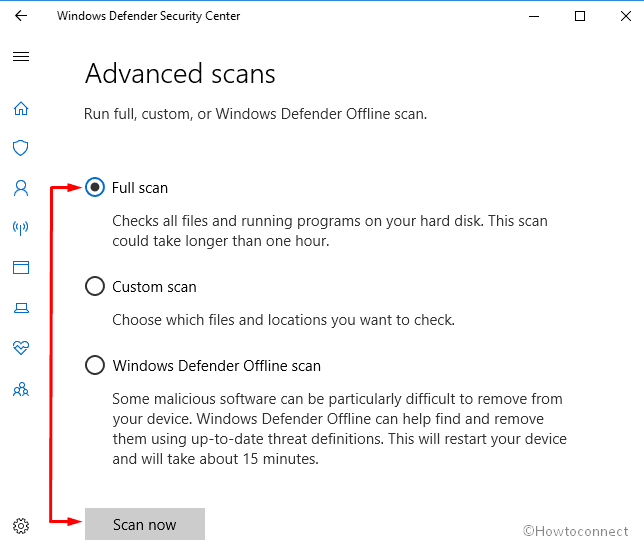
- Make sure the radio button of Full scan is checked and then click on Scan now.
You may also Read – How to Run Offline Scan from Window Defender Security Center in Windows 10
Update your Windows 10
Microsoft keeps updating its operating system to fix the bugs and problems. So installing the latest version may fix wermgr.exe in Windows 10 that is causing high bandwidth usage and also doing same with the CPU. To do so, follow the below process –
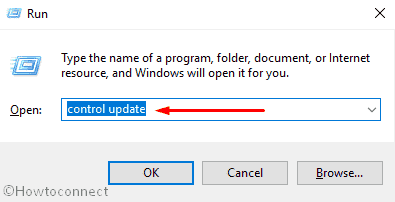
Right-click on Start button and Select Run.
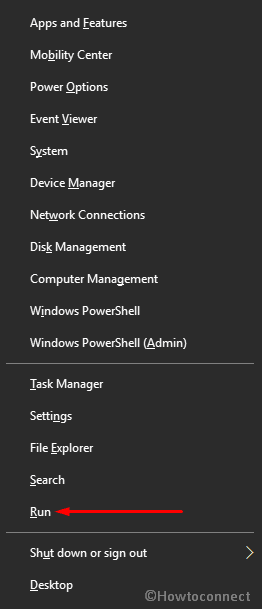
Write down control update in the text box and hit Enter.
Here you will view the Setting page of Windows Update. Click on Check for updates.
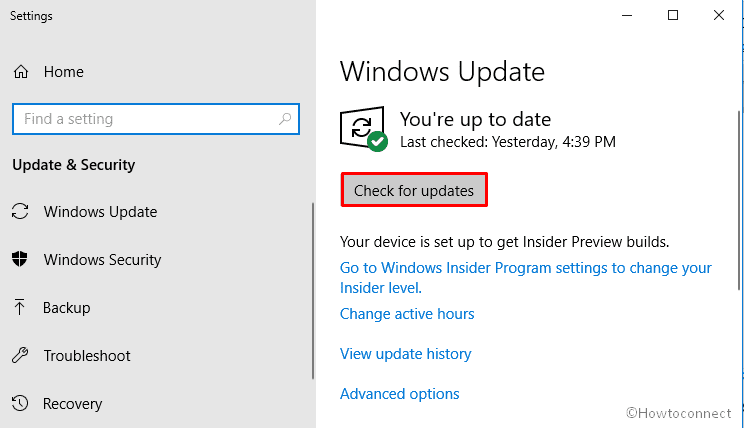
Thereafter, the system will start searching for updates for you. If it get’s any, install that.
Run System File Checker
As we said, the corrupted file often causes issue related to Error Reporting Manager such as high bandwidth usage. SFC /scannow will help in this regard. Here’s how –
Press Win+X together and Select Windows PowerShell (Admin) from the list of options.

When User Account Control throws up, click on Yes.

Copy-paste the following command in the blue Window and hit Enter –
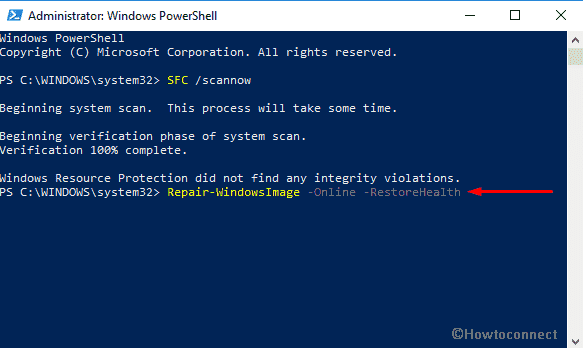
SFC /scannow
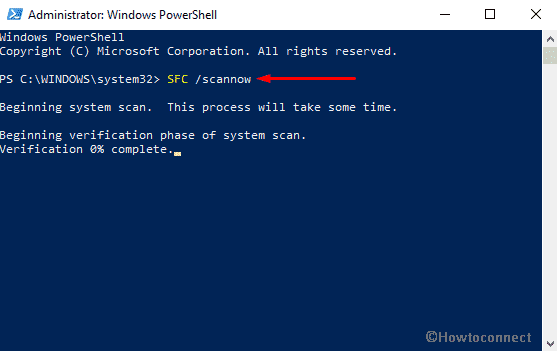
This process will take time so, wait patiently until it’s done.
Thereafter, write down the following command in the same Windows and Press Enter again –
Repair-WindowsImage -Online -RestoreHealth
Once done, Restart your computer and relax with smoothly running Windows 10
That’s all. Hope you already solved the issue of wermgr.exe in Windows 10.