Procedures to Disable/Enable Startup Delay in Windows 10 through Steps. – The Startup items on Windows 10 comprises of shortcuts, programs, folders, drivers, etc that run automatically when OS boots up. You will get all these items inside Startup folder. Startup items are either selected by yourself or they get added by the apps or drivers during their installation. So, Windows 10 delays the Startup items when the OS boots up and this improves the performance of Windows startup. By default, the OS keeps hold on the startup items for about 10 seconds from running after the startup.
If your OS startup at a rapid speed, then you surely wish to run Startup items right away after logging into the account. But to run these items at startup, you have to disable the Startup Delay feature. So, in this guide, learn the steps to Disable/Enable Startup Delay on Windows 10 for your account through Registry Editor.
Way to Disable/Enable Startup Delay on Windows 10
Before following the steps, make sure that you are good at registry editing. Back up the respective registry key and proceed carefully.
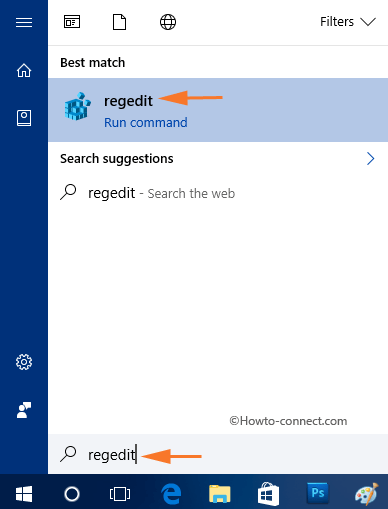
Step 1 – Click the Windows icon on the taskbar and type the command regedit. This will soon launch Cortana displaying the regedit Run command as a result. So, click the regedit command.
For reference, you can also read our guide on How to Access Registry Editor in Windows 10 – 5 Simple Tips.
Step 2 – UAC prompt will show up on the screen, and to proceed further select Yes button.
If you are fed up from the prompting follow How to Stop User Account Control / UAC on Windows 10.
Step 3 – Now, browse to the below-mentioned key on the Registry Editor that comes up.
HKEY_CURRENT_USER\Software\Microsoft\Windows\CurrentVersion\Explorer\Serialize
Note – In case, if you don’t see Serialize key, then create a one. Simply, perform a right-click on Explorer and select New followed by Key. Now, name this new key as Serialize.
Step 4 – Next, move to the right-hand side of Serialize and on a blank space do a right-click. From the list of options that pop-up, select New option and DWORD Value.
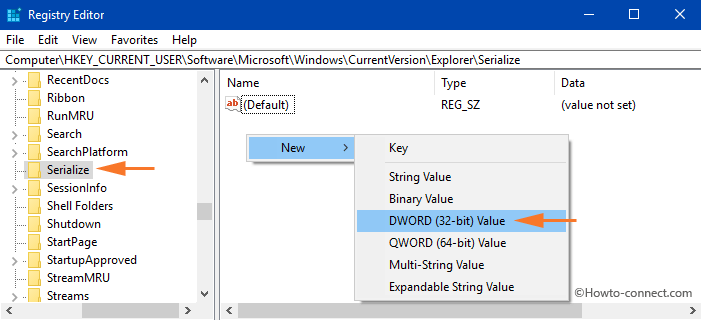
Step 5 – Now, name this DWORD as Startupdelayinmsec.
Disable Startup Delay in Windows 10
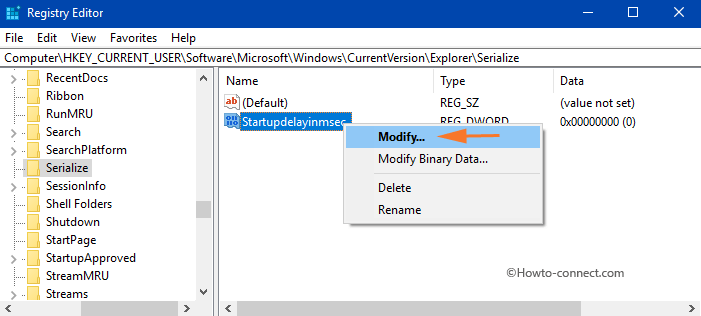
Step 6 – After naming it, do a right-click on it and select Modify.
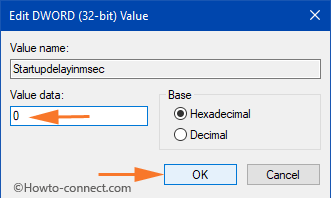
Step 7 – Now, a small edit box will be visible, put its Value data as 0 and finally click OK to disable Startup Delay on Windows 10.
Enable Startup Delay in Windows 10
Step 8 – Simply right-click the Startupdelayinmsec DWORD and select Delete option and this will enable Startup Delay in Windows 10.
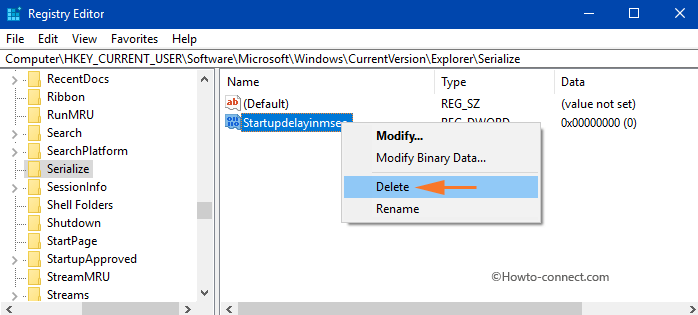
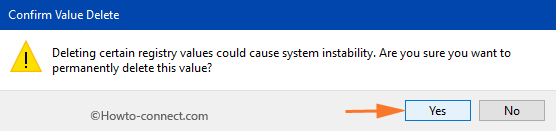
Step 9 – Lastly, one small box for confirmation will appear, select Yes and Startupdelayinmsec DWORD will get deleted.
Conclusion
Hence, to Disable/Enable Startup Delay on Windows 10, follow the above-mentioned registry steps very cautiously. If you know more ways to do this task, write to us in the comments form.