To store any of the important information most users prefer to use a high capacity storage device. For some, the computers hardly take enough time to get full which further demands the need for another external repository unit. In such cases, these portable hard drives become very handy even in the era of cloud storage. Just like their names, these devices are attached to the PC through a USB cable. But after using it, you cannot unplug the cable and remove the device from the computer.
You need to follow certain protocols to Eject External Hard Drive and Windows 10 provides you several procedures for the same. So in this article, you will get to know about all the methods that would let you remove the external storage devices pretty easily.
Eject External Hard Drive
Here is How to Eject External Hard Drive Windows 10 –
1] Through the Safely Remove Hardware icon
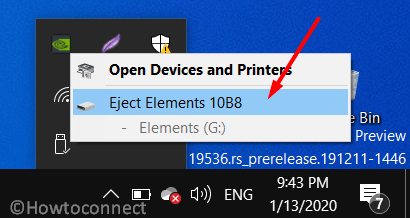
The effortless and straightforward way to eject an external peripheral from the computer is to use the “Safely Remove Hardware” icon which generally appears at the taskbar. This is how you would proceed –
- Go to the taskbar and locate the ‘Safely Remove Hardware‘ icon. If you cannot find it, click the upward-pointing arrow of Show hidden icons.
- Now, keep a hold on the ‘Safely Remove Hardware‘ icon and choose the external device you wish to remove.
- In case you can’t find the icon, then perform a right-click on the taskbar and select Taskbar Settings from the menu.
- Scroll down the following page and select the link that says “Select which icons appear on the taskbar“.
- On the corresponding page, find and toggle ON the switch against the option Windows Explorer: Safely Remove Hardware and Eject Media.
2] From Settings App
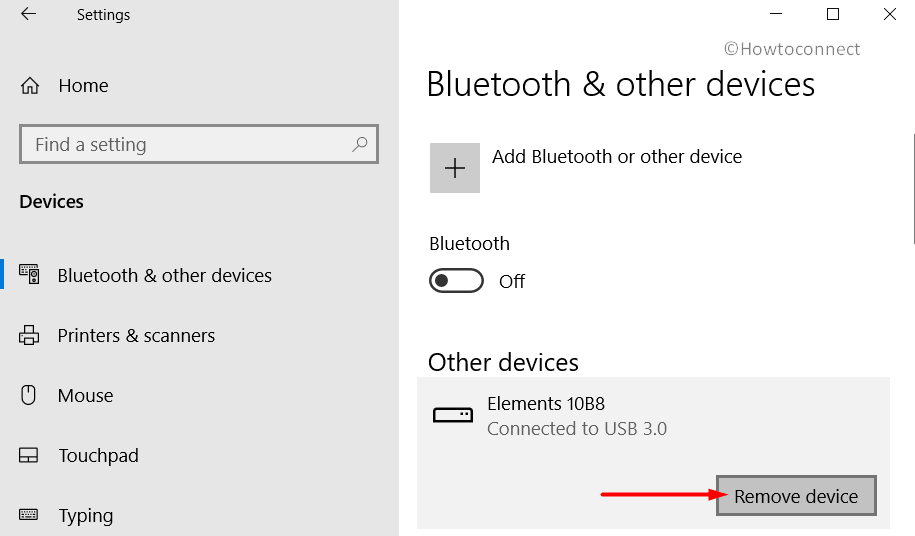
Another way to pretty smoothly Eject External Hard Drive is from the Settings application. The Devices category is specifically designed to manage all the configurations related to all the devices attached to the computer. As mentioned earlier, you need to ensure that the external device has stopped all the activities like copying, pasting, or syncing items. Go through these series of steps to carry out the task –
- Press the key combination “Win logo+I” to open Windows Settings.
- Select Devices.
- On the right pane, choose the hardware peripheral you wish to unplug and click Remove device.
3] Eject External Hard Drive Using Disk Management
To manage all the disks or drives that are attached to your PC, you can use a built-in utility known as Disk Management. This method becomes useful when you cannot eject the external hardware device through the above two ways. Proceed with the below sequence of steps to perform the task –
- Right-click on the Start icon and choose Disk Management from the Win+X menu.
- From the interface, locate the external hardware device you wish to remove.
- Do a right-click on it and select Offline.
- Now safely eject the drive but make sure that you set the disk to Online in order to use it the next time.
4] Using Run Dialog
In several forums, experts suggested another quick method that can easily Eject External Hard Drive. All you need is to simply execute a command on the Run dialog that will prompt up the ‘Safely Remove Hardware’.
- Open Run dialog box by hitting the ‘Win+R’ hotkey.
- Type the following and click the OK button.
RunDll32.exe shell32.dll,Control_RunDLL hotplug.dll
- This will immediately fire up the ‘Safely Remove Hardware’ dialog on the PC screen. Choose the external device you wish to remove and click Stop.
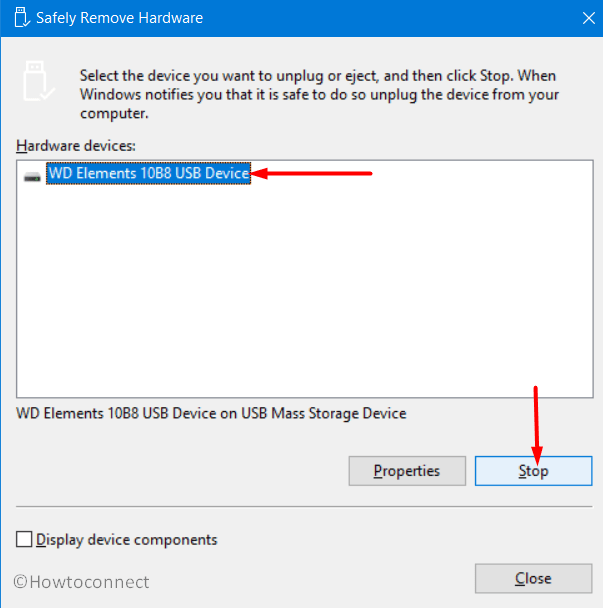
- Once Windows is done with it, it will notify you to eject the external hard drive.
5] Via This PC
The starting point to access any item in Windows 10 is definitely This PC. This window displays several types of folders, various drives such as local, network, external, and so on.
But to try out this procedure, you need to first Bring This PC icon on Windows 10 Desktop. Once you do so, carry out the below sequence of steps carefully.
- Go to desktop and double-click This PC icon.
- Locate and right-click the external storage device.
- Choose Eject.
- Wait for the ‘Safely Remove Hardware’ dialog to prompt up and then remove the drive.
What to do if you Can’t Eject External Hard Drive
A certain number of users have reportedly come forward with an issue where they Can’t Eject External Hard Drive. The problem occurs by other processes that use the contents of the drive which eventually prevents the ejection of the external drive.
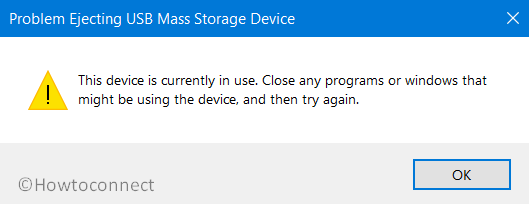
However, you need to ensure that all the activities are closed and no process is using the drive before you make an attempt to remove it. But even if you come across such an unexpected situation, these are the below tips that you can try.
1] Restart PC
Restarting the device will put an end to all the running processes of the system including that of the external drive as well. Furthermore, it will also close all the background apps, 3rd party programs, and upon startup, there will be no files using the external peripheral. So, after you restart Windows 10 PC, try to eject the drive using any of the methods mentioned above.
2] Update USB Drivers
Another significant and possible reason for the failure of the external storage device could be obsolete drivers. If the USB drivers are not up to date, you are likely to encounter various issues. Therefore, always try to keep them running by installing the latest version. So go through the below steps to accomplish this update task –
- Insert the command devmgmt.msc on the taskbar search box and hit Enter.
- Once you open Device Manager, scroll and expand the category namely ‘Universal Serial Bus Controllers‘.
- Right-click on the devices listed out there and select Update driver.
- Select Search automatically for drivers.
- Wait for the system to scan, download, and install the updates for the selected device.
As an alternative, you can also try to visit the manufacturer’s website and grab the current version of the USB from there. Search for your model number, download the file depending on the required architecture and manually install it.
After keeping the USB drivers up to date, try to Eject External Hard Drive without any complication.
Methods:
1] Through the Safely Remove Hardware icon
2] From Settings App
3] Eject External Hard Drive Using Disk Management
4] Using Run Dialog
5] Via This PC
That’s all!!