When you Enable and Disable Snap in Windows 10 you can actually make yourself available to execute multiple tasks simultaneously. Snap helps you systematize more than one windows of the programs you are running on your PC at the same instant. This feature failed to stand on the expectations of the users of the previous editions and made a solid return with highly improvised features. Here we are with the tips How to Enable and Disable Snap in Windows 10.
Snap made its space in the past version like Windows 7 but disappointed users with its limitations to allow users to fix two active windows beside each other either by dragging or with the help of shortcut keys. But in the successor version, Windows 8, it focused on the modern scenario. The prime app could be seen on the main screen whereas you could see the snap feature fetched rest of the windows from the narrow side column. This really created fuss among the users to pick up another snapped window. Microsoft couldn’t let its users down and thus improved the feature in Windows 8.1. There, each broken aka snapped window could actually cover one part of the screen space allowing another half part to be covered by another window.
The latest Windows 10 OS put everyone into awe as it clenched all the previous ideas of snap into one. And the reason is the modern scenario is no more and all the apps despite desktop, web, modern, universal app, etc can be snapped uniformly. Also, it empowers you to pick up the next snap window among the active windows when you Snap. Hence, our point of talk in this article is to guide you the steps to Enable and Disable Snap in Windows 10.
You may like to read
Windows 10 Snap Assist, Vertical Snap, 2×2 Snapping – How to Apply
How to Enable and Disable Snap in Windows 10
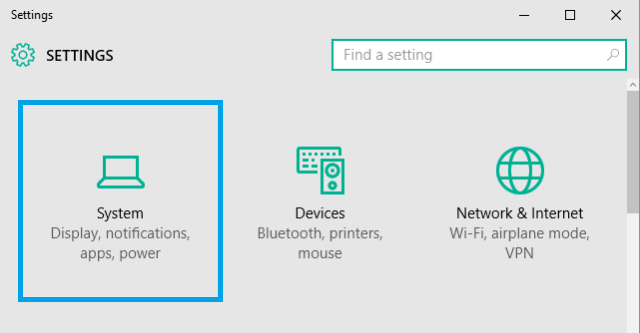
1. Make your way to the Settings app and allow System category to open.

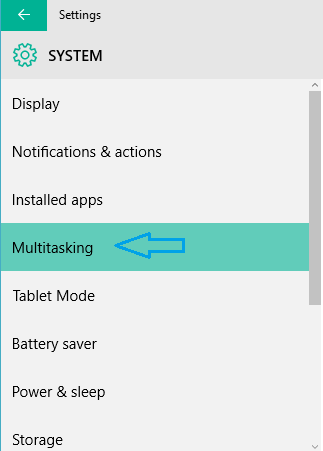
2. Check the left sidebar of settings and pick up Multitasking.

3. The right half of Multitasking enlists few sliders to turn or off. Now carry out step number 4 or 5 as per your requirement.
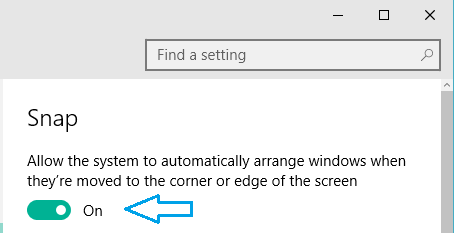
4. Enable Snap
- Turn on the slider of the option that Allow the system automatically arrange windows when they’re moved to the corner or edge of the screen.
- Snap feature has now been activated.

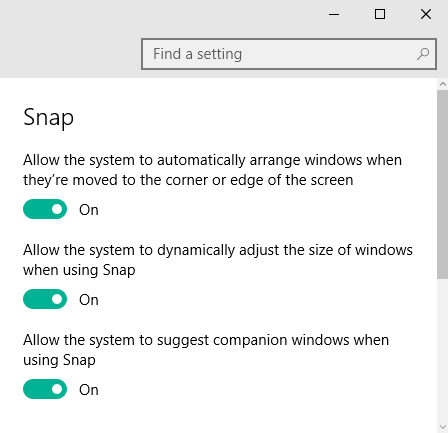
Snap also empowers you to give certain authorities to the system to perform certain functioning when you use the feature. After you turn on this feature you can see two more options been activated automatically. Let us take a look on both of them:
Allow the system to dynamically adjust the size of windows when using Snap: Take your snapped app to any corner of the screen and you see it automatically gets adjusted to its original size.
Allow the system to suggest companion windows when using Snap: This is the newest addition to the Snap feature. Suppose more than two windows are activated when you prefer to use Snap. So, the snap one app, the system will recommend you other opened windows to use on the other half.

5. Disable Snap
- When you don’t want to use the Snap feature completely, simply turn off the Allow the system automatically arrange windows when they’re moved to the corner or edge of the screen option.
- Instead of turning off the feature completely, you can choose to switch off the rest two features.
6. You are done!!!
To Enable and Disable Snap in Windows 10 is an effortless task if you run multiple programs on your PC at a time. Apart from desktop users, this feature was very well embraced by tablet users also.

Since the most recent Windows update (11 Dec 2018) my open windows are all resized/repositioned after waking from a sleep. SNAP is off. One window (at least) is very difficult (or impossible) to resize. I have a 32″ screen and have window 2/5 and 3/5 width and full height.