Ways to Enable and Disable OneDrive Usage on Windows 10. – OneDrive is the built-in cloud storage of this Current edition of Windows OS. Microsoft provides an OneDrive Folder on Windows 10 allowing you to save the items on your Computer here. But the company itself announced that they sneak your data through this cloud storage service on Windows 10. So many users want to integrate while a few others don’t on theirs. If you need to see this app, in the beginning, follow Windows 10 – How to Start OneDrive Automatically when Login.
When you Enable and Disable OneDrive Usage in Windows 10 you ensure that it will be working or not on your PC. Accessing personal files or important data from anywhere or through any device becomes so easy after OneDrive was brought into existence. You can use this feature like an external hard-disk where you can upload/store your files (through your PC) and can also get back to them through any device anytime from anywhere. If you are not interested in saving the items then see Stop OneDrive Automatic File Upload When login to Windows 10.
If you are into how you can Enable / Disable OneDrive Usage in Windows 10, you have landed to a very right location. Here, in the next few minutes, we will clear all your queries about how you can successfully engage or can get rid of this feature in no time. When you disable OneDrive usage on Windows 10 –
Users can’t get access to the OneDrive application.
At startup, The Microsoft OneDrive will not run a for all users.
Windows Store applications can’t open OneDrive with the WinRT API.
OneDrive doesn’t appear in the Quick access navigation pane for all users.
Files in OneDrive folder will not remain in sync with the cloud.
Users will be unable to automatically upload images from the camera roll folder.
Note – Ensure to Login in with your Microsoft account (as an administrator) to Enable / Disable OneDrive Usage in Windows 10. See the detail –
Ways to Enable / Disable OneDrive Usage in Windows 10
Way 1 – Through Local Group Policy Editor
You can easily engage One Drive Integration using your Windows Group Policy Editor. How? Keep Reading.
Step 1 – Press Windows (key) + R to get access to RUN prompt. In the box, type or copy-paste gpedit.msc and click OK to open your window’s Group Policy Editor.
Step 2 – Navigate to the following path:
Computer Configuration> Administrative Templates> Windows Components> OneDrive (from the categories listed in the left pane).
Once you click on the OneDrive in te left pane, you’ll see an option in the corresponding right pane as “Prevent the usage of OneDrive for File Storage”.
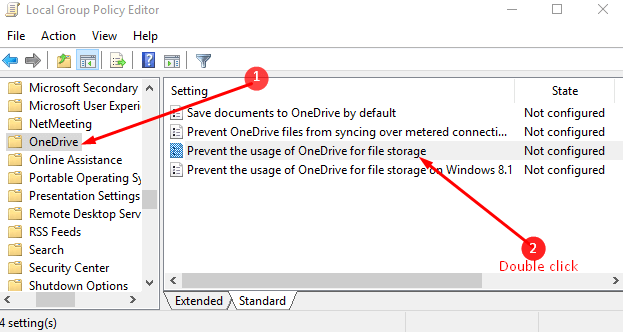
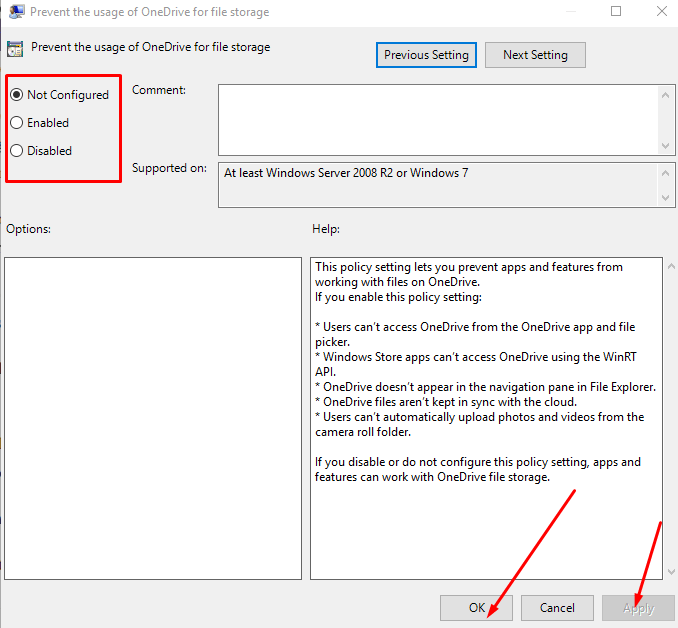
Step 3 – Double click this option to configure/edit this as per your requirements. You’ll thus see three options listed there, namely; Not Configured, Enabled and Disabled.
Step 4 – Check the Disabled/ Not Configured option if you want to enable the OneDrive usage.
Step 5 – If it is already been enabled and you want to switch it off, check the Disabled option to execute the command. Lastly, remember to click Apply and OK.
Step 6 – Close the Local Group Policy Editor.
Step 7 – Restart the system to implement the changes you just did. That’s it.
You get success to Enable / Disable OneDrive Usage in Windows 10 driven PC using the Group Policy Editor (gpedit.msc).
Way 2 – Enable / Disable OneDrive Usage in Windows 10 using Registry Editor
This method is useful for them who keep Windows 10 Home version. Windows 10 Home does not comprise gpedit.msc so they can Enable/Disable OneDrive Integration in Windows 10 manipulating Registry Editor (regedit.exe) instead. It is, however, easier than the method discussed above as it does not actually need to navigate to multiple locations. How? Follow the steps given below.
Step 1 – Press the Start button at the far left of the taskbar, type regedit and once you see the result, press the Enter key.
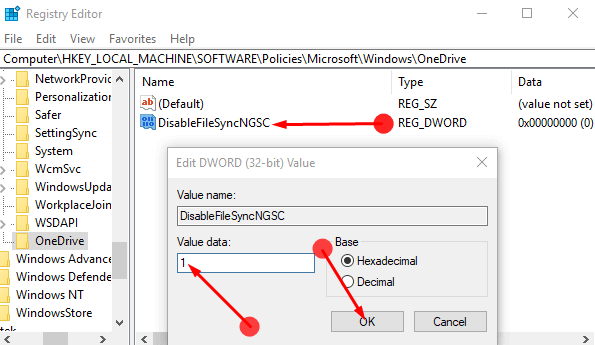
Step 3 – Navigate to HKEY_LOCAL_MACHINE> Software> Policies\ Microsoft\ Windows and lastly to the OneDrive.
Step 4 – Go to the right pane and right-click there. Select New and then DWORD (32-bit) value option from the dropdown menu.
Step 5 – Name this entry as DisableFileSync and hit Enter.
Important – Sometimes you might not find OneDrive in Windows key at the end of the path. In that case, right click on Windows and select New after then Key. Name this Key as OneDrive. Now in the respective left pane OneDrive, right-click and select New and after then DWORD (32-bit) value. Provide the name of this value name DisableFileSync.
Step 6 – Set this entry to 1 to disable OneDrive usage or simply delete this entry to enable this feature. You can also set the value to 0 to enable this usage feature.
Step 7 – Restart the system to implement the changes/settings.
That’s it. You have already achieved the need.
So this was all about How to Enable / Disable OneDrive Usage in Windows 10. These two methods are the sure shot, yet if any problem persists, don’t forget to leave us a feedback or simply contact the Microsoft support.