There are certain files and folders in Windows 10 which are hidden and thus you cannot get access to them. In this post, you will read find the tip applying which you can enable hidden files and folders in Windows 10.
The files, folders and drives related to the system are hidden in Windows 10. When you have to navigate to such folders you won’t be able to locate them. Also, if you have some important files which you have made hidden long before so that no one else can access it, you can choose to enable them. Follow the steps below and see How to Enable Hidden Files and Folders in Windows 10.
You may like to read:
Hide multiple files just in seconds with Windows Hider on PC
How to Enable Hidden Files and Folders in Windows 10
Read further how to Enable Hidden Files and Folders in Windows 10 to locate them as well as reveal private stuff furthermore disclose system files to manipulate.
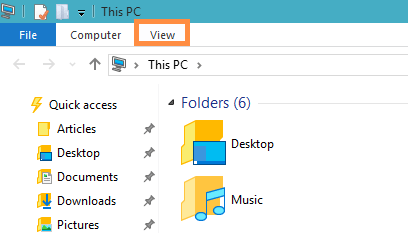
- Double click on This PC icon on your screen.
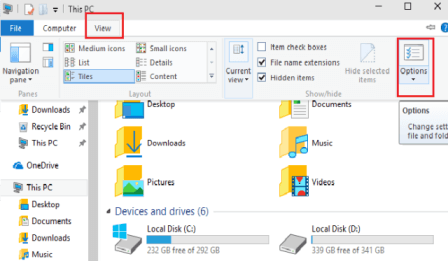
- On the newly appeared explorer hit/tap View option of the menu bar.

- Upon the emergence of the ribbon click Options which is on the extreme right corner of the ribbon.

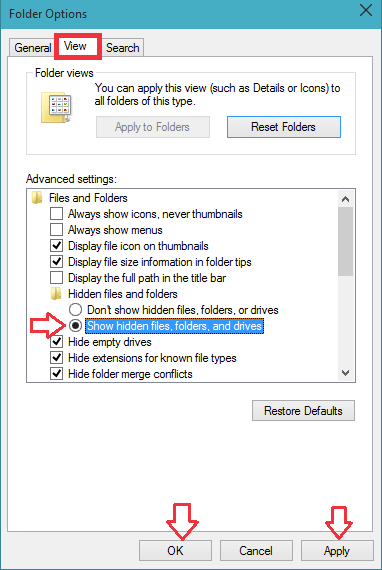
- A new Folder Options applet will emerge now.
- Get into the View tab.
- The Advanced Settings section under the View tab displays you many options.
- Go down and look for the option Show hidden files, folders, or drives.
- Check the box against this option and click Apply button followed by Ok.

- This will now display you all the hidden files, folders, and drives in Windows 10. Now, you can easily navigate the file, folder, or drive you require.
