You will find effective workarounds to resolve BAD_OBJECT_HEADER BSOD Error in Windows 10 in this article. The issue represents actually corruption in The OBJECT_HEADER and for obvious reason, it has got a bug check value of 0x00000189. Once detected in the user PC, Windows will have a proclivity to restart without notifying the person dealing with. In addition, people might experience hanging resulting in making device inaccessible and frequent showing of error messages. In a nutshell, like seems at a stake when a device is detected with this notorious error.
BAD OBJECT HEADER Error in Windows 10 aka BAD_OBJECT_HEADER will shout its presence in the system mostly when you have outdated, old and troublesome device drivers. With that, malicious threats deleting important windows components, corrupted system files as well as missing DLL ones, leaving update patches pending for longer time, incorrect allocating of memory will add extra momentum from software end. Hardware troubles like the presence of dreadful areas in the Disk drive, running in low space can also cause the same. Hence, in the latter part, we will be presenting some powerful workarounds to dismiss this error. So, let’s begin –
BAD_OBJECT_HEADER Windows 10
Here is how to fix BAD_OBJECT_HEADER BSOD Error in Windows 10 –
Obstruct Automatic Restarting of Windows
Since Windows goes under continuous rebooting after being affected with BAD_OBJECT_HEADER blue screen of death error, this has become the most annoying issue. We can neither take it normally nor can resolve the error as insufficient time to deploy workarounds. Therefore, the prime workaround is to stop this restarting.
Step-1: Save and close ongoing processes if have any and straightway head to Desktop area by pressing Win+D hotkeys combined.
Step-2: When in place, do a right click on This PC icon here and select Properties eventually.
Step-3: Once System window comes into view, select “Advanced system settings” from the left sidebar of this page.
Step-4: A wizard will be visible, move on to its Advanced tab.
Step-5: Move straight down to the Startup and Recovery section and hit Settings button.
Step-6: After the next wizard unrolls, come down to System failure area and remove the checkmark from the box beside Automatically restart.
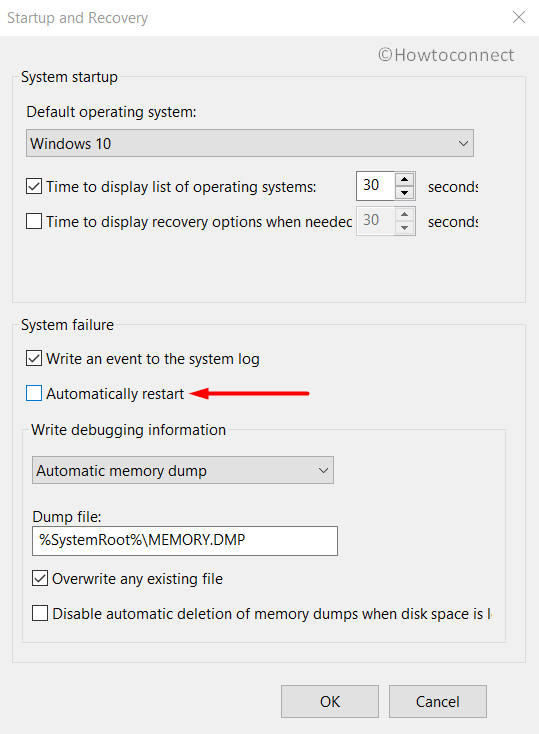
Step-7: Now, hit the OK button located at the bottom and leave the wizard as well.
Make the Operating System up to date by installing every single available patch
Well, when we talk about the operating system, obviously an updated one comes to the imagination. Outdated ones lack features, bugs and are naturally weak in strength which is incapable to fight BSOD errors. We are now moving out to download and install all the available update patches using Windows Settings app to fix BAD OBJECT HEADER Blue Screen of death.
Important – Ensure you are connected with a high-speed internet connection, broadband or a wireless one. In case of using the “Mobile Data”, disable the Metered Connection in the Network Settings, otherwise, downloading will not take place.
- Make a combined press of Win+I hotkeys and open Windows Settings app.
- While in the app accessible area, head to Update & Security and perform a click on it.
- On the following page, select Windows Update located at the left-hand side.
- Shifting on the right side, you might see the dialog “You’re up to date”. Be less bothered and directly click on the button saying Check for updates.
- Once the searching is finished and available patches are previewed, select the Download button under each of these.
- After all the files get into the system, the installation will take place automatically.
- Windows will prompt for restart, and attend all the requirements in the process.
Once the Windows are up to date, there might not be any BSOD error in the system.
Allow Default Blue Screen Troubleshooter to work by your side
Windows has its own built-in utility in the name of Blue Screen Troubleshooter to fight for you in BAD OBJECT HEADER issue. To avail this privilege, you have to upgrade the OS to Windows 10 Fall Creators update or above. This is a handy and light tool that can potentially remove stop errors. The most amazing fact is, you don’t need to go for any installation as it is a default utility.
- Get access to Windows Settings app using the above guidelines and head straightway to the additional settings of Update & Security.
- Once the next page comes in the view, select Troubleshoot from the left sidebar and jump to the adjacent side.
- Here, locate the Blue Screen option and perform a click on it.
- When expanded downward, hit Run the Troubleshooter and let it do the rest.
The troubleshooter will start detecting the possible causes and will eventually make an attempt to repair them as well.
Eliminate Problems in Windows Memory and RAM issues
Windows memory itself often create malfunction and end up calling BAD_OBJECT_HEADER BSOD Error. However, the wrong allocation of memory devices, defective areas in RAM will cost you badly. Therefore, let’s use the “Windows Memory Diagnostic” to eliminate these problems. Move forward with below instructions-
- Manage to open the Windows Settings app using the same instructions stated above.
- When you will see a search box here in this page, start typing memory here.
- Once the results start peeking up, select Diagnose your computer’s memory problems.
- Sharply Windows Memory Diagnostic will open up on the screen and here, perform a click on “Restart now and check for problems (recommended)”.
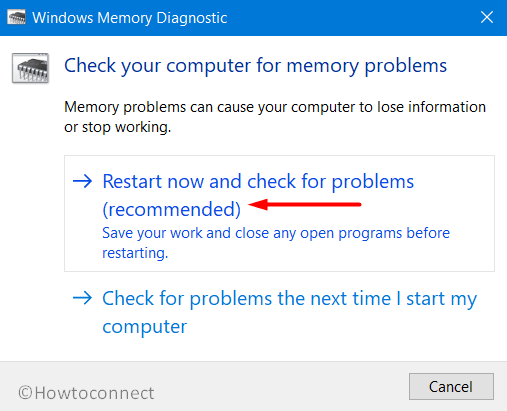
- Windows will, therefore, reboot initially in accordance with the command and once it completes the first cycle of this task, you will experience a blue screen.
- This Blue screen will start detecting the memory issues present in the system and progress will be previewed in percentage. When it reaches 100%, Windows will again restart for the second time.
- Result of the diagnosis will be available in the System tray- notification area once it gets back to operation further.
Safe Boot- the most reliable resort to solve BAD_OBJECT_HEADER BSOD Error
Starting from the development of Windows as an operating system, booting in Safe Mode continuously serving best for critical issues such as BAD OBJECT HEADER. This as renowned in work as upon application Windows loads only basic services and programs. Most of the error take leave in this process and like every other time, let’s try this method in the following steps –
Step#1: Move the pointer to the extreme left bottom end of Desktop and eventually do a click on Start menu.
Step#2: Once the options are loaded, hit the Power icon from here and also select the Restart. At the same time, press and hold the Shift key.
Step#3: The device will restart and upon powering ON, there will be a blue screen with few options on the page.
Step#4: Select the option saying Troubleshoot and move ahead to the consequent page.
Step#5: Choose Advanced options => Startup settings.
Step#6: Proceeding ahead to the right bottom end of this page, hit Power => Restart.
Step#7: Windows will prepare for the second tier of rebooting. Upon startup, you will find some more options including “Boot in Safe Mode“.
Step#8: Now, keep pressing the F4 key continuously and lead to the Safe Mode on the further move.
Correct the Windows System components and recover missing DLL files
Windows tends to damage its necessary system elements and lose DLL files once fall into corruption. In the process, the ultimate result is BAD_OBJECT_HEADER BSOD Error. We really cannot afford this to happen in our systems. Therefore, System File Checker is developed by Microsoft and undoubtedly it can serve the best. You just need to run a command line tool in “elevated Command Prompt“.
- Execute a right-click on the taskbar and choose Task Manager from the pop-up menu.
- Hit on File option located at the top left end and select Run new task once visible.
- When a dialog box appears, type cmd in the empty text field provided here and also put a checkmark before “Create this task with administrative privileges”. Click OK.
- In the black window, type the following command where cursor blinks and hit Enter key-
sfc /scannow
Immediately, System File Checker will be executed and start checking the corrupted elements. If any discrepancy is discovered, it will resolve automatically also resulting in fixing BAD OBJECT HEADER.
Give a break to Hardware components
We often use Hardware items as well as external HDD to serve respective purposes. Some people have discovered BAD_OBJECT_HEADER BSOD Error in their system after connecting an additional Hard Disk. It might seem little weird but yes this is true but the solution is simple as well. You just need to offer them a pause and then reconnect again once issue resolves.
- Unhook all the accessories along with additional Hard Disk from the computer.
- Leave them separate in a safer place to avoid any damage.
- Open the Start menu and hit on Power sign.
- Select the Restart option and allow it to reboot at once.
- When the device gets back to normal activity, perform a thorough checking for the existence of the issue.
- Hopefully, the result will be on your side and if happen so, start connecting them again.
- Now, launch Edge browser, and in the process make a visit to the manufacturer website of those hardware items.
- Download the latest Drivers and install them in the system.
Never Allow Malware to stay over in the system, Dismiss in Windows Security
We all are well aware that, a virus is moving to and fro everywhere on the web. Still, these bugs manage to get inside of our system and cause vulnerabilities. Once they get the pass to Windows, have a tendency to remove the necessary components required to run OS. Therefore, the result is a BAD_OBJECT_HEADER BSOD Error in Windows 10. Windows has its own security system offers you the opportunity to resolve this notorious malware.
- Hover the cursor to the right side of the taskbar and do a click on the “Shield” icon and head to Windows Security app.
- Moving ahead to the app area, choose Virus and threat protection from the left-hand side and move sideward.
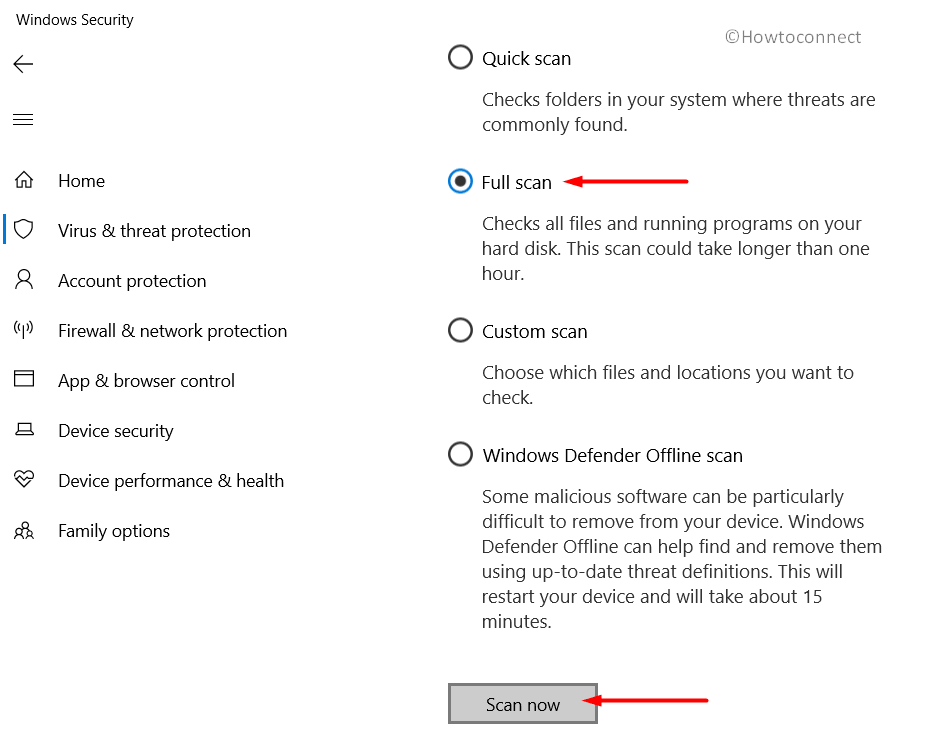
- On this place, make a click on the link Scan options and once all of them are displayed, hit the radio button behind Full scan.
- Proceeding forward, select Scan now button located here and allow Windows to carry out malware checking.
- When the result is upfront after searching, wipe out all the viruses by clicking Clean threats option.
- Proceeding ahead to the next page, three will be three option left for you. Choose Remove and finally hit the Start actions option.
Restrict staying over of similar programs in the system
Once similar programs get a chance to stay side by side, they are prone to be in collision with each other. This act results in removing some vital components in the system and hence, BAD_OBJECT_HEADER Error in Windows 10 is imminent. To stop this, we can uninstall one of such applications and if the error resolves, reinstall the removed one once necessary.
- Do a combined press of “Win+R” hotkeys and open the Run dialog box on the screen.
- Once seen, type appwiz.cpl in the blank search box and hit the Enter key.
- Programs and Features window upon unrolling on display, locate the programs causing BAD_OBJECT_HEADER BSOD Error in Windows 10.
- Perform a right click on each and select Uninstall option from there.
- Perform the upcoming tasks as will be displayed on the screen to completely remove these.
- Once all these programs get dismissed, restart the device using normal procedure.
- When returning back to the desktop again, check if there are any issues present like BAD_OBJECT_HEADER BSOD Error.
- If there is no problem in the system and in case the removed program is necessary, download them again.
Clear up the Storage from Junk and make some more space
Junk files are fabricated by processes to accomplish tasks. When they grow large in amount, take up huge space in storage and eventually the volume run in low space. “Disk Cleanup” utility comes handy in freeing up job ending up as a solution to BAD OBJECT HEADER.
- Make a conjugal press of Windows and S keys together and open the Taskbar Search.
- Fill the blank text area here with cleanmgr and when Disk Cleanup Desktop app is visible in the list, select it.
- A small popup dialog will open up shortly asking the drive where the task will be carried out. Select C: by clicking on the dropdown menu and press Enter key.
- The Disk Cleanup Utility will start the action by calculating the space it can bring out from the system and unroll a wizard.
- Move down in the wizard and hit on “Clean up system files” option.
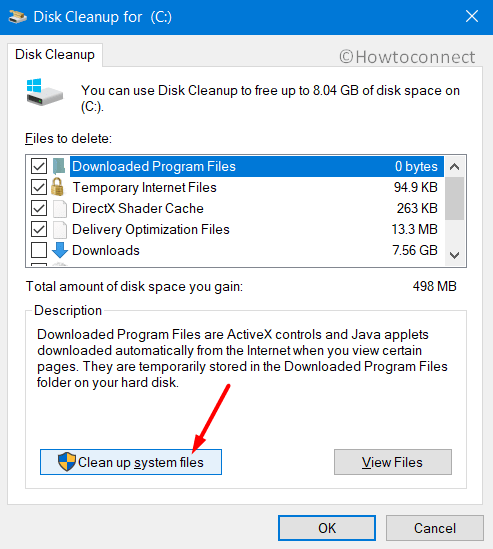
- The small popup will ask one more time for selecting the preferable drive. Choose C: again and hit the Enter button.
- Disk Cleanup for C: will appear after doing the calculation again.
- Check all the boxes here only except Downloads and then perform a click on the Ok button located at the bottom.
- This process involves several deleting and hence might take a quite long time, wait patiently until it gets over.
Note- Before proceeding with this workaround, make sure there is nothing important left in Recycle Bin folder as everything will be deleted.
Assign Deployment Image Servicing and Management (DISM) tool to repair dreadful image files
When Windows Image files run in disruption, so many errors are like to occur in the system. Among them, BAD_OBJECT_HEADER BSOD Error can damage the most. However, a simple tool namely DISM can save you from a devastating case.
- Access Command Prompt with administrative rights using the same instruction we have shown before.
- When in the dark window, type or copy-paste the below-mentioned command and at the hit of the Enter key, DISM tool will be activated and rectify defective image files once detected.
DISM.exe /Online /Cleanup-image /Restorehealth
- Thus you can get rid of the BAD_OBJECT_HEADER BSOD Error in Windows 10.
Bade Farewell to Defective Windows Update Files
We recommend all users update their OS by installing all available patches. This process is autonomous and rarely fall into manipulation. Once it undergoes such malfunction or stops at the midway of installation, BSOD error like BAD OBJECT HEADER is impending as a result. So, the best deal is to erase them from device going through the below steps.
- Launch the built-in Settings app by clicking the gear icon located on the Start menu.
- Straightway move to Update & Security tile when in the app UI and perform a click on it.
- Once the next page is upfront, select Windows Update from the left wing and then transfer to the alongside pane.
- On this side, hit a click on View update history link and open all the received patches list.
- Proceeding forward, execute a hit on Uninstall updates.

- By default, you will be guided to the “Installed Updates” page from Control Panel.
- Move ahead to the last received patch and do a right click on it.
- Select the Uninstall option and go through the on-screen guidelines to get rid of them.
Recruit Disk Checking Utility in Elevated Command Prompt to deal with bad Hard Disk areas
“CHKDSK” command is basically a Disk Checking utility which potentially detects as well as fix the worse sectors present in HDD. Since it may resolve the BSOD BAD OBJECT HEADER error also, we can definitely give it a try.
- Roll the cursor to the left bottom side of Taskbar and make a click on the Search icon.
- Once the Taskbar Search launches, type cmd.exe in the empty text field.
- When Command Prompt shows in the result, hit a right click on it and select “Run as Administrator” option.
- When UAC prompts for permission, hit Yes to continue.
- On the Elevated Command Prompt window, type the following command where the cursor winks.
chkdsk C: /f /r /x
Here, CHKDSK will only show the Disk status upon activation. We have used a few other notations indicating following-
f- represents fixing the detected problems.
r- represents detecting the existing problems in the Disk.
x- represents splitting up of the disk volume to facilitate the detection process.
C: - represent the Disk where the OS is installed. You can change this to D:, E: or any depending upon your usage.
- Once you hit Enter key, the Disk Checking Utility will detect and fix all the problems immediately. This process will take some time, so, hold the patience and wait until it gets over.
- Restart Windows 10 PC and upon startup, check for the occurrence of BAD OBJECT HEADER error codes.
Perform updating Drivers having Yellow indication Mark in Device Manager
Outdated and troublesome device drivers came out strongly to cause BAD_OBJECT_HEADER BSOD Error in Windows 10. Every time we experience this BSOD error, the solution is indeed singular and simple. Drivers having yellow indication mark in Device Manager needs to update.
- Perform a right click on Start icon and choose Run from Win+X menu.
- When it is visible, type devmgmt.msc in the search box located here and press Enter key.
- “Device Manager” will open and if you see any mark of exclamation, expand that specific device.
- Perform a right click on the driver and select “Update driver” option.
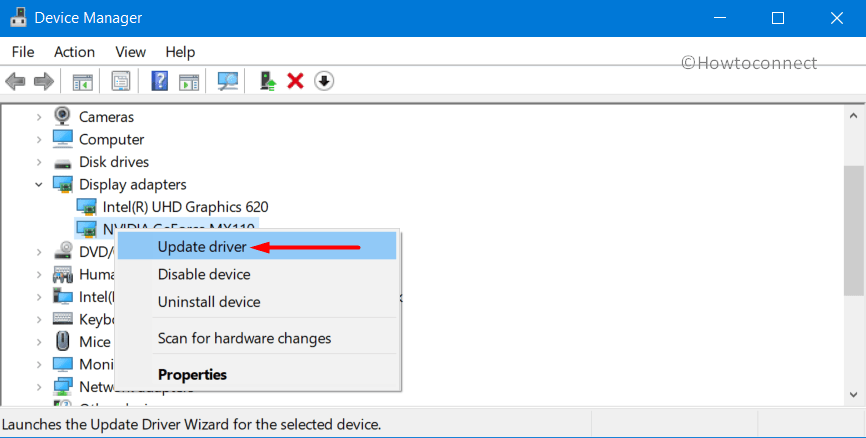
- Keep cooperating with Windows by following shown instruction until the drivers are up to date.
Go back to last created Point and revert all the recent changes
If you have a previously created restore point, you can straightway go back to a point where there was no BSOD error. As recent modifications in the registry by installing or removing a program can be guilty, and hence, System Restore will provide you the ultimate relief from BAD OBJECT HEADER problem.
- On Cortana search, type rstrui and hit Enter key to launch the System Restore.
- When the popup window is visible on display, hit the Next button to move ahead.
- On the consequent page, uncover all the past created points by clicking the Show more restore points.
- Select the recently created one from the list and hit Next again.
- Once the next page unrolls, select Finish to start the Restoring process.
Use only Windows Security, remove all other third-party anti-virus programs
Windows Security offers the best deal in malware issues and this is also a built-in program. So, if you have a third party anti-malware tool, it’s really meaningless and might cause BAD OBJECT HEADER. So, we will show you how to remove these completely from the system in the below instructions.
- Launch Settings => Apps.
- Hit Apps & features option from the left side and jump to the corresponding pane.
- On the right, when the apps are loaded, find out antivirus programs installed in the system.
- Select to expand in the pane and hit Uninstall option once seen.
- If User Account Control prompts for permission, give consent by selecting Yes.
- Perform the on-screen guidelines to completely remove the programs.
Hereby we have discussed all the best available workarounds to resolve BAD_OBJECT_HEADER BSOD Error in Windows 10. Bravo! If you have finally succeeded to fix this notorious issue and the hard work has come out victorious. It’s a matter of frustration if you are having the issue still in the device after performing all these tasks. Well, there is no problem on the earth without a solution we believe. You can perform “Clean installation of Windows 10” and that will be the ultimate solution for ending all problems.
After being assured of doing this task, make sure you have already saved all the required data, files, images as back up in the external drive. We recommend you to seek help from experts for doing this task if you are not confident enough. Hopefully, you can recover the device from all issues including BAD OBJECT HEADER after doing so.
That’s all!!