Blue screen of death is one of the most frustrating issues that hampers gameplay and normal doing on Windows system. When this error occurs Windows all of a sudden starts bug checking and after a little time, it restarts showing a message with a stop code. EasyAntiCheat.sys is such an error that mostly appears when playing a game. This BSOD commonly appears with PAGE FAULT IN NONPAGED AREA, however, there may be another bug check like SYSTEM THREAD EXCEPTION NOT HANDLED, KERNEL DATA INPAGE, IRQL NOT LESS OR EQUAL, or other.
What failed: EasyAntiCheat.sys blue screen error is associated with the Easy Anti Cheat or EAC software which is incorporated with almost all game launchers and famous games. The bugcheck might be a result of its collision between Easy Anti Cheat and system files or third-party applications. In some cases, malware may also trigger this bug check because of mess up and infection.
Blue screen EasyAntiCheat.sys BSOD
Here is how to fix EasyAntiCheat.sys blue screen error BSOD in Windows 10 or 11 –
Way-1: Delete the file
Usually, this BSOD seems to happen because of the corrupt Easy Anti-Cheat program file. Several users report that the error is fixed only when the file is deleted from the installation folder. Therefore, you simply need to delete easyanticheat.sys by following the steps –
- Press – Ctrl+Shift+Esc.
- Once Task Manager loads on the screen, click on – More details.
- Find Easy Anti Cheat in the Processes tab
- Right-click on this process.
- Select – End task.
- Now, click on Search.
- Type – easyanticheat.sys.
- Right-click on the result and select – Open file location.
- Select the file and delete it.
Way-2: Uninstall Easy Anti-Cheat software
However, with several launchers, this software is coalescent as an essential part of the app and comes as default. So this method is suitable for those users who installed Easy Anti Cheat from a third-party vendor or website. All you have to do is uninstall the Easy Anti Cheat from the device.
- Press – Winkey+R.
- Type – appwiz.cpl.
- On the Programs and Features window, locate Easy Anti Cheat.
- Right-click on it and select – Uninstall.
- Follow the instructions from the screen until the software is removed.
However, many times, residues of the uninstalled program remain extant on a hard drive. It will be better if you use Revo Uninstaller and perform the removal and cleaning of leftovers.
Way-3: Update the Graphics driver
What failed: EasyAntiCheat.sys might occur due to the presence of an obsolete graphic driver. Old driver software might create conflict with the anti-cheat app. So, check if any driver is outdated particularly NVIDIA and update it.
- Right-click on the – Start
- Select – Device Manager.
- Once the app is loaded, double click on – Display adapters.
- Right-click on each of the adapters here including NVIDIA.
- Select – Update driver.
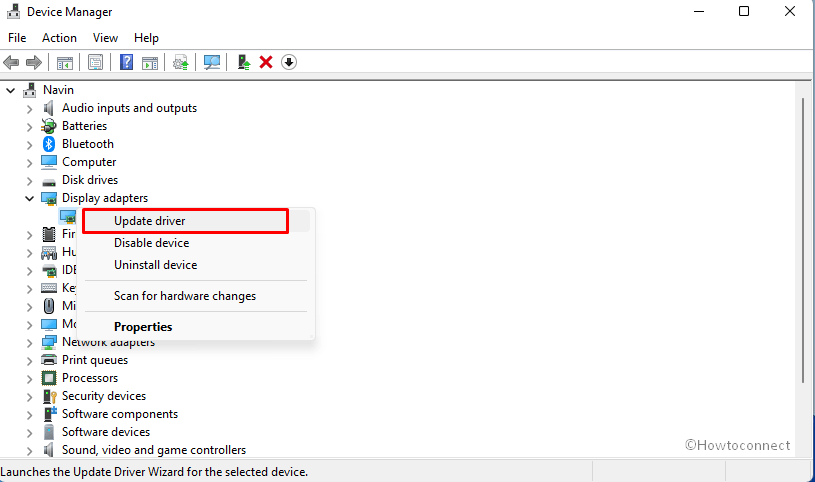
- Choose – Search Automatically for drivers.
- Restart the machine.
Way-4: Uninstall third-party programs
The incompatibility of a 3rd party program has been a common reason for starting this Bugcheck issue. You can check .dump file to detect what is involved in the mess up. Furthermore, the Bluescreenview app can also be used for the same purpose. Anyway, if any third party app is found remove it using the below guidelines –
- Right click on the Start.
- Select – Apps and features.
- On the Settings app, from the list of all installed apps, find the third-party software.
- Click on it
- Select Uninstall from the expanded pane.
- A tiny pop-up will appear, again click ‘Uninstall’.
- Follow the instructions on the screen if shown
- Reboot the PC.
Way-5: Run System file checker
When you encounter EasyAntiCheat.sys PAGE_FAULT_IN_NONPAGED_AREA BSOD, corrupted system files are the basic reason. The files don’t allow the system to load resulting in crash and subsequently blue screen. System files checker thoroughly scans all these components that include .DLL, .exe, .sys files, and repairs those which are found corrupted. Actually, the tool replaces the broken files with the identical ones available in the cache folder. Therefore, run the tool using the below instructions –
- Press Windows+S.
- Type – cmd.
- Click on Run as administrator.
- Type – SFC /Scannow.
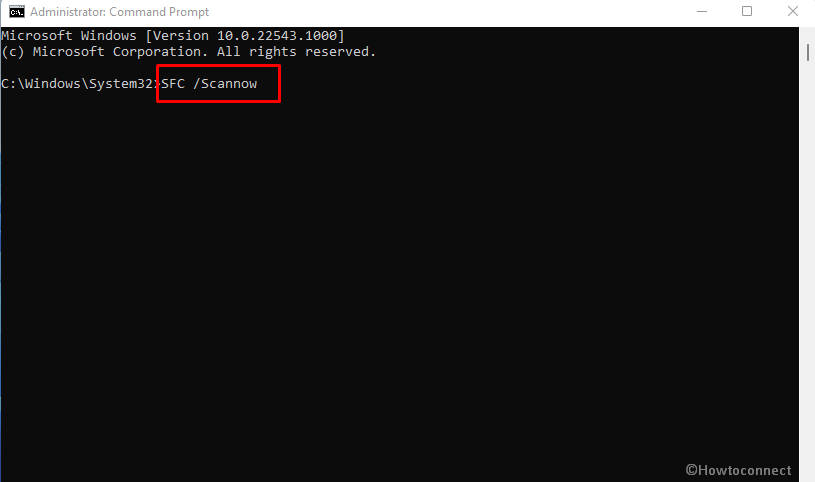
- Press Enter.
- Allow the scanning and repair to complete and reach 100%.
- Restart the PC and check if the BSOD is fixed.
Way-6: Use DISM tool
Occasionally the Blue screen may appear due to something wrong with .wim in Windows 10 or 11. Fortunately, using a default repair tool named Deployment Image Servicing and Management or DISM will fix the glitches found in the aforesaid file. Follow the steps –
- Open ‘Command prompt as administrator’ as you have done in the previous method.
- Type – DISM /Online /Cleanup-Image /RestoreHealth.
- Press – Enter.
- Let the process be completed and then reboot the computer.
Way-7: Clean boot Windows 10 or 11
When the above solutions don’t work you may try to use clean boot function that allows Windows to run with a set of least services and drivers. Furthermore, this functionality will disable all the startup programs so that nothing may remain to interfere with the boot process. Using this you can not only run Windows but also find the culprit factor leading to the EasyAntiCheat.sys Blue Screen error.
- Click on the Start.
- Type – Msconfig.
- Hit Enter.
- On the System Configuration window, click on the Services
- Check the box for – Hide all Microsoft services.
- Click the button for – Disable all.

- Select – Startup tab.
- Click on the link for Open Task Manager.
- On the Task Manager, you can see a list of all the startup programs.
- Right click on each enabled program and select Disable.
- Close the Manager.
- On System Configuration, click on Apply then OK.
- Select Restart.
Way-8: System Restore
This method will work if a restore point has been created before the occurrence of the BSOD. Your system will be brought back to the date and time when the issue was not happening. So follow the method –
- Click on – Search.
- Type – rstrui.
- Press Enter.
- System Restore wizard will come into view.
- Select the radio button for – Choose a different restore point.
- Click on Next.
- Select the date and time when the blue screen didn’t start to show.
- Click – Next.
- Review the options you have chosen and click on Finish.
- On Verification pop up, click – Yes.
In case the system is so badly affected that cannot be recovered from the blue screen the last option is clean install. Media Creation tool will help you to install a fresh copy of Windows 10 or 11 so navigate to this link and download it.
Later make it bootable and install it on your machine. See – How to Make Pendrive Bootable for Windows 10.
Note – these fixes are applicable to Apex blue screen error in Windows 1-0 and 11.
Methods list:
Way-1: Delete the file
Way-2: Uninstall Easy Anti Cheat software
Way-3: Update the Graphics driver
Way-4: Uninstall third-party programs
Way-5: Run System file checker
Way-6: Use DISM tool
Way-7: Clean boot Windows 10 or 11
Way-8: System Restore
That’s all!!