While trying to install Windows 11/10 updates, many users conflict with different error codes and each of them delineates a distinct scenario. Error 0x800f0922 is one of the errors people are encountering. The issue generally shows up when the system fails to install the downloaded update files. No matter how many times you restart the PC and retry, every time the process triggers the update error at the end of the installation process and after that, all changes get reverted.
Error code 0x800f0922 mainly occurs if Microsoft itself sent a faulty update or some of its files somehow get corrupted during installation. Besides, missing system elements, low disk space on System Reverted Partition, disabled .Net Framework, and enabled VPN software can bring forth the same. Since there is no official fix has been provided for this particular error, you might need to try out some advanced workarounds. We have listed all probable resolutions that fix the issue, however, start with the basic ones.
Table of Contents
Error code 0x800f0922 Windows 11 and 10
Here is how to fix error code 0x800f0922 Windows 11 or 10 update failed –
1] Check internet connectivity
Due to poor internet connection oftentimes auto-update fails to install the latest Windows 10 patch. Therefore, make sure you have a strong network connected to your PC. Also, disconnect the current internet connection from your device and then wait for a few minutes. In the meantime, turn off the router and turn it back on after few seconds. Connect the WiFi to your Windows 10/11 machine and make sure the connection has internet. If the network you are connected with doesn’t have internet access, a question mark will be present before the WiFi name.
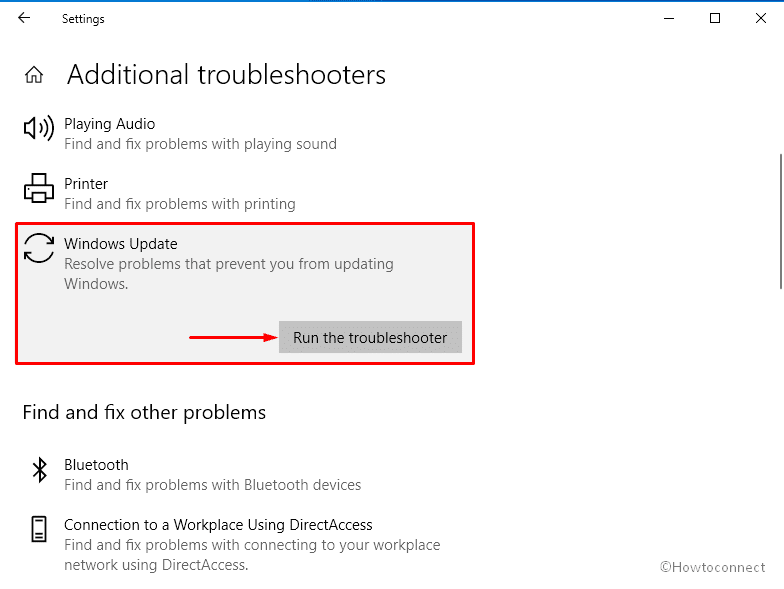
2] Run Windows Update troubleshooter to fix error 0x800f0922
Windows 10 and 11 have a built-in troubleshooter to solve update-related errors automatically. When you run the utility, it goes through the full system to find out what is obstructing the installation process and bringing forth error 0x800f0922. If the found issue is not complicated, the tool will resolve the issue on its own. Otherwise, the troubleshooter will suggest potential fixes that you need to try out to fix the update error. Let’s see how to run update troubleshooter –
- Press – Windows + S.
- In the search bar, insert – troubleshoot.
- Hit – Enter.
- Move to the right-pane of the appearing settings page.
- Click – Additional troubleshooters or Other troubleshooters.
- Select – Windows update.
- From the expanded tray, click – Run the troubleshooter.
- If you are using Windows 11, click – Run straightaway.
- Comply with on-screen instructions to start scanning.
- When the utility comes with a resolution, click – Apply this fix.
- Or else, do what the troubleshooter put forward.
3] Install latest .Net Framework
Windows 11 and 10 devices that have .NET Framework disabled are more likely to cause error 0x800f0922. This generally happens when the system request for the installation of the .net framework but the process fails since the feature is not enabled. Hence, make sure .NET Framework is enabled in Windows features and then try to upgrade Windows 11/10. To do so, follow the way –
- Click search icon present on the taskbar.
- Type in – Windows features.
- Press – Enter.
- When the dedicated window appears, check all the boxes related to .NET Framework.
- Click – OK.

- Now, the system will look for files that are required to install the feature.
- Once the process ends, reboot your PC.
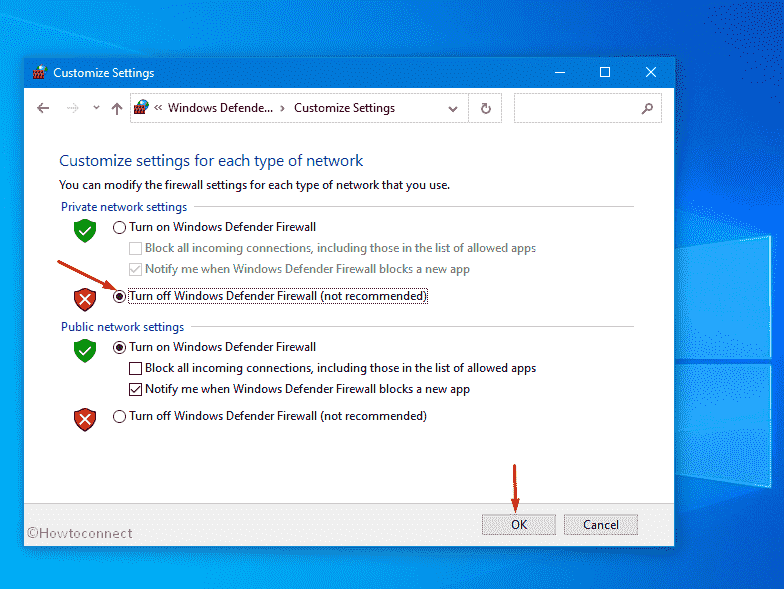
4] Disable Windows Firewall to fix error 0x800f0922
Turning off the firewall for the time being worked like a tweak for many users who were encountering error 0x800f0922 continuously. However, the fix only works if your Windows 11 or 10 is connected to a Private network. Therefore, switch the network if you are using a Public one and then go through the below steps.
- Press – Windows + R.
- In the command box, insert – control firewall.cpl.
- Hit – Enter.
- From the left sidebar of Windows Defender Firewall window, click – Turn Windows Defender Firewall on or off.
- Reach to Private network settings segment.
- Select the radio button set for Turn off Windows Defender Firewall (not recommended).
- Click – OK.
5] Reset update components
If any of the update components goes corrupted or don’t function as they should be, the system may end up with update errors while installing a patch. Restoring the default state of these components usually helps in such issues. When you reset the elements, BITS, Cryptographic, MSI Installer, and the Windows Update Services get restarted. Also, the process renames the Software Distribution and Catroot2 folders that hold all temporary files of Windows update.
- Press – Windows + Q.
- Type in – cmd.exe.
- Press – Ctrl + Shift + Enter.
- To allow User Account Control, click – Yes.
- In the black pane, insert the below commands one by one successively and hit Enter after each –
net stop wuauserv

net stop cryptSvc

net stop bits

net stop msiserver

ren C:\\Windows\\SoftwareDistribution SoftwareDistribution.old

ren C:\\Windows\\System32\\catroot2 Catroot2.old

net start wuauserv

net start cryptSvc

net start bits

net start msiserver
- Close Command Prompt and restart Windows.
6] Turn off VPN connection
If you are operating a network that uses VPN, the system may fail to establish a connection with Microsoft Windows update servers. This might be the cause why your system is getting error 0x800f0922 while installing the update. To eradicate the issue, follow the way –
- Disconnect the PC from your office or home network.
- Disable your VPN software.
- Run Microsoft Windows 11/10 upgrade.
- If the update process ends without any error, connect the network again and also turn the VPN on.
7] Repair corrupted system files to fix error 0x800f0922
If Windows files that are required to make Windows 11/10 update work go faulty or the system fails to read the same, installation may fail with error code. System File Checker and DISM tools help in tackling such issues since they are able to restore corrupted and missing files. To run the command lines, go through the below steps –
- Press – Windows + R.
- In the text field, insert – cmd.
- Press – Ctrl + Shift + Enter.
- Give consent to User Account Control by clicking Yes.
- In the Command Prompt, type in –
sfc /scannow. - Hit – Enter.
- Let the utility complete the scan.
- When the process hits 100%, review the reports thoroughly.
- If the report says found issue can’t be fixed, run DISM tool.
- For that, again open Command Prompt as administrator.
- Execute the below command one after another –
dism /online /cleanup-image /scanhealth

dism /online /cleanup-image /checkhealth

dism /online /cleanup-image /restorehealth
- Close Command Prompt and reboot the system.
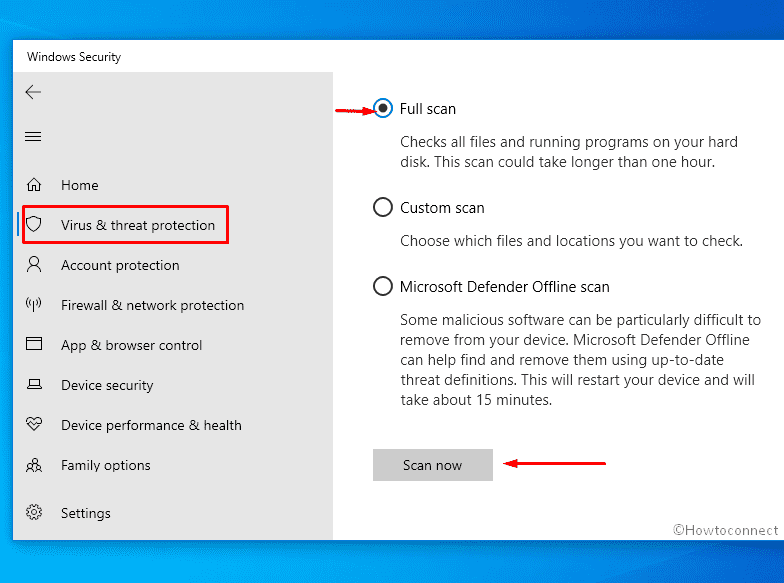
8] Perform virus scan
Many times update error 0x800f0922 occurs due to virus attack since malware obstructs the smooth process of Windows. To confirm whether the issue is triggered by a virus, perform an anti-malware scan. Though there are plenty of third-party antivirus programs available on the web, built-in Windows security is nothing less. The utility will scan your full system to detect existing threats moreover remove viruses and potentially unwanted programs. To run the utility –
- Press – Windows key.
- Type – Virus & threat protection.
- Hit – Enter.
- From the right-hand side of the appearing page, click – Scan options.
- Select the radio button present before Full scan.
- Click – Scan now.
- When the system finishes scanning, hit – Clean Threat if any threat is found.
- After that, click Remove and then Start actions.
- Reboot Windows 10.
9] Make changes in App readiness service to fix error 0x800f0922
To ensure the error-free installation of the Windows 11/10 update, App readiness service must remain enabled. If the service is disabled, error 0x800f0922 may evolve which prevents the system from installing updates. To start the service, here are the steps to imitate –
- Click the Start button and type – services.msc.
- Hit – Enter.
- When the Services window appears, find – App readiness.
- Double-click the same to bring forth its Properties.
- Set the Startup type to Automatic.
- If the service is not running, click – Start.

- Click Apply and then OK.
- Reboot PC and then try to update Windows.
10] Free up disk space
Many users reported that Windows 11 or 10 update failed in their system because the local disk didn’t have enough free space. You can make some extra space in the disk drive by wiping out existing junks and temporary files. Though these temp files are not necessary after a certain point of time, often they end up occupying huge disk space. To clean up the junks, follow the below steps –
- Right-click on Start button and choose – Run.
- In the text field of Run dialog box, type – cleanmgr.
- Hit – Enter.
- When a pop-up prompts named Driver selection, make sure C: is selected and then click – OK.
- Hit – Clean up system files.
- Again, click OK for the Driver selection pop-up.
- Select all the checkboxes present beneath Files to delete.
- Hit – OK.
- Confirm the process by clicking Delete files.
- When the process ends, reboot the Windows device.
11] Install the troublesome update manually to get rid of error 0x800f0922
In Windows 11 and 10, the system receives updates automatically over the unmetered connection. During the process, if the internet connection is interrupted, the system may get faulty or broken setup files. When Windows request to install these files, error 0x800f0922 may evolve. To get the update without any error, download the patch manually and install the same.
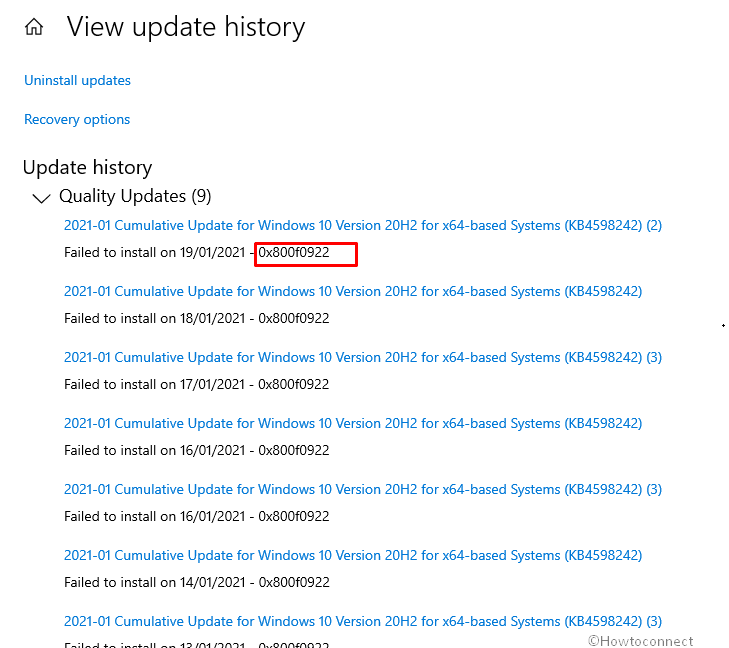
Before you proceed, check the KB number that is giving you the update error. For that, open Windows settings and then click Update & Security. From the right-pane of the appearing window, click the link that says View update history and then note down the KB number that has failed to install. In case of using Windows 11, go to Settings => Windows Update (left column) => Update history (right pane).
- Visit the official webpage of Microsoft Update Catalog.
- In the search bar of the webpage, type the KB number you noted down.
- Hit – Enter.
- From the search result, find the one that goes with your PC specs.
- Click Download present next to the compatible KB build.
- When a new window prompts, hit the link that ends with .msu.
- Choose Save File and then click – OK.
- Visit the directory where the system saves downloaded items.
- Double-click the downloaded MSU file.
- To continue the installation process, click – Yes.
- Comply with on-screen instructions to finish the procedure.
Methods list:
1] Check internet connectivity
2] Run Windows Update troubleshooter
3] Install latest .Net Framework
4] Disable Windows Firewall
5] Reset update components
6] Turn off VPN connection
7] Repair corrupted system files
8] Perform virus scan
9] Make changes in App readiness service
10] Free up disk space
11] Install the troublesome update manually
That’s all!!!