Do you get Error 0x8024402f in your Windows 10 device that causes fail to check for the latest update? Mostly, poor internet connection is responsible behind this issue but corrupted SoftwareDistribution folder may lead to the same too. Furthermore, This error code also appears when Microsoft server becomes unable to handle the number of update requests. Go to following solutions to Fix Failed to Check for Updates with Error 0x8024402f on Windows 10.
Error 0x8024402f is very commonly encountered bug on Windows 10 which hinder the upgradation procedure. This might look to be complex however it could be fixed in no time by adopting simple fixes like – Checking Internet Connection, Updating Antivirus, Running Windows update Troubleshooter, Removing junk files, Uninstalling problematic drivers, Changing DNS etc.
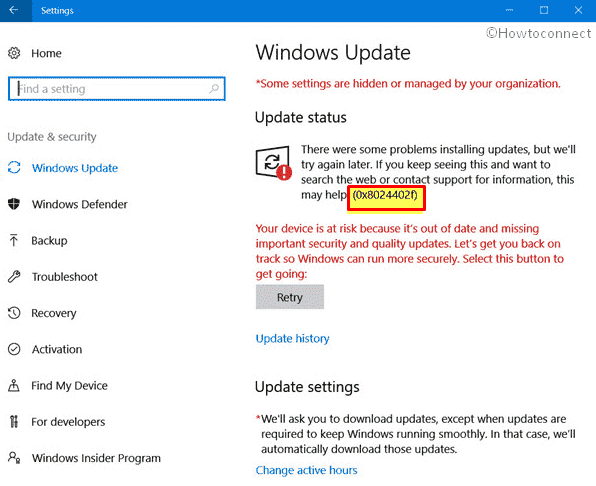
Error 0x8024402f Solutions
Here is How to Fix Failed to Check for Updates with Error 0x8024402f in Windows 10 –
Check your internet connection
Error 0x8024402f points to Connection related issue while going through Windows Update. This implies that if your computer is unable to connect to the Microsoft Update Server, this fatal may occur. The code could also appear if the server is corrupted itself. If the problem lies in the Microsoft Update Server there is nothing which you can do except waiting as it would be soon corrected by the Staff. In the case, you can perform the following steps –
Hover over the Start button and click on it. Type Identify and repair network in the search box and when it comes into the view, either click on Open or hit Enter.
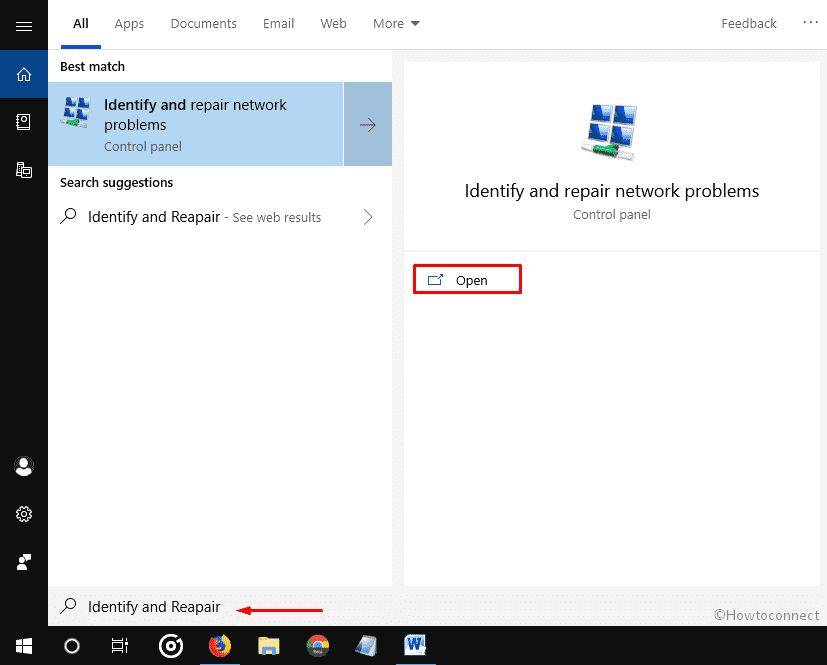
Once the troubleshooter finished, look for connectivity issue, it will direct you on what needs to be followed to resolve Network connection problem.
Check your antivirus software
The virus is a program developed to hamper system’s files. In most cases, the antimalware program works as a security policy to protect your PC by removing threats. Though this tool is an important factor, however, some antivirus program restrict the operation of other applications like obstructing Windows Updates and cause error 0x8024402f. To wipe out this issue you need to uninstall the third-party antimalware program which you are recently using and thereafter activate built-in Windows Security to stay safe.
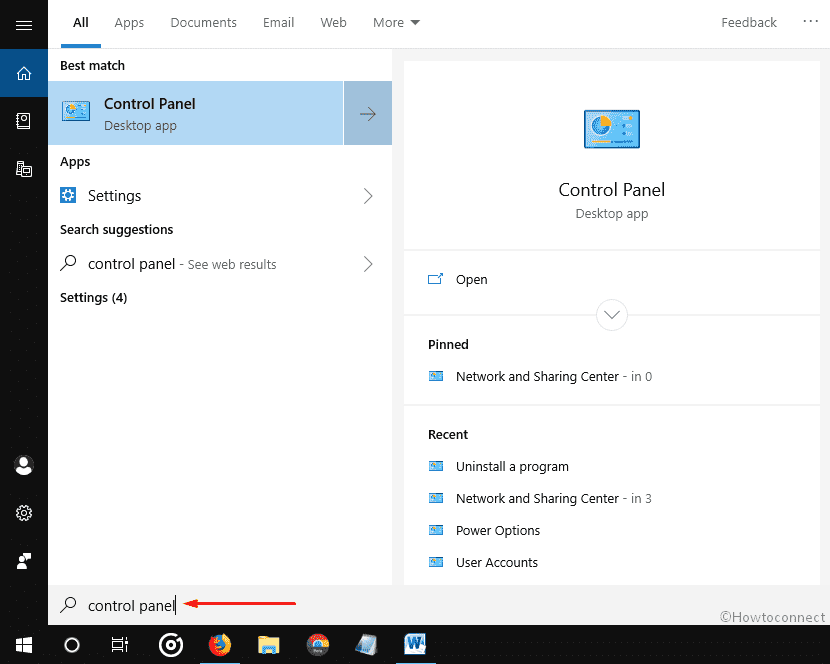
Step-1: Press Win & Q altogether and type control panel in the search box. Once the result shows up, Press Enter on your keyboard.
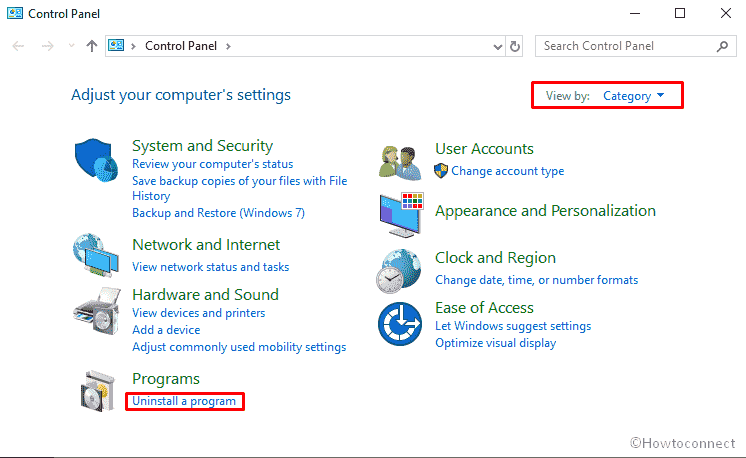
Step-2: On the following Window, Make sure that View by option is set as Category. Then click on Uninstall a program.
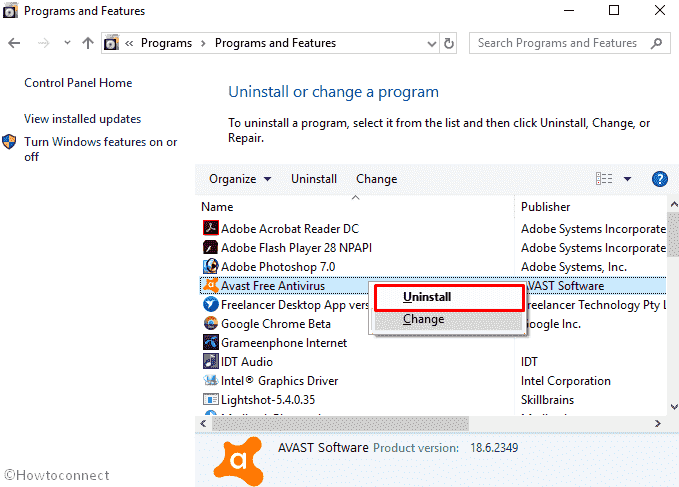
Step-3: Next, search the antivirus tool which you want to remove. In our case, the software is Avast. Now, Right click on the same and select Uninstall.
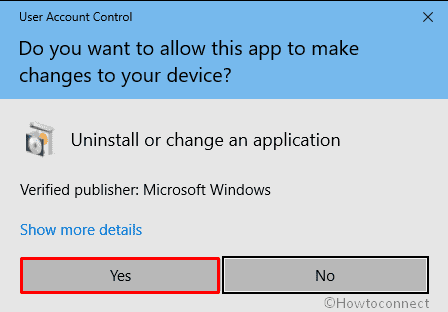
Step-4: A UAC will prompt up for confirmation, click on Yes.
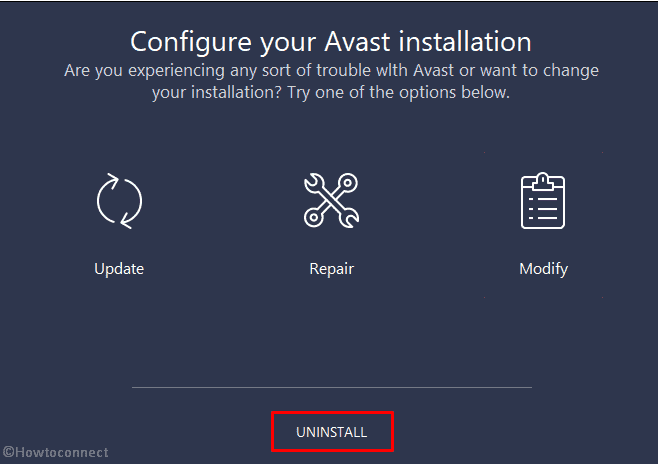
Step-5: On the successive wizard, click on Uninstall.
Now, follow the on-screen instruction to successfully remove Avast from your machine. Once you have done, Restart your PC and check if the error 0x8024402f has been corrected or not.
Turn on Windows Firewall
After uninstalling the third-party anti malware, turn on the Windows Firewall again.
Press Win and R at the same time to open the Run dialog. When it turns up, type the following in the text field and hit Enter on your keyboard –
shell:ControlPanelFolder
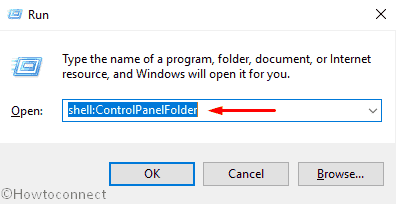
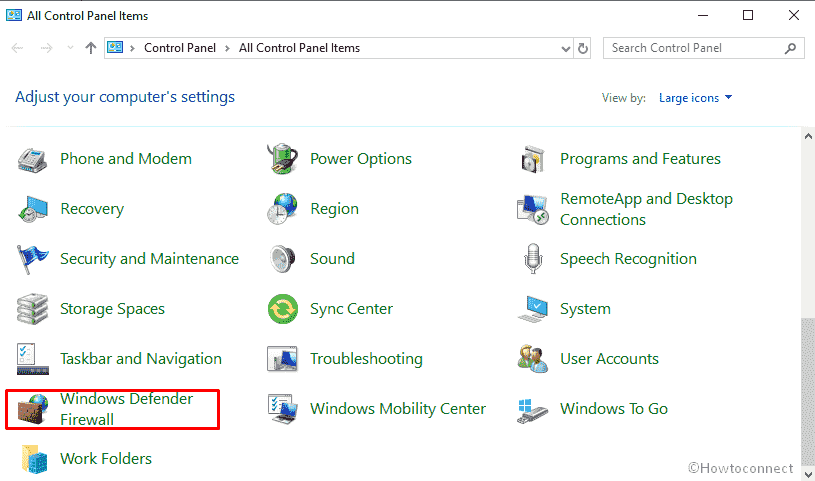
Now, the system will bring up Control panel on the display. Set the view by option as Large icons and make a click on Windows Defender Firewall from the visible list.
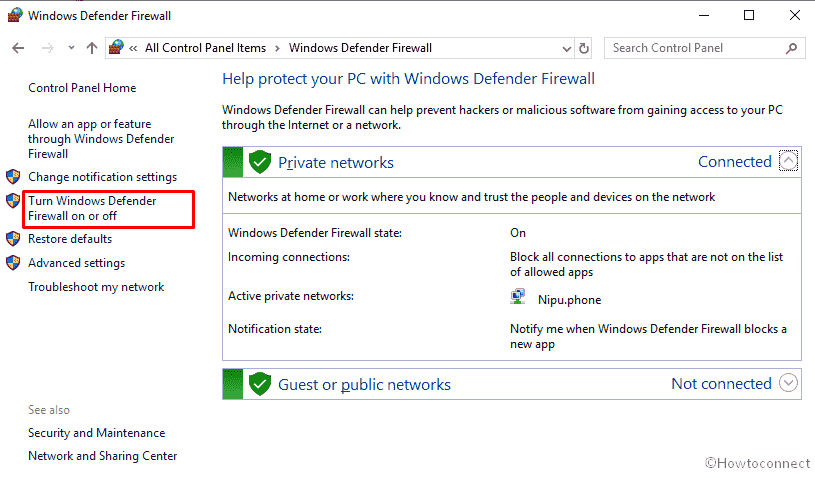
Next, select Turn Windows Defender Firewall on or off from the left column.
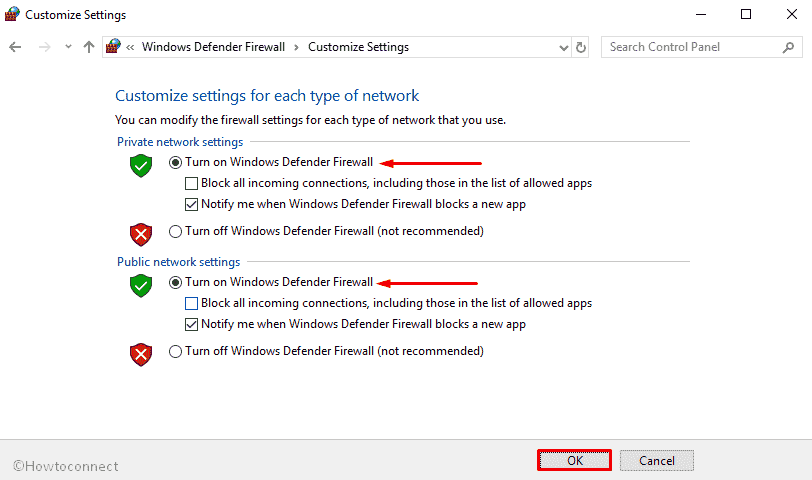
Here, check the radio button for Turn on Windows Defender Firewall for both “Private” and “Public network settings”. Finally, click on OK to save the changes.
Run Windows Update Troubleshooter
Mostly, Troubleshooter decontaminates all the issues related to Windows update.
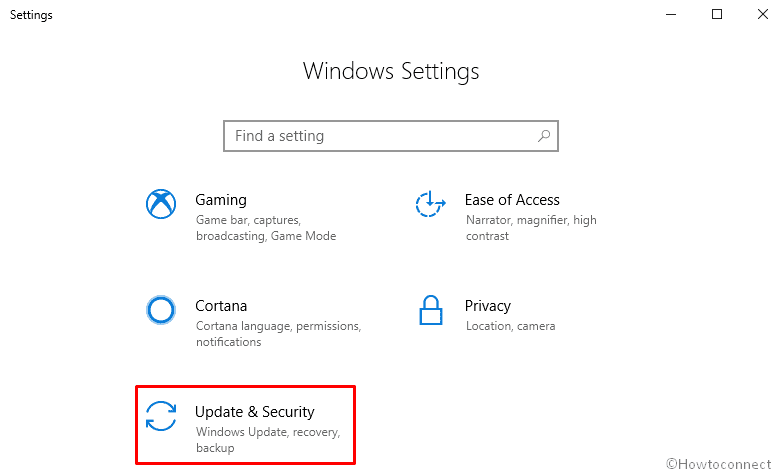
To run the Windows update troubleshooter, Press Win+I at the same time to open Settings app and then click on Update & Security.
On the following page, select Troubleshoot from the left column and move to the right pane. Locate Windows Update in the right pane, click on the same and then select Run the troubleshooter.
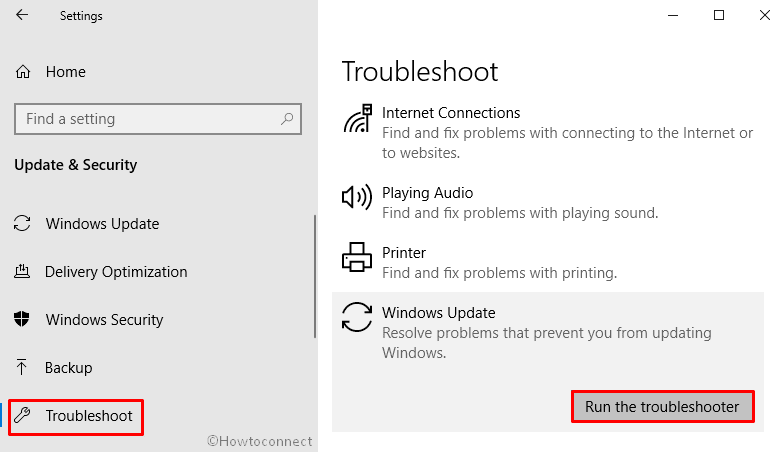
Now, an application will start scanning for the issue that is causing Error 0x8024402f. Follow the instructions and complete the method.
Uninstall problematic updates
There are instances when several updates result in the appearance of unwanted Error Messages. If you have recently gone through any such upgrade, try uninstalling them one after another.
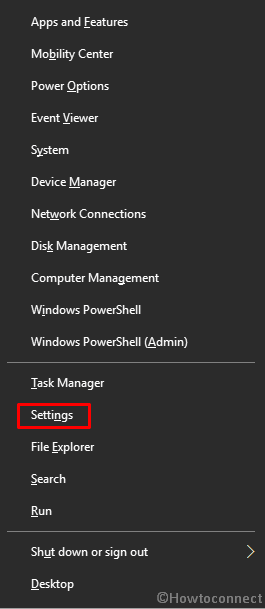
Do right-click on the Start button and select Settings from the visible list.
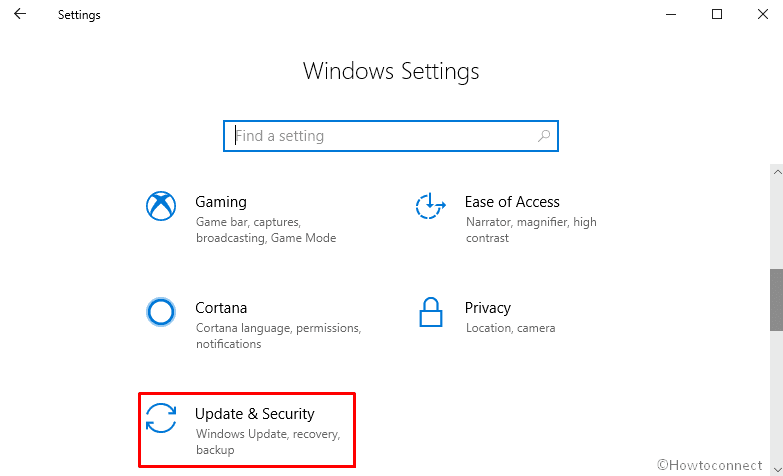
Click on Update & Security.
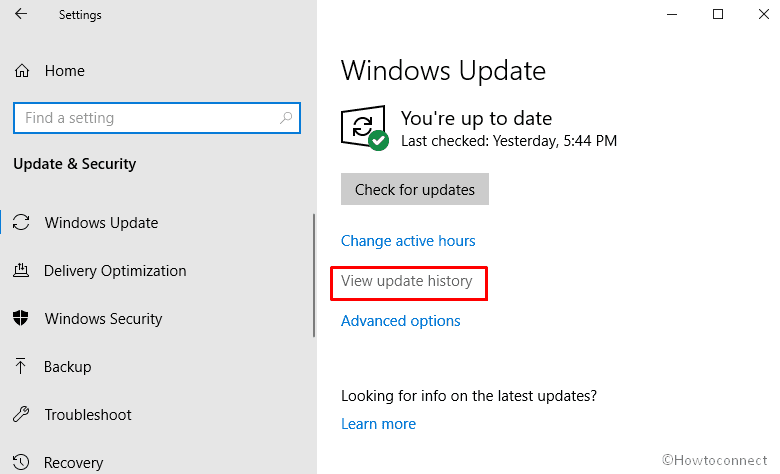
On the succeeding window, move the mouse pointer to the right-hand side and make a click on View update history.
Next, click on Uninstall updates.
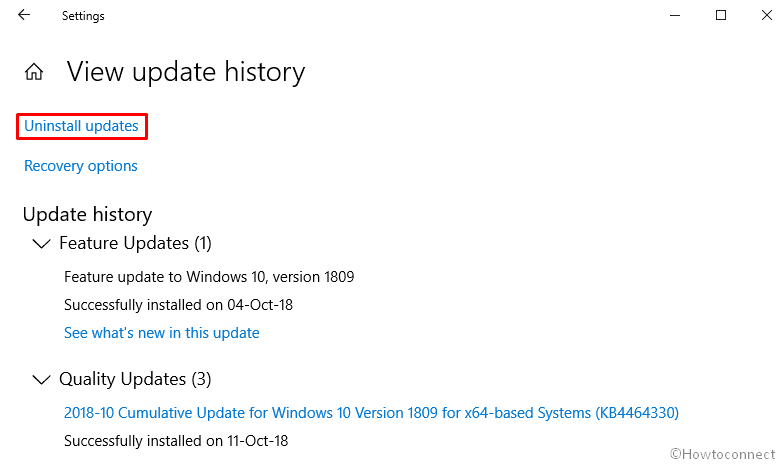
Perform right-click on the most recent update and select Uninstall.
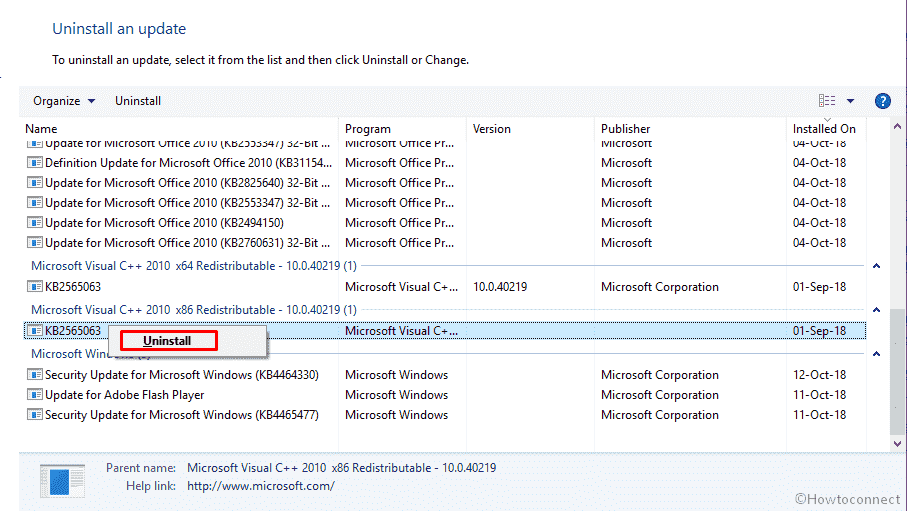
Now, Reboot your machine and try to install the update again. If Error 0x8024402f still exists, uninstall the other updates you have recently installed.
Remove temporary files
There are several temporary files which are being used by different apps on Windows 10 for smooth functioning. If they somehow become corrupted, Error 0x8024402f can arise on your Computer. If the condition is same for you, delete the entire temporary files inside the system. Because these files would be re-generated over the period of time, therefore, you needn’t worry about them.
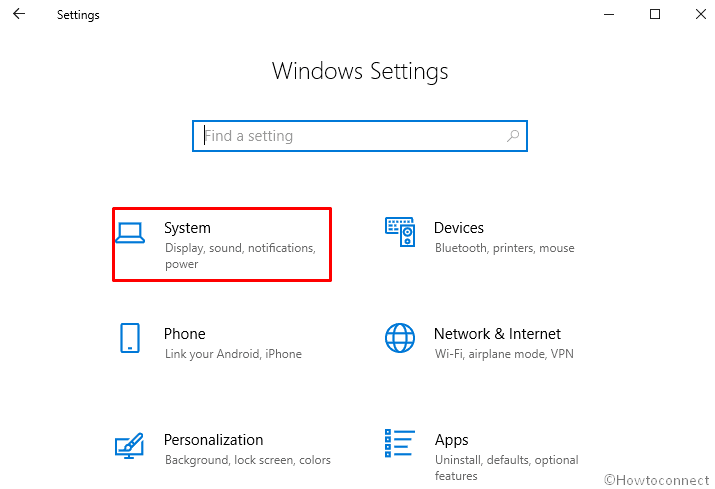
To initiate, Open Windows Settings app on your Windows 10 PC.
Once it turns up in the screen, click on System.
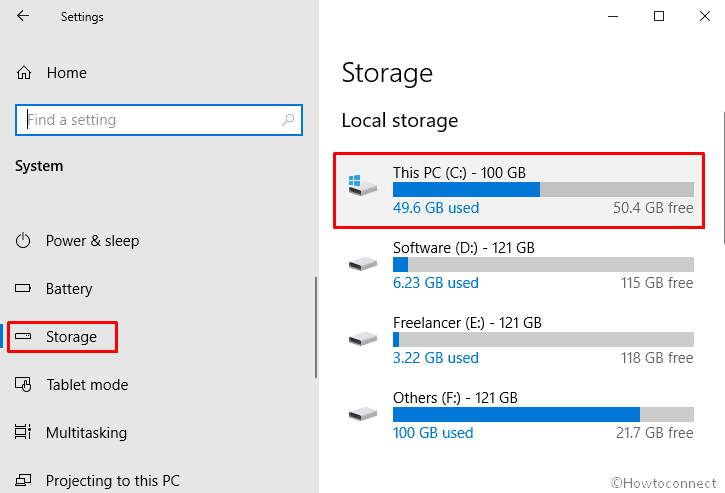
On the subsequent page, select Storage from the left pane and then move to the right pane and click on This PC (C:).
After then, click on Temporary files.
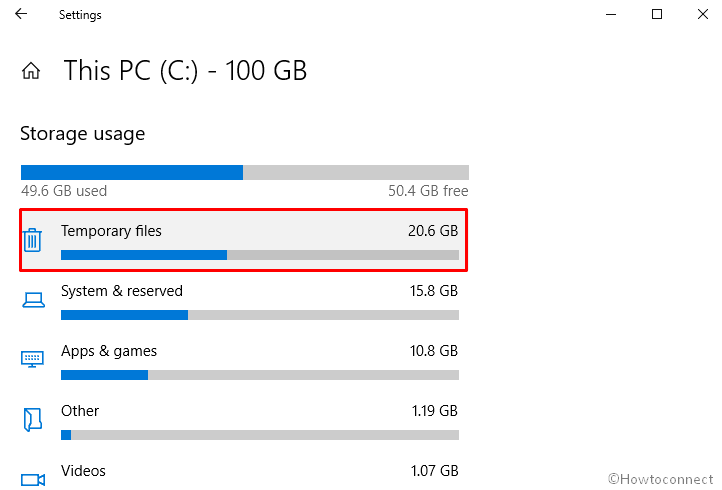
On the next Window, check the box of Temporary files and then click on Remove files.
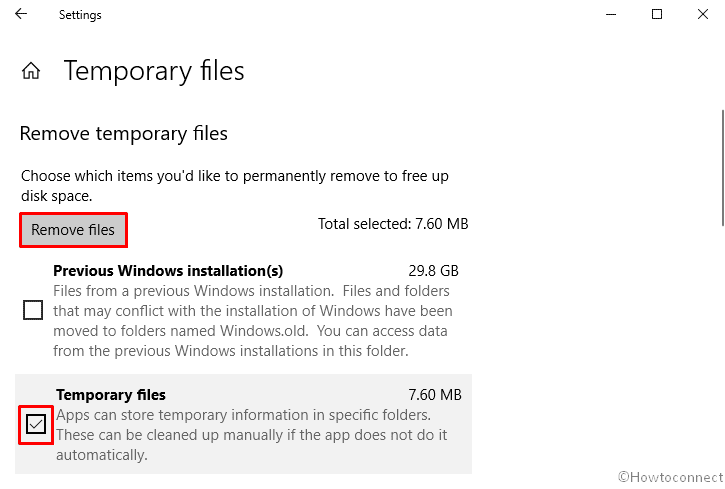
At last, Restart your PC so that changes take to effect.
Reset your router
Often The faulty configuration of your router causes Error 0x8024402f. Mostly, this fatal code occurs when it is set to work in bridge mode. Therefore, To fix this issue, you need to reset it to default settings.
Insert a pin into the reset hole of your router, continuously hold and let the power LED blink once.
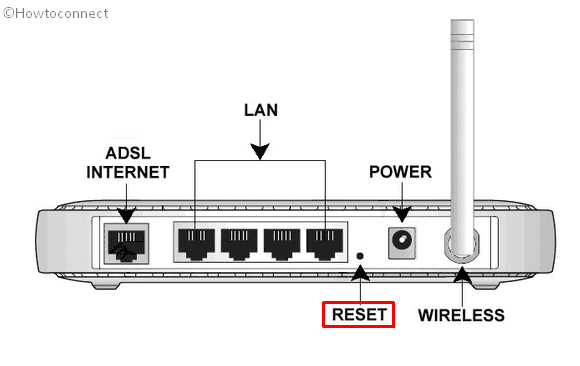
Once you have successfully restored the “factory settings” of the router to default, reshape the configuration according to your need. If you find this procedure nettlesome, call your Internet Provider and tell them to do the same.
Try VPN as an alternative
Some Internet Service Provider blocks unwanted sites and prevents you from downloading updates. If you are getting the case that causes Error 0x8024402f, immediately contact the ISP and tell them to fix out this issue.
Alternatively, if you bother to inform your ISP, you have to use VPN to solve the issue. Just go through the Users review and select potentially viable one.
Change Windows Update settings
Incorrect settings in Windows Update may cause error 0x8024402f in a computer. Below steps will help you in this regard –
Click on the Start button and select small gear icon located in the left corner side.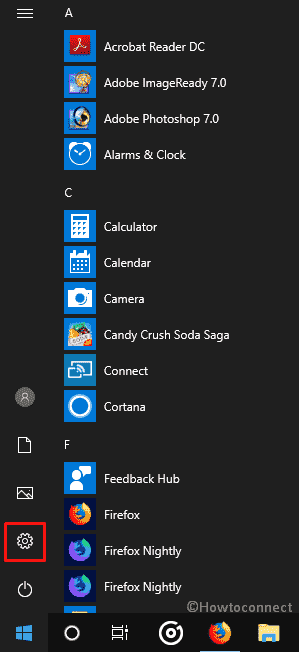
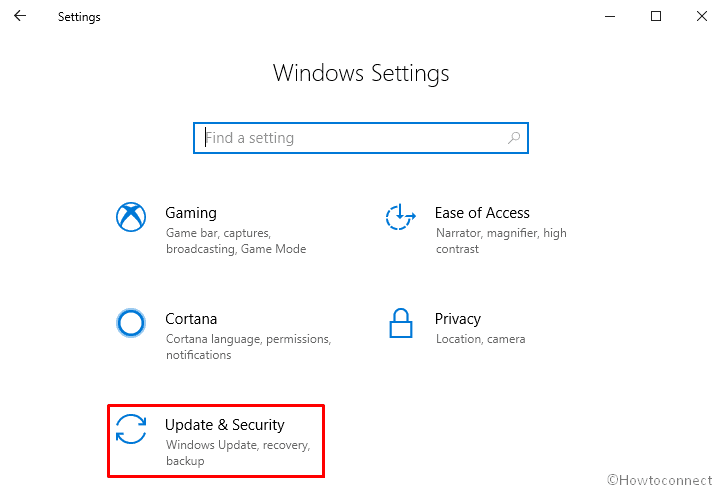
When the Settings program comes out click on Update & Security.
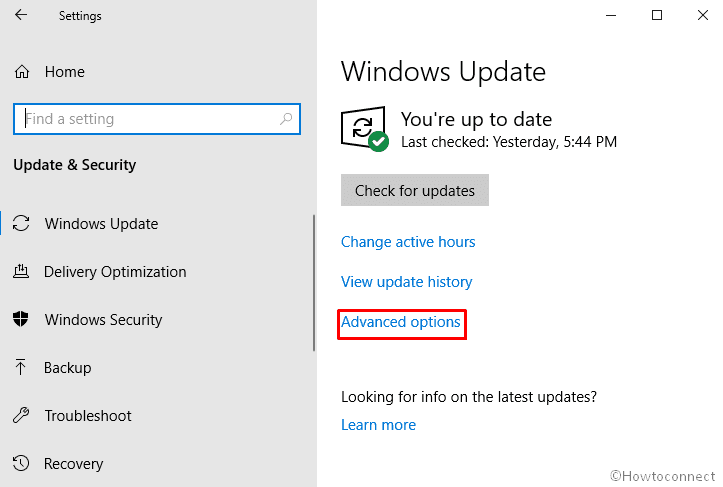
On the following page, click on Advanced options from the right pane.
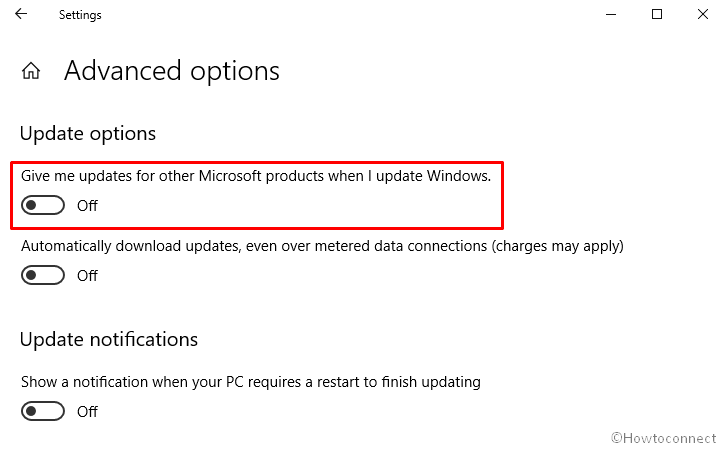
Next, turn off the toggle button of Give me updates for other Microsoft products when I update Windows.
Now, Scroll down a bit and click on Delivery Optimization.
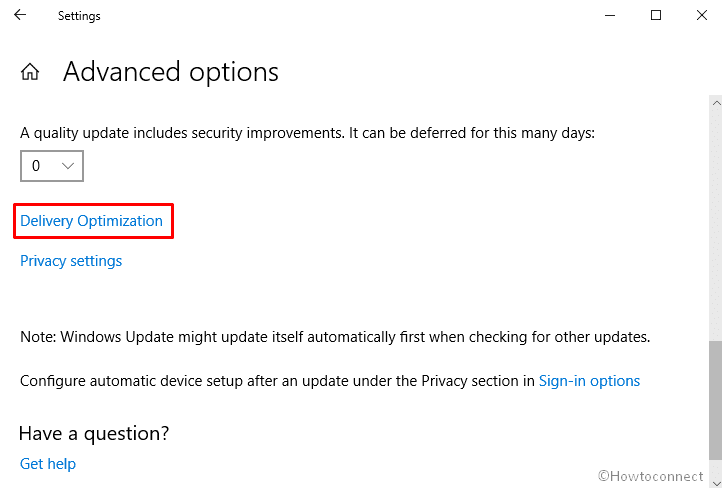
Drag the toggle to right to switch on “Allow downloads from other PCs” and then check the box against “PCs on my local network and PCs on the Internet”.
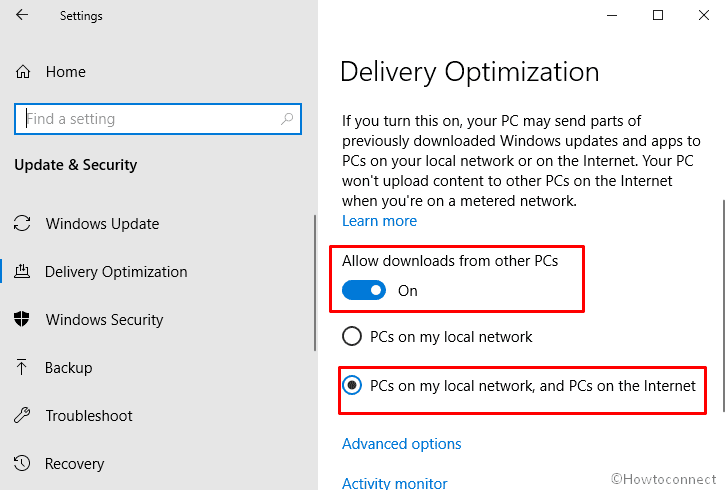
After finishing the method, Reboot your PC and try to install the updates again. Hopefully, Error 0x8024402f will no longer occur.
Change your DNS
The Domain Name System might be a reason for error 0x8024402f. So changing your default DNS to Google’s DNS sometimes works as a solution to this Windows update problem.
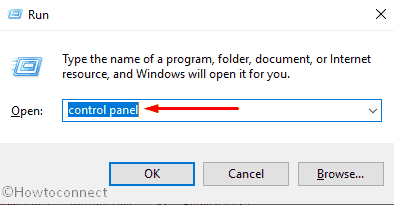
Press Win + R simultaneously. When the Run dialog shows up in the screen, type control panel in the void text box and hit Enter.
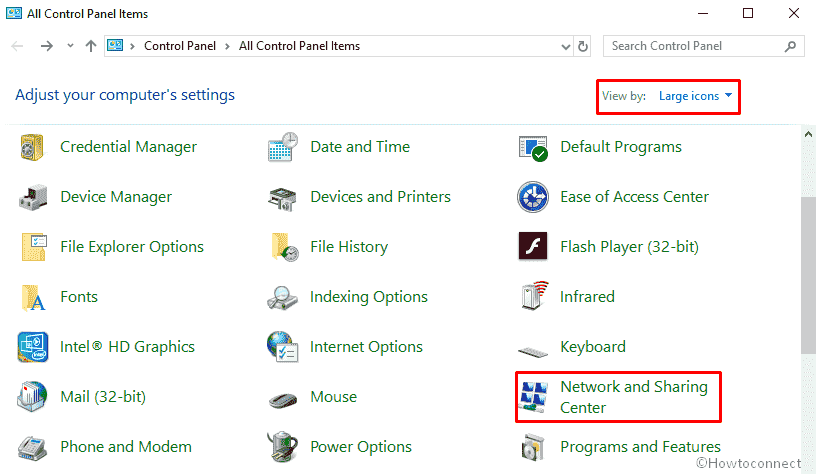
On the subsequent window, set the view by option as Large icons. Click on Network and Sharing Center.
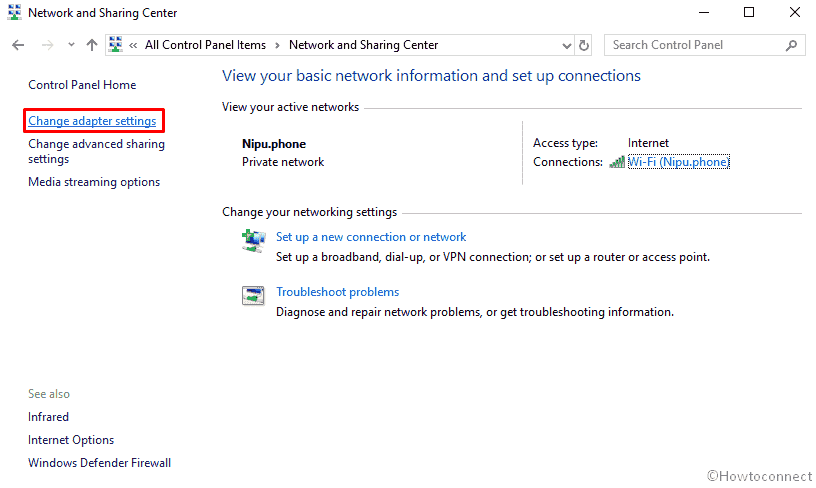
To proceed forward, select change adapter settings from the left column.
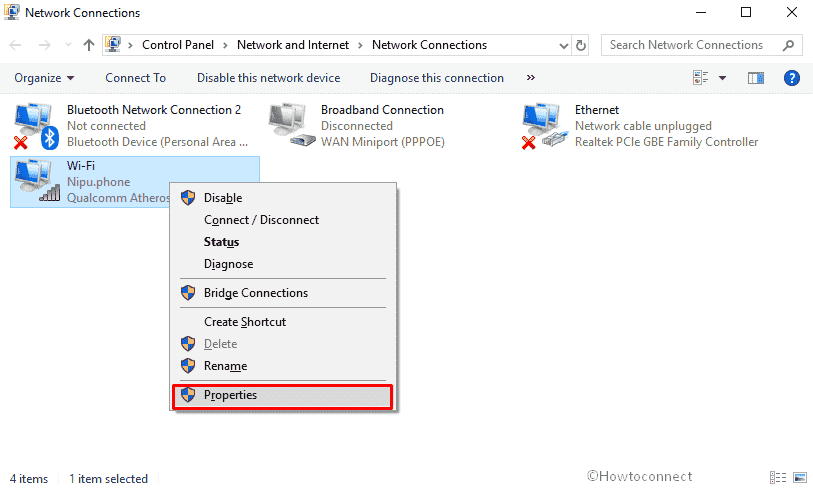
Locate the network adapter, make a right click on it and select Properties.
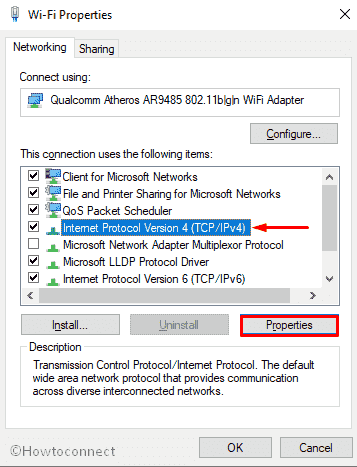
Choose “Internet Protocol Version 4 (TCP/IPv4)” from the list of items then select “Properties”.
When an additional wizard prompts, click on the radio button against “Use the following DNS server addresses”. Then set the following and then click on OK to save the alteration –
Preferred DNS server: 8.8.8.8
Alternate DNS server: 8.8.4.4
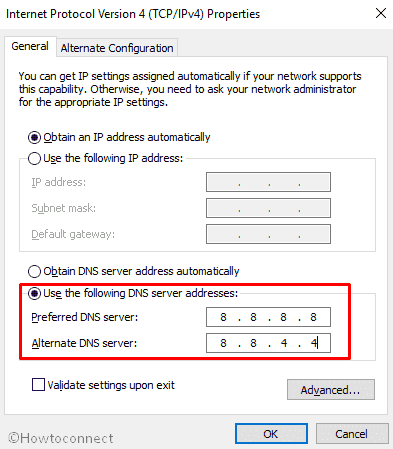
These modifications will allow your PC to open Google DNS. The procedure may slow down the internet speed a little bit but Error 0x8024402f will be fixed.
Delete the SoftwareDistribution folder
C:\Windows\SoftwareDistribution is the directory where the system stores Windows Updates files. Sometimes this folder becomes corrupted and causes Error 0x8024402f. Therefore, you need to delete it and let the system re-create it automatically in order to download updates and install without interruption.
Do a right-click on the Start button and select Run.
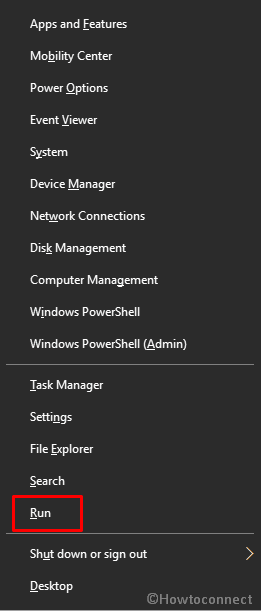
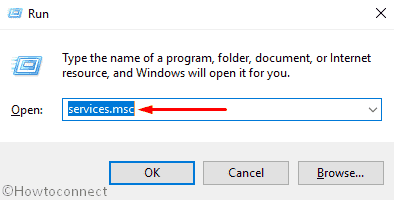
Write down services.msc in the empty text field and thereafter either hit Enter or click on OK button.
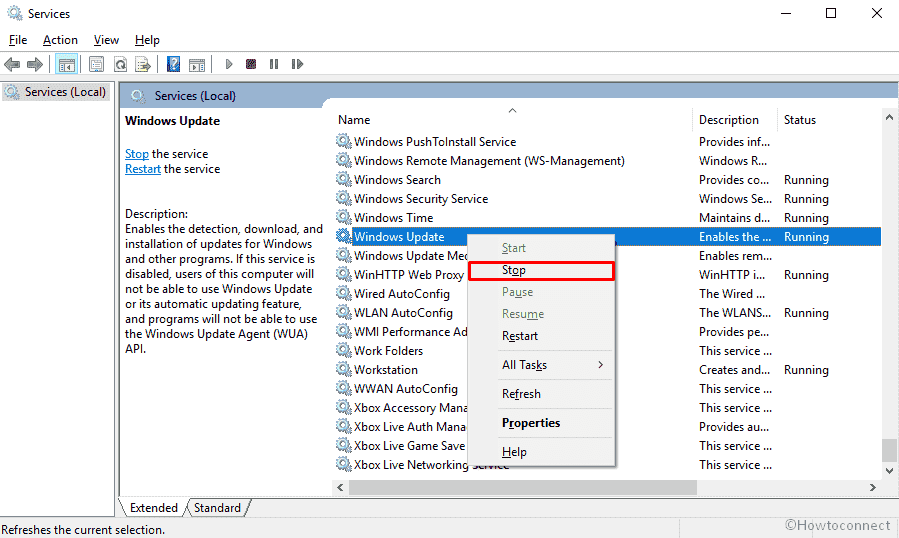
When the system brings up Services console, locate Windows Update in the Name list. Make right-click on the same and select Stop.
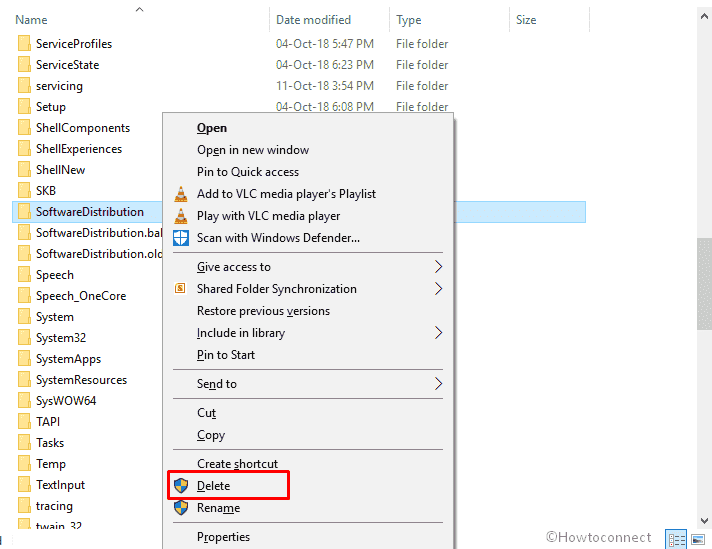
Access C:\Windows directory –
Once you reach there, locate SoftwareDistribution folder and right-click on this one then Select Delete.
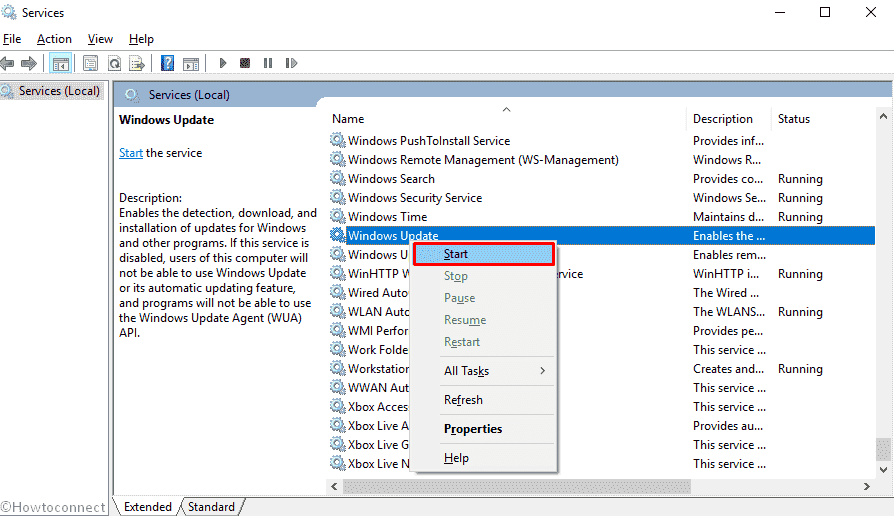
Start Windows Update service again from the console (to access the method is shown earlier).
Uninstall the Microsoft .NET Framework 4 Client Profile
Step-1: Open Command Prompt as admin.
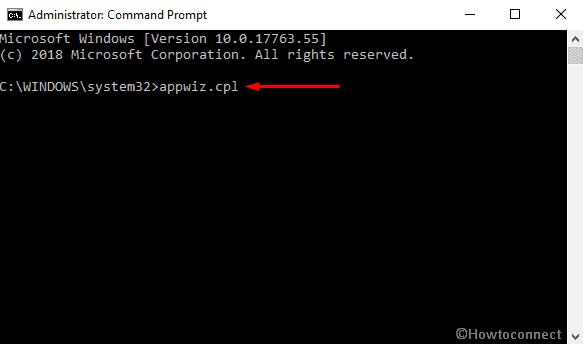
Step-2: When the window turns up in the desktop screen, Type the following command and hit Enter in order to execute –
appwiz.cpl
Step-3: Once the Programs and Features appears, right-click on the “Microsoft .NET Framework 4 Client Profile” then click on Uninstall.
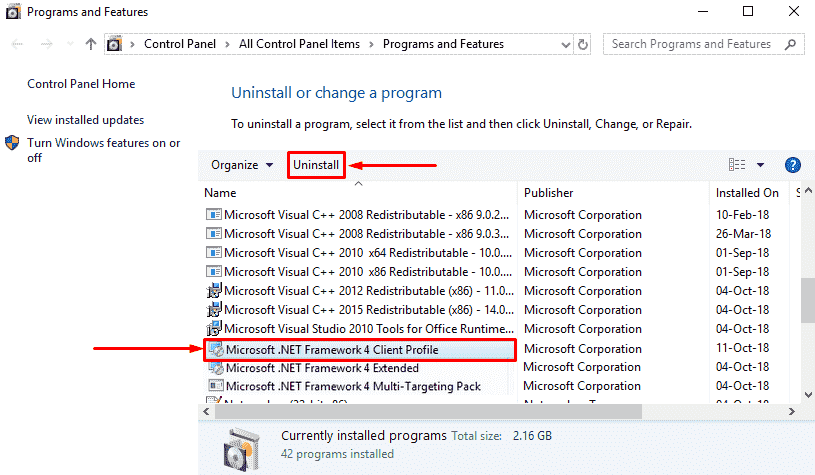
Step-4: Give content when a pop-up appears for confirmation.
Hope the solutions were helpful to dispel the issue. Let us know which method helped you to fix Error 0x8024402f.
That’s all!
