Nothing in Windows 10 comes error-free so does Microsoft store. You might encounter certain codes at times that restrict the procedure while attempting to download or install an app. Error 0x800706D9 is one of these and it mostly prompts when something unexpected happens with the Windows Store. There might be some other factors that lead to such unwanted issues like corruption in the system and damaged cache.
Some people also reported that Microsoft Store error 0x800706D9 is more prominent when Storage Service is disabled in their Windows 10 PC. However, fixing the fatal code is not hard at all no matter what the actual reason is. In most cases, a built-in troubleshooter dedicated to the Windows store does the tweak. If not, you might need to enable storage service, reset the store to its default state, or reinstall the app.
Microsoft Store Error 0x800706D9
Here is how to fix Microsoft Store Error 0x800706D9 in Windows 10 –
1] Run Store App Troubleshooter
Microsoft offers a dedicated troubleshooter for Windows store that works to bypass any problem the app conflicts. Usually, the tool scans the system to find the issues causing 0x800706D9 and fixes them automatically. Even if it fails to do so, the tool will let you know what the problem is and what step you should take next. Steps to run the troubleshooter are as followed –
- Press Win+I keyboard shortcut.
- When Windows Settings page turns up, click Update & Security.
- Opt for Troubleshoot from the left overlay.
- Move to the right pane and click the link Additional troubleshooters.
- Scroll down and locate Windows Store Apps.
- Select the same and click the button Run the troubleshooter from the extended tray.
- Let the tool detect and fix any problem related to error 0x800706D9.
2] Enable Storage Service to settle down error 0x800706D9
Oftentimes Storage service becomes troublesome and many of you keep it disabled in order to prevent Windows from writing hidden system files to USB devices. Due to this reason, 0x800706D9 Windows store error may take place. In such a case, what you can do is enabling the service manually and check if this was the real cause behind the code. Here is how to proceed –
- Right-click on Start button and choose Run.
- Type services.msc in the dialog box and click the OK button.
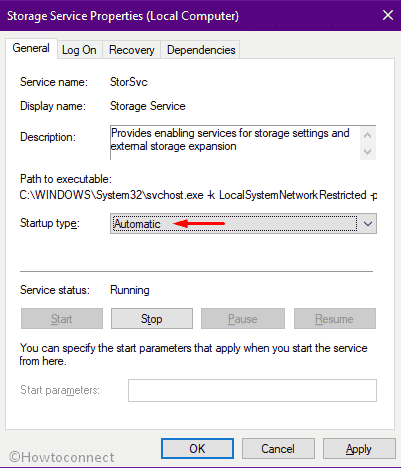
- Locate Storage Service on the Window that appears.
- Double-click the same to open its Properties.
- Set the Startup type to Automatic.

- Click on Start if the service is highlighting the Start button.
- Select Apply followed by OK button to save the changes.
- Lastly, restart Windows 10.
3] Reset Microsoft Store
As we said earlier, error 0x800706D9 mostly shows up when you try to download and install new software. Corrupted Store Cache is highly responsible for giving rise to such stop codes. Resetting the store cache may help in this kind of issue. To do so –
- Open Windows Settings app first.
- Click on Apps.
- When Apps & features page shows up, move to the adjacent right and scroll down to find out Microsoft Store.
- After getting the app, select it.
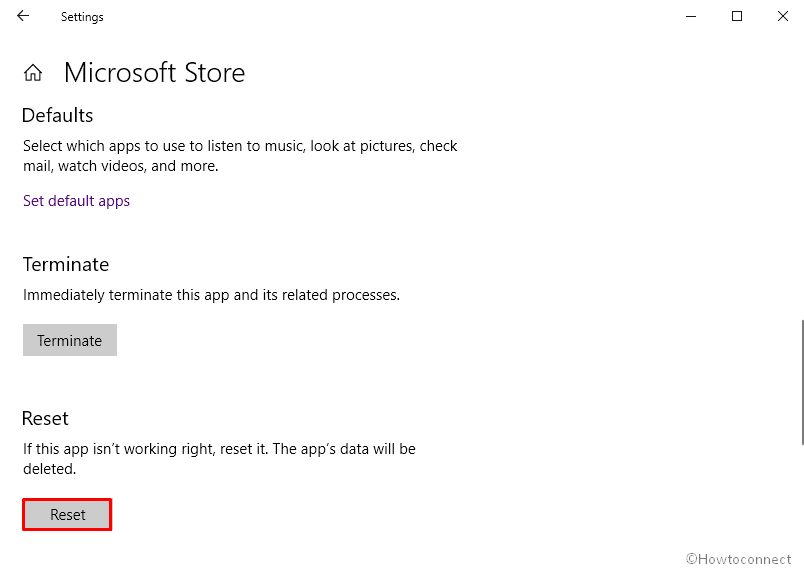
- Click Advanced options link from the expanded pane.
- From the next page, move down a bit and click the Reset button.

- A popup may appear for final confirmation where you need to click Reset again.
You can also follow the guidelines here – 5 Ways to Reset Microsoft Store in Windows 10.
4] Re-register All Store apps
Microsoft store can’t get deleted automatically or without any valid reason but the same can be damaged by losing its essential components which result in 0x800706D9. To settle it down, you need to re-register the app using PowerShell command. Here are the steps you need to follow –
- Press Win+Q, type in PowerShell, and choose the option Run as administrator from right pane.
- When a UAC prompts, click Yes button.
- Once Administrator: Windows Powershell console rolls out, insert the below command –
Get-AppXPackage -AllUsers | Foreach {Add-AppxPackage -DisableDevelopmentMode -Register "$($_.InstallLocation)\AppXManifest.xml"}
- Hit Enter.
- In the end, reboot the system.
5] Uninstall & Reinstall Store to fix error 0x800706D9
If the Windows Store has become corrupted or defective itself, better to uninstall the app and install it again. In this way, you will have a fresh moreover error-free version of store. To proceed forward –
- First of all, run PowerShell as administrator.
- Once the console becomes ready to execute a command, insert the below line at the base of blinking cursor –
Get-AppxPackage *windowsstore* | Remove-AppxPackage
- When the app is uninstalled, reboot the computer.
- After powering up, again open Windows PowerShell (Admin).
- This time, execute the below command-line –
Get-AppXPackage *WindowsStore* -AllUsers | Foreach {Add-AppxPackage -DisableDevelopmentMode -Register "$($_.InstallLocation)\AppXManifest.xml"}
6] Run SFC /Scannow
Store error 0x800706D9 may appear on Windows 10 PC due to corrupted system components and missing dll files. Such an incident usually happens because of unexpected power surge, malware attack, and collision of programs. To resolve the corruption at the same time recover missing elements, run system file checker in elevated Command Prompt. For that –
- Open Run Dialog box.
- Put cmd.exe in the text field and press Ctril+Shift+Enter keys altogether.
- When a UAC shows up, click Yes.
- Once in the black window, insert the below command followed by hitting Enter key –
Sfc /scanow
- Let the tool complete the scanning process without interruption.
- After completion, restart the computer and check if error 0x800706D9 has resolved.
7] Disable Antimalware program for a while to resolve error 0x800706D9
Antimalware programs always work to keep you away from vulnerable threats and to do so, often they block some app from downloading that seems suspicious. There is a high chance that Microsoft store has misinterpreted the app you are trying to download or install. As a result, the system fails to get it and throw 0x800706D9 Windows store error. To get rid of it, you can disable the active anti-malware program for a while. Keep in mind that disabling the security program for always can harm the PC badly, so, don’t forget to enable it later.
Disable built-in Windows Security
- Press Win+I to bring Settings app.
- Continue with Update & Security.
- Select Windows Security from the left overlay.
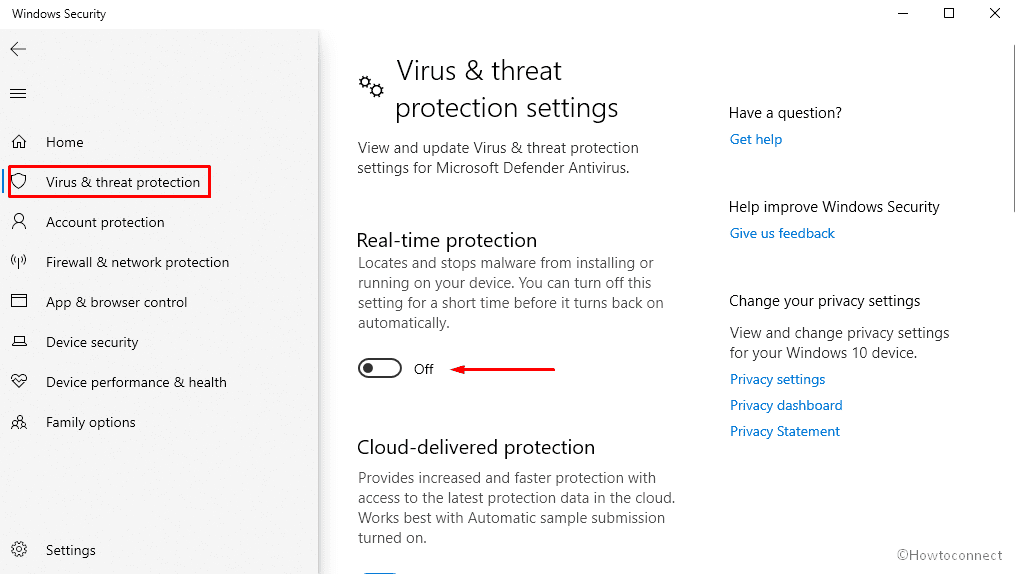
- Move to alongside right and opt for the option Virus & threat protection.
- From the newly appeared window, click the link says Manage settings located in right pane.
- Switch the toggle button of Real-time protection left.

- A pop-up will turn up for final confirmation. Hit the Yes button.
Disable third-party antivirus
- Click the up arrow icon from the right side of taskbar to unfold system tray.
- Right-click on the antivirus icon installed on your PC.
- Choose Disable or anything identical from the appearing context menu.
- Now, you might need to choose a time slot that decides how long the antivirus program will remain disabled. Choose what you prefer.
Methods:
1] Run Store App Troubleshooter
2] Enable Storage Service
3] Reset Microsoft Store
4] Re-register All Store apps
5] Uninstall & Reinstall Store
6] Run SFC /Scannow
7] Disable Antimalware program for a while
That’s all!!
