Microsoft rolls out its cumulative updates for Windows almost every month. We have often seen that pending updates notification on the bottom right corner of our screen and kept postponing it. The updates are often invariably bug-free and are quite efficient for the performance of our PC. However, it’s not the same in some cases and it has been noticed that the update fails to load and an error message is displayed. The message might appear something similar to this – There was a problem installing some updates, but we’ll try again later Error: 0X800f0988, but often it changes too.
Basically, this Windows 11 or 10 update error could have emanated due to a number of reasons. Most common reasons are buggy patches, interference of some application, an external hindrance to the PC in between the updating process. Installation of third party shady application may also lead Error 0x800f0988 to come up. However you don’t need to bother, what may be the cause, we have the solutions ahead.
Windows 10 or 11 update error 0x800f0988
Here is How to fix or repair Windows 11/10 update error 0x800f0988 –
1] Manually install the update
One of the ways to fix the Error Code 0x800f0988 is to install the updates manually instead of the automatic process. Microsoft releases patches and builds with upgraded features and bug fixes quite often. These updates, following built-in configurations, are automatically downloaded and installed in the availability of an internet connection. However, sometimes the settings become a reason for Windows update not working issue the situation might fit with this the occurrence here.
Therefore, Downloading updates manually helps in eradicating this error. Follow the steps ahead –
- Click the Search icon or bar from Taskbar and type the – update.
- Press the – Enter.
- Select the – View update history.
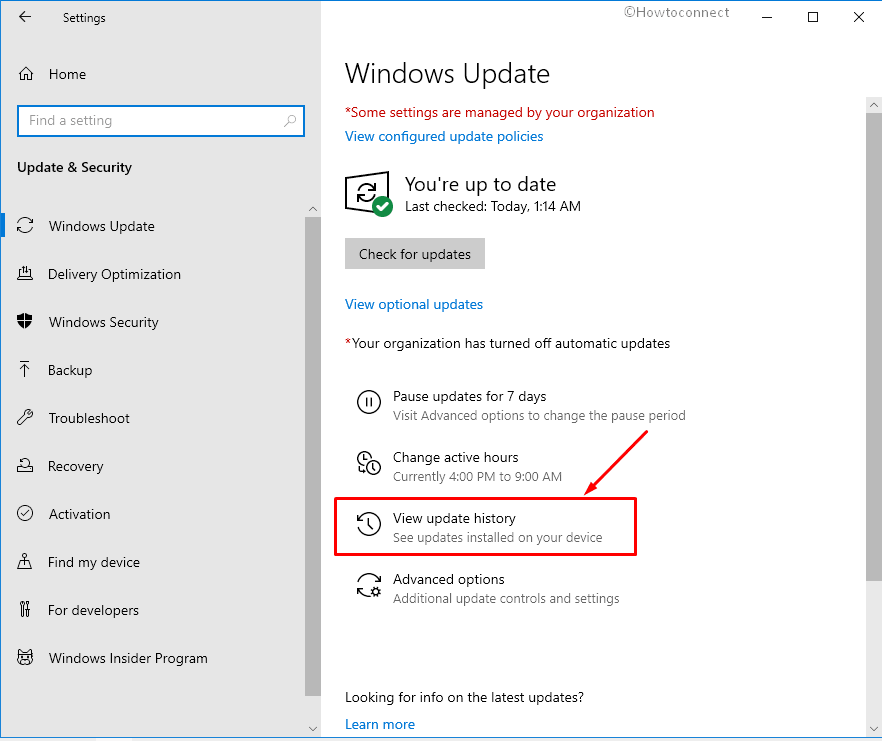
- Find and copy the failed update KB number.
- Click this link and go to Microsoft Update Catalogue.
- Paste the KB number in the search box and then hit the – Enter.
- Find and download compatible architecture.
- Double click the MSU file and follow the onscreen guidelines until the end.
This way you can avoid the Error Code 0x800f0988 during the installation of updates.
2] Use the Windows Update Troubleshooter
Microsoft has designed this troubleshooter utility to help users to deal with any update and installation errors. This tool deeply checks the system to detect issues and presents on-screen guidance to ending up with resolving them. Same with the update problems as the troubleshooter dig out the proper reason and repair once executed. The built-in tool allows solving some common windows issue quite easily and in a hassle-free manner.
So run the Windows Update TroubleShooter to fix Error Code 0x800f0988 using the following guidelines –
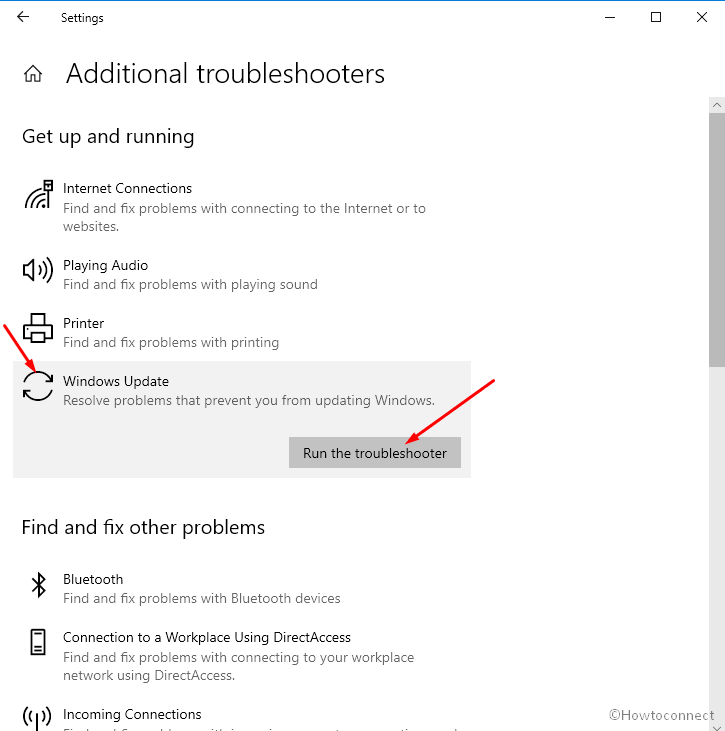
- Press Win+S, type troubleshoot and then hit the – Enter.
- After the settings page appears, select the – Additional troubleshooters.
- Find and click the – Windows Update.
- Finally, click the – Run the troubleshooter.
3] Uninstall additional language packs
Windows comes with a feature to install and use the operating in different prominent languages around the globe. The feature helps make windows more feasible and render an immersive experience to its users. But sometimes during the installation of updates, if you have selected English as your default language, it may cause some trouble. This could result in the Error: 0x800f0988 to arrive on your system screen.
Here’s how you can uninstall the additional language packs using a few simple instructions –
- Type language in the search on Taskbar and hit the – Enter.
- Under the Preferred languages section, there would be some language pack showing.
- Click to expand and select Remove.
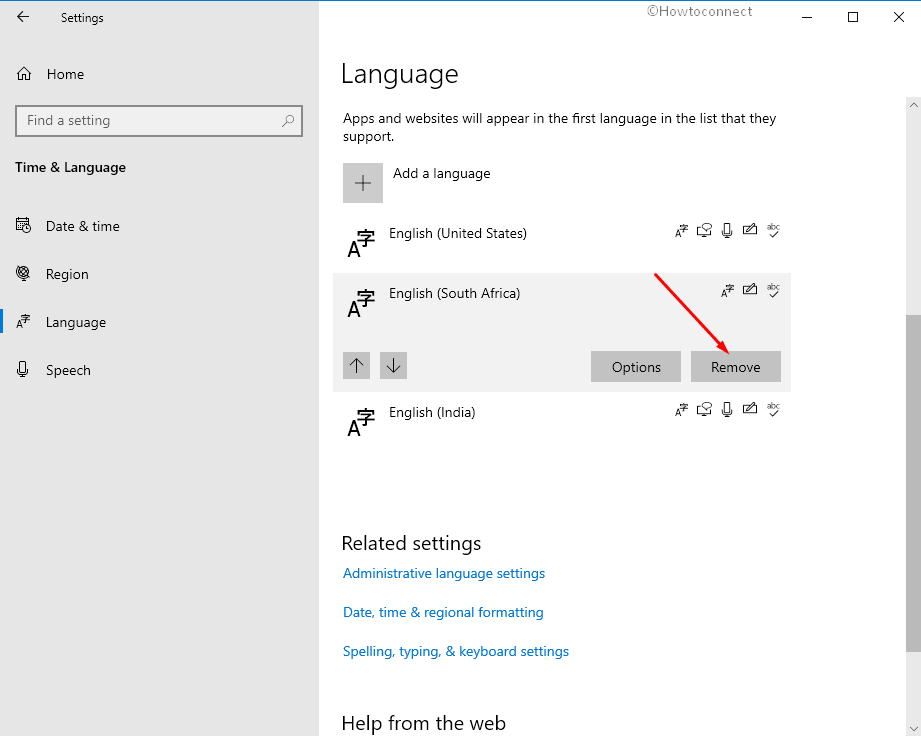
- Reboot the computer and see if error Code 0x800f0988 still persists.
See – How to Reinstall Windows 10 Language Pack.
4] Evacuate the WinSxS folder to fix Windows 10 update error 0x800f0988 Windows 11
Excessive accumulation of unwanted data in the Winsxs folder could also be one of the reasons for error 0x800f0988 to appear. The folder prevents installing any sort of cumulative update patches on the system. A great number of users have come forward to tell us that cleaning this directory using DISM could solve this glaring issue.
Here’s how you can proceed with this method –
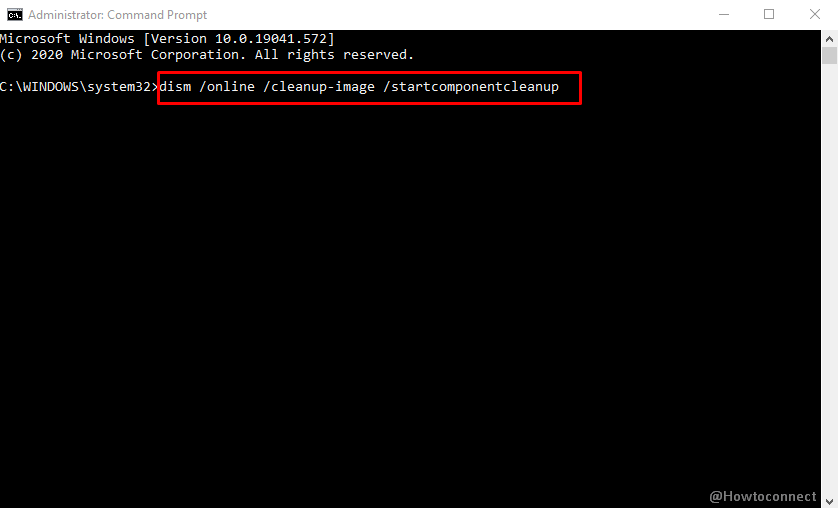
- Type in CMD in the windows search box on the taskbar
- From the result window, select the – Run as administrator.
- In the command prompt window type in the following code exactly as it is and hit enter –
dism /online /cleanup-image /startcomponentcleanup
- When the process gets over and the directory is cleaned, reboot your system and try to reinstall the pending updates.
5] Purge the Windows Update Components
A corrupted or mismanaged windows update component has often come out as one of the major causes why Error: 0x800f0988 trouble us all. An online survey reveals that 6 out of 10 people would face this issue because of a corrupt windows update component only. Let’s see how we can resolve this nagging issue in a few simple steps –
- Hit Win+Q and Type in – CMD.
- Once the result pop up appears, click the – Run as administrator.
- On the command prompt window type in the following syntax exactly as it and don’t forget to hit enter after each line.
net stop wuauserv
net stop cryptSvc
net stop bits
net stop msiserver

- These commands will render the above of the services running in the background disabled temporarily.
- Now, what you need to do is rename the SoftwareDistribution and catroot2 folder using these two different commands in the command prompt
ren C:windowsSoftwaredistribution SoftwareDistribution.old
ren C:windownsSystem32catroot2 catroot2.old
- After you are done with that, you must restart the services that you disabled earlier. In order to do that type in the following command exactly as it is and hit enter after each line –
net start wuauserv
net start cryptSvc
net start bits
net start msiserver
Once you have concluded this method your system would have successfully reset the windows update components and now you’ll be able to install the pending.
6] Reset the Windows 10 to repair Windows 10 or 11 update error 0x800f0988
In some rare cases where all of the above four solutions don’t seem to help then resetting your PC is the only way out of this mess. This should always be your last resort as it could wipe your data from the C drive or on the particular drive where your windows is installed.
Let’s see how you can do that in a few simple steps
- Type in “Reset this PC” in the windows search box present on the bottom left side of your taskbar
- Hit the – Enter.
- Click on the Get Started button under from within Reset this PC section.
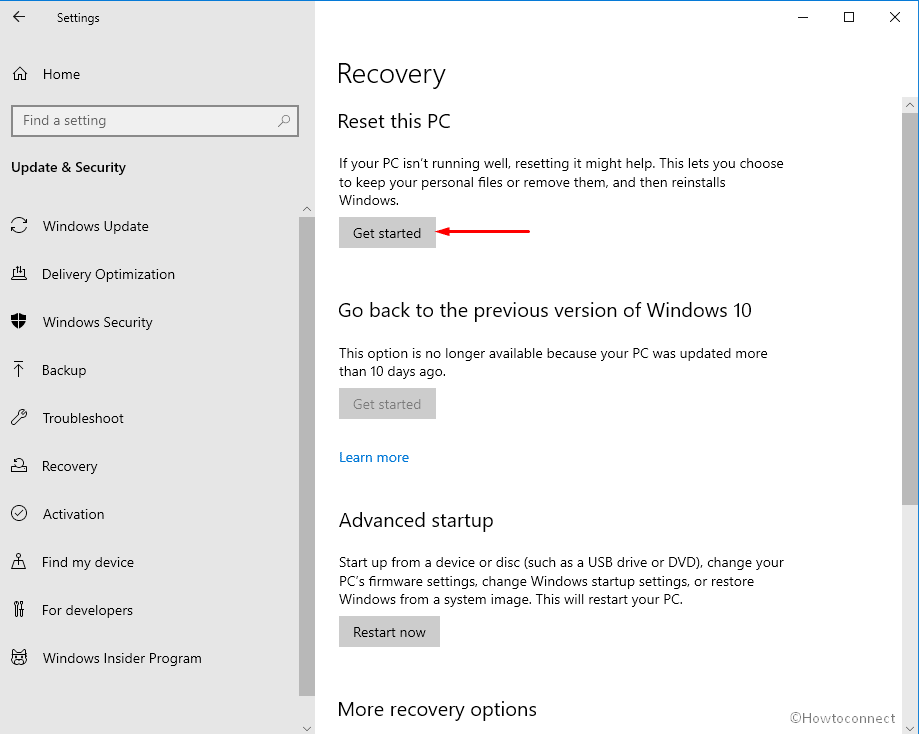
- Select the – “Keep my files” option and then move ahead
- On the next prompt click on “Reset” and then Confirm to get the process started.
This would have most certainly resolved the persisting issue of Error: 0x80040988 and you will be able to install your pending updates now.
Methods list
1] Manually install the update
2] Use the Windows Update Troubleshooter
3] Uninstall additional language packs
4] Evacuate the WinSxS folder
5] Reset the Windows Update Components
6] Reset the Windows 10
That’s all!!