Sometimes, you might hear no audio on your laptop or desktop powered with Windows 11. Furthermore, speaker, headphone, and microphone might also fail to play sound. Commonly, this sound issue is supposed to occur due to problems with drivers but there are more reasons that may cause the annoyance. Faulty Windows update, untight connection, incorrect settings, wrong format are some of the decisive factors when audio is problematic. Irrespective of all the troubles good thing is you can fix sound issues even without having vast tech knowledge. Therefore, we are here with several easy methods to fix sound not working in Windows 11.
Let’s clear that the audio-linked error is that it is seldom a hardware issue. So our main focus will be on the configurations, settings, updates like components to fix the Sound not working in Windows 11 problem.
Sound Not Working in Windows 11
Here is how to fix sound not working in Windows 11 –
Way-1: Restart the PC
The easiest and first solution you should try when the Sound is not working in Windows 11 is to restart the computer. While switching on the system, some of the drivers might not be loaded properly, causing the issue. Once the PC is restarted, the drivers will get a chance to freshly start and it may resolve the audio problem.
While performing the restart process, ensure to wait for a couple of minutes and avoid haste. Following the right way to reboot the system will make sure you have offered the time to drivers and cards to load and work in the manner they are intended.
Way-2: Check the Volume
Examine the volume level of the device (hardware). This is the most basic explanation for your computer’s lack of sound. Though this solution might sound quite a simple one, there are chances that the volume key is switched off, which may be one reason. We are providing a detailed method for checking volume, cable and other hardware components related to sound in the next solution. Follow them carefully.
Way-3: Check Speaker Connections
Checking the speaker connection is one of the best solutions to the Sound not working in Windows 11. Sometimes loose or damaged cables can cause issues in audio and “Windows 11 No Sound Realtek” error as well. This will hinder the system’s connectivity with the speaker that will not assist in the voice or audio output. Replace worn-out cables with new ones whenever possible.
Also, if the speaker wires do not seem worn out, it is still better to connect them to some other devices and check. If the sound issue is still there, the possibilities are that the wires are not properly passing through the connection. But in case they are functioning smoothly, then the issue can be linked to the drivers or updates.
Closely look over the volume, speaker, and headphone connections, plugs, jacks, and cables using the instructions underneath –
- Inspect the headphone and speaker connections for loose cables and cords. Confirm that all cables and cords are plugged in.
- In case of having more than one 5mm jack, particularly for a surround sound system, ensure every cord and cable is plugged into the right jack.
- If you are in confusion about which jack goes with which cord, ask your hardware manufacturer, or try the most evident output one at a time and see if they work. Attention – Commonly, systems use a pink jack for mic input, green for output, and others are labeled microphone or headphone.
- Confirm the power is switched on and check the volume level.
- Ensure to turn up all the volume controls.
- Make sure the device hasn’t turned on mute.
- Keep in mind that some apps and speakers have their own volume control. Check all of them.
- Try connecting the speakers and headphones to a different USB port.
- Several times, speakers don’t work when headphones are connected. Disconnect the headphones and see if that helps.
See – Fix External Speakers not Working in Windows 11 (Solved!).
Way-4: Check the Speaker output
To ensure the speaker is connected correctly to the system and working well you need to check the output devices. This is very easy and you need to follow a few steps only –
- Go to the right side on the taskbar and click on Speaker/headphone icon.
- On Action center, see the volume level.
- Click on Select a sound output located in the right of the volume control or slider.
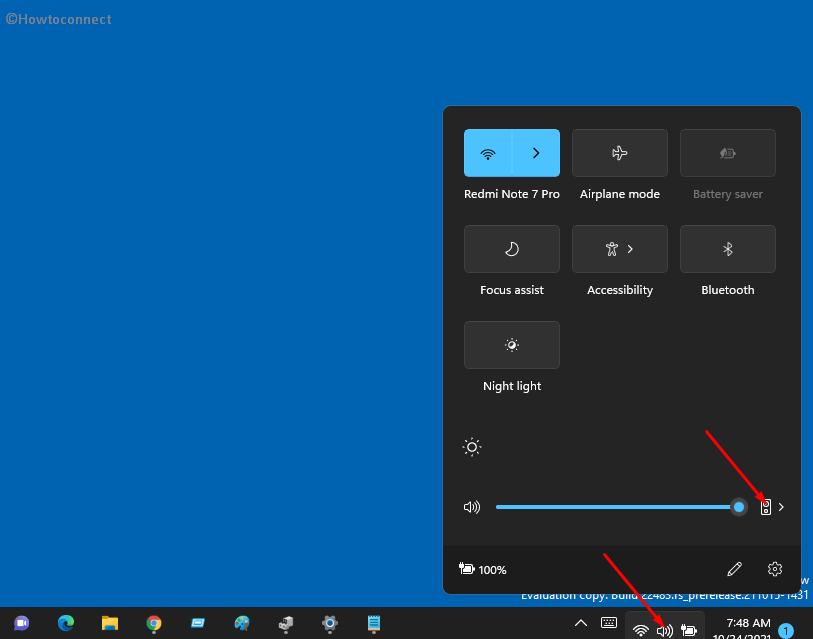
- See which device output is selected and change if you need.
Follow – Fix: No Audio Output Device is Installed in Windows 10
Way-5: Check Sound Settings in Volume mixer
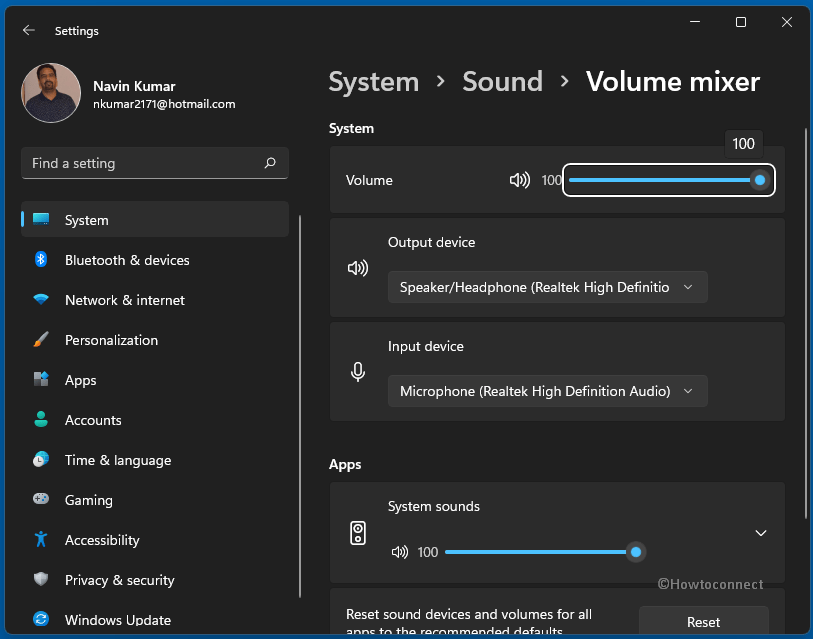
The most simple method to check all the Settings of Sound is via Volume mixer. This will show the volume level for each device whether it is speaker or headphones, provides options to select another device, and reset all settings. You need to move along with the below steps only –
- Right click on “Speaker/Headphone” icon.
- Select – Open volume mixer.
- Check the volume level and make sure that it is not muted.
- Check that the correct input and output device is selected in the drop down, otherwise change them.
- Look over the System sound settings and ensure that everything is fine there.
- Check if the sound not working in Windows 11 desktop or laptop is fixed.
- In case, it is not, click on Reset.
- Now check once more.
Way-6: Enable Playback Device
If there are multiple sound output devices connected to the system, then there are chances that incorrect one is set as default which is why Sound is not working in Windows 11. Furthermore, the disabled headphone or speaker may also create the same issue which is pretty obvious. Now the best solution is setting the playback device as default by following the steps –
- Click on – Start.
- Type – control.
- Press – Enter.
- This will open the Control Panel.
- Make sure that View by is selected as Large icons or Small icons.
- Next, click on Sound.
- A ‘Sound’ window will appear showing Playback tab by default.
- Right-click on the empty field.
- Make sure Show Disabled Devices has a checkmark on it.
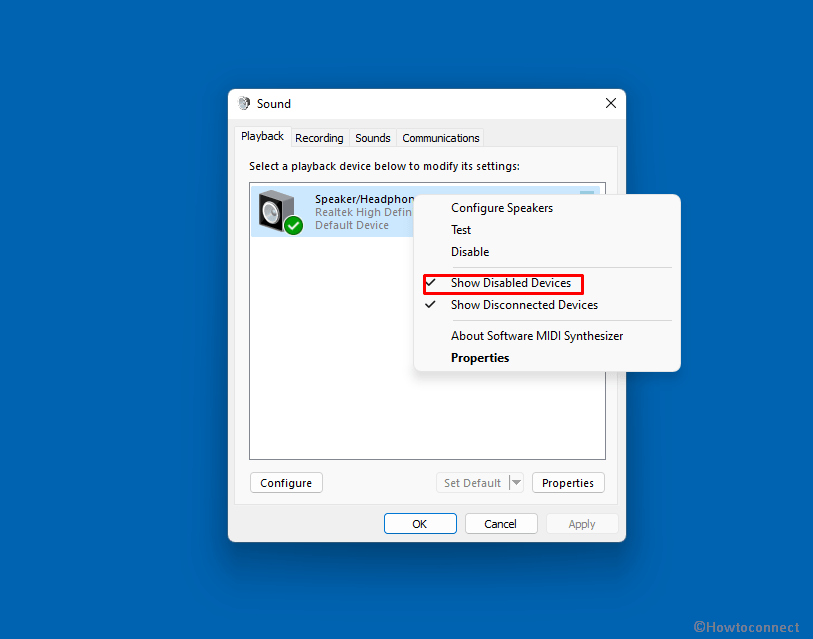
- It will display a list.
- Check if any of the devices are switched as disabled. This can be a reason for not being able to hear the sound.
- Right-click on the device and select – Enable.
- Check the sound is working now.
Way-7: Run The Audio Troubleshooter
Troubleshooter is a built-in repairing tool, Windows 11, following the older versions, offers. This troubleshooting will diagnose the root cause of sound issues on Windows 11 and fix it automatically. Follow the instructions below to run the tool –
- Click on the Search.
- Type – audio troubleshooter.
- Press – Enter.
- Playing audio troubleshooter will appear,
- Select Advanced > Repair automatically.
- Click- Next.
- This will diagnose what is causing no sound on computer Windows 11.
- Follow the suggestions given by the tool till the end.
You can follow – How to Run Recording Audio Troubleshooter in Windows 10
Way-8: Check the Windows 11 Sound Setting Options
Every function in Windows operating system is controlled by Settings where a user can easily modify options as per his need so with the audio. When sound not working on laptop Windows 11 incorrectly set settings might be a reason. Therefore, go with the steps to check them and make changes if necessary –
- Go to the taskbar.
- Click on the Speaker/Headphone icon that is given on the right-hand side.
- If the sound is set on an audible level, then right-click on Select a sound output icon.
- Select – Go to settings.
- Check the level of the volume.
- Click on – Choose where to play sound.
- The pane will expand; click on – “Speaker/Headphones”.
- In the Audio section, if you see Allow button on the next settings page then click on it.
- If you see Don’t allow then leave it as it’s.
- Go to the Output section and click on Test.
- If the sound is good then it is ok otherwise use the slider to increase or decrease the volume on whole and through right and left channels separately.
Way-9: Update the Audio Drivers
Most of the time, system sound not working in Windows 11 problem occurs dues to obsolete or incompatible driver. You know the driver is an application to establish communication between hardware and software. Sometimes the system does not install the updated software because of a bug or issue and results in no sound on computer Windows 11. You can try updating your audio driver and then see if the problem persists using the instructions below –
- Press – Win+X.
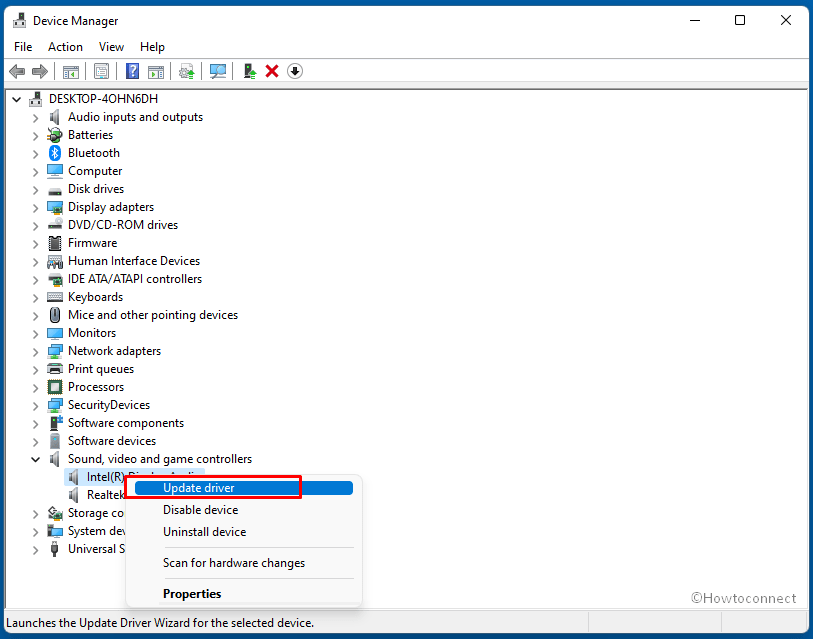
- Select the – Device Manager.
- Find the option that states – Sound, Video, and Game Controllers.
- Expand by double-clicking on it.
- There will be a list of the audio card drivers.
- Determine the audio device.
- Right-click on it.
- Click on Update driver.
- From the wizard that opens up, click on – Search automatically for drivers.
- In the same way, go to – Audio inputs and outputs.
- Double click on it.
- You will find a list of drivers.
- Right click on each of them and select – Update Driver.
- From the wizard that opens, click on – Search automatically for drivers.
- Restart your computer and see if the emission of Sound is proper.
- Still, the sound is not working then you can try updating the driver using another method. Follow from Step 1-9 as given in this way. When the Update Drivers wizard opens, select the option – Browse my computer for drivers.
- On the next window, click on – Let me pick from a list of available drivers on my computer.
- A window will appear named – Select the device driver you want to install for this hardware.
- Check the box for – Show compatible hardware.
- Now, you see a limited number of models available in the box.
- Select one of them and click on Next. Note that if it shows any warning pop up then select No.
- Select another model there and click on “Next”.
- After the driver is manually updated, restart the PC.
- The sound should work now.
Read – How to update drivers in Windows 11 (Best ways)
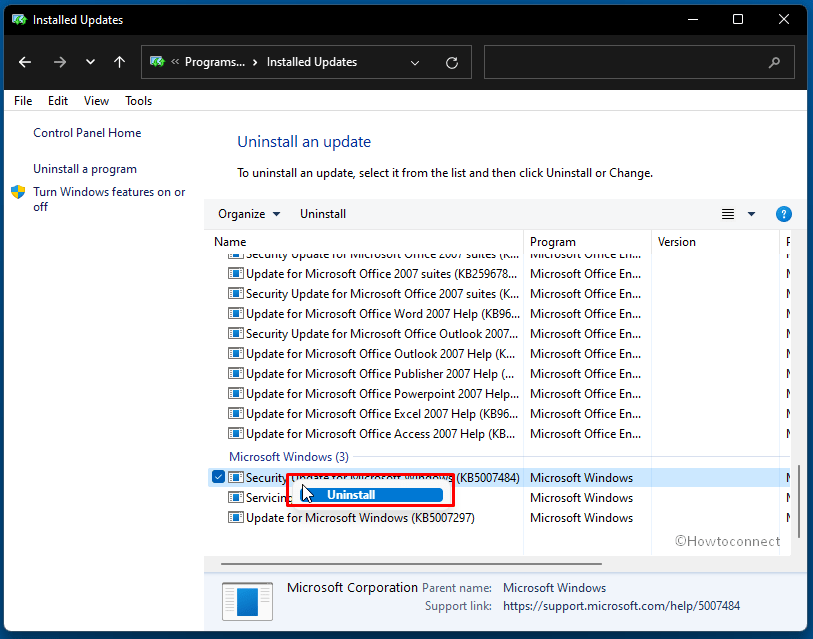
Way-10: Uninstall Windows 11 update
You might notice no sound after Windows 11 update in some cases. This occurs when the update is faulty and not suitable for the system. Uninstalling the Windows update will solve the audio issue so follow the guidelines –
- Press – Win+I.
- Select – Windows update.
- Click – Update history.
- From the next page, click – Uninstall updates.
- Another window will prompt up from Control panel.
- Right click the most recent update your system has installed and choose – Uninstall.
- Follow the instructions coming out on the screen.
Way-11: Restart Speaker Audio Services
Every function of Windows is controlled by Services that can be restarted, stopped, or started and the same with audio. If you are getting no sound on computer having Windows 11 Services may help you. Follow the steps and restart all the audio-related services –
- Click the Start from taskbar.
- Type – Services.
- Press – Enter.
- Find – Windows Audio.
- Right-click on it
- Select – Restart.
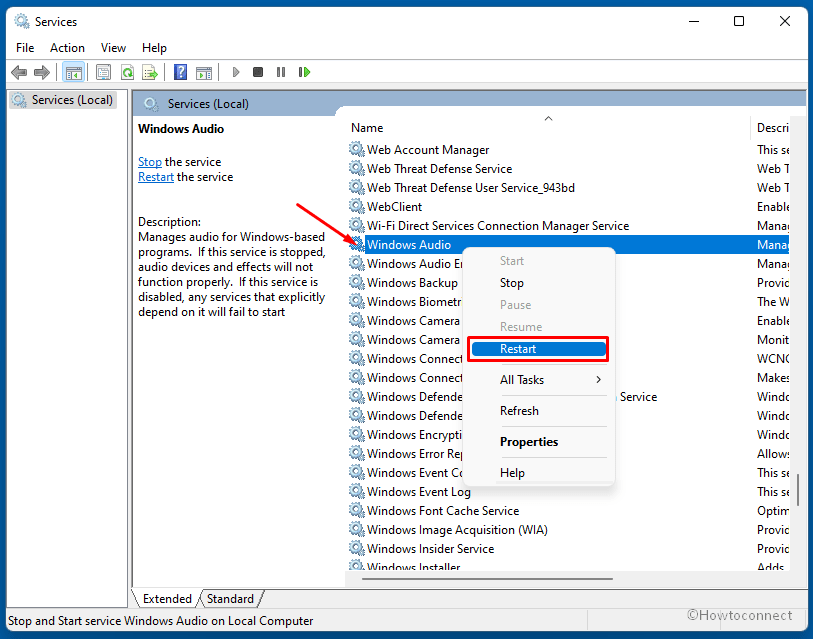
- Now, locate Windows Audio Endpoint Builder and Remote Procedure Call.
- Restart both the services, in the same way, one by one.
- Reboot the system.
Way-12: Update your Windows 11
Every Windows update includes functionalities as well as bug patches. Most of the patches are intended to fix the difficulties you are experiencing therefore updating your Windows 11 can quickly resolve Sound Problems.
- Right-click on the – ‘Start’.
- Select – ‘Settings’.
- Click – ‘Windows Update’.
- From the right pane, click – Check for updates.
- Your system will now scan for pending updates, download them if available and ask you to reboot the system.
- Click – Restart now.
Way-13: Uninstall the Audio Drivers
Many times, audio problem occurs because the sound driver is not working in Windows 11. This case happens when a malfunctioning or buggy driver is installed. As a result, it involves conflict with the system files and ruins the sound settings. Uninstalling the Audio driver may fix the issue in this situation.
- Press the – Windows +R.
- Type – devmgmt.msc.
- Press Enter to launch the Device Manager.
- Look for – Sound, Video, and Game Controllers.
- Double click to reveal the drivers’ list.
- Right-click on the Audio card drivers.
- Select the audio device.
- Right-click on it and choose – Uninstall device.
- A pop will appear giving you a warning; where make sure that this option is unchecked – Attempt to remove the driver for this device.
- Click on – Uninstall.
- Wait for the process to complete.
- Restart the computer.
- Now check if Windows 11 sound is working perfectly.
- In case, the audio is not up to the mark then again follow Step 1-8 as it is in this method.
- When the warning pop up appears, check – “Attempt to remove the driver for this device”.
- Select -Uninstall.
- Now, go to the Official website of the manufacturer of your laptop/computer.
- Find the latest version of the driver and download it.
- Install the driver and check if sound is fine.
Way-14: Disable All Enhancements
This solution was mainly used in Windows 10, but we are providing here because in case Windows 11 adds this setting in future it will be useful for you. You would understand that this setting is not available till now. Disable the enhancements using the below guidelines -:
- Press – Winkey+R.
- The Run command will open.
- Type – mmsys.cpl.
- Hit the – Enter.
- Once the ‘Sound’ window is displayed, the Playback tab would be selected by default.
- Right-click on Speaker/Headphone and choose – Properties.
- Go to the Enhancements tabs.
- Check – Disable all sound effects.
- Click – Apply.
- Next, click on OK to Confirm.
- Restart the Windows 11 computer.
- Chek on the sound if it is working properly.
Way-15: Change Audio Format
Sound not working in Windows 11 error may happen when your laptop or computer doesn’t support the audio format selected by default. Oftentimes, this issue might be generated when you change the format. To activate the sound on your computer follow the steps –
- Press Windows logo key and R at a time and type “mmsys.cpl”.
- Hit ‘Enter’ to launch the Sound window.
- Right click on the device shown in the list for the modification of the settings.
- Select the – ‘Properties’.
- Go to the Advanced tab.
- In the Default Format section, click on the dropdown.
- Use the Test button and check different audio bit formats to confirm which one is proper for your computer.
- Once selected, click OK to save and apply this audio format.
- Restart the system to check if the audio is working well.
Way-16: Manually update driver for IDT High Definition Audio CODEC
Sound Not Working in Windows 11 might trigger because of issues with the audio system IDT High Definition Audio CODEC. Fortunately, you can fix it through driver update manually which lets you select the sound driver you want to use. Keep in mind that all systems don’t have an IDT High Definition Audio CODEC. Therefore, check if your system has this driver using Device Manager and then run a manual update using the guidelines –
- Press Winkey and R simultaneously.
- Type – devmgmt.msc.
- Hit the – Enter to open Device Manager.
- Look for Sound, video and game controllers.
- Click the arrow next to it.
- Locate – IDT High Definition Audio CODEC.
- If you find this in the list then right-click on it.
- Select – Update driver.
- When a separate window opens, click on Browse my computer for drivers.
- On the next page select – Let me pick from a list of available drivers on my computer.
- Now you notice a list of pre-installed drivers.
- Select – High Definition Audio Device.
- Click – Next.
Way-17: See if permission is configured properly
This solution will work if the microphone sound is not working in Windows 11. Check the privacy settings configuration using the below steps –
- Click – Start.
- Select – Settings.
- Choose – Privacy & security.
- Go to the right pane and click on – Microphone.
- Turned on the setting for – Microphone access.
- Also, turn on – Let apps access your microphone.
- In case a particular app is creating the problem then move down and make sure that the toggle for the app is turned on.
Way-18: Boot In Safe Mode
If the issue causing the sound not working on Window 11 is basic, you can use any of the above methods to get the same resolved. But when the problem persists, restarting the system in safe mode is the best option. The following are the procedures that must be taken to boot into safe mode:
- Click the – Start.
- Type – MSConfig.
- Hit the – enter key
- The System Configuration window will open.
- Click on Boot Tab
- Check the Safe Boot option
- Select – Minimal (Usually it is selected by default configuration).
- Click on OK.
- Now Restart the system by selecting the option displayed.
- Check for sound is good now.
Methods list:
Way-1: Restart the PC
Way-2: Check the Volume
Way-3: Check Speaker Connections
Way-4: Check the Speaker output
Way-5: Check Sound Settings in Volume mixer
Way-6: Enable Playback Device
Way-7: Run The Audio Troubleshooter
Way-8: Check the Windows 11 Sound Setting Options
Way-9: Update The Audio Drivers
Way-10: Uninstall Windows 11 update
Way-11: Restart Speaker Audio Services
Way-12: Update your Windows 11
Way-13: Uninstall the Audio Drivers
Way-14: Disable All Enhancements
Way-15: Change Audio Format
Way-16: Manually update driver for IDT High Definition Audio CODEC
Way-17: See if permission is configured properly
Way-18: Boot In Safe Mode
That’s All!!