Blue Screen of Death is supposed to be one of the most annoying errors that force Windows to stop working and stick with a code. Sometimes, the problem sends device to frequent restart that doesn’t give users an opportunity to apply solutions. Windows 10 desktop unexpectedly stuck on blue screen or reboot loop and display USB_DRIPS_BLOCKER_SURPRISE_REMOVAL_LIVEDUMP indicates that you just need to effectuate the workarounds here. Numerous cases hint that faulty drivers are the prime cause of this BSOD.
The issue hints a USB device that will be surprise removed because it is blocking DRIPS. Talking about the reason, missing system resources or DLL files because of malware infection, or corruption in them come in the first place. Furthermore, conflicts between similar kinds of apps, bad sector in hard disk, low drive space suffering junk gathering, incorrect allocation of memory are also factors. Therefore, today we will discuss some possible methods which can resolve the issue.
USB DRIPS BLOCKER SURPRISE REMOVAL LIVEDUMP
Here is how to Fix USB DRIPS BLOCKER SURPRISE REMOVAL LIVEDUMP Error Windows 10 –
1] Disconnect and then connect external drives
Some users report that USB DRIPS BLOCKER SURPRISE REMOVAL LIVEDUMP Error in Windows 10 occurred after using a DVD driver or additional Hard Disk in the system. The solution is rather uncomplicated. Most cases witness that only disconnecting them for a while fixes the issue. Follow the below instruction and offer these items a momentarily break –
- Disjoint everything such as external Hard drive, DVD drive from the computer.
- Place them in an easily accessible and safe location.
- After then, Restart Windows 10.
- Sign back in and check for USB_DRIPS_BLOCKER_SURPRISE_REMOVAL_LIVEDUMP Error if it occurs.
- The issue is resolved completely? Plug the devices back in.
- Start any web browser and do a visit to the device maker’s website.
- Consequently, download and install the updated drivers from web pages and use them smoothly.
2] Update all Drivers
Stop Errors like USB DRIPS BLOCKER SURPRISE REMOVAL LIVEDUMP occurs due to having old, defective and outdated device drivers in the system. Reasonably, any computer should not have such a vulnerable driver in any condition. However, Windows Device Manager simplifies the whole task to a good extent. Administrative tool designated this utility shows the problematic drivers in yellow caution mark and thus updates them in a single click. See the procedure in the below steps –
- Take the mouse pointer to Start icon lying in the farthest left of the taskbar and do a right-click on it.
- When a menu appears, choose Run and let the dialog box appears.
- Type devmgmt.msc in the available blank text field and click Ok button.
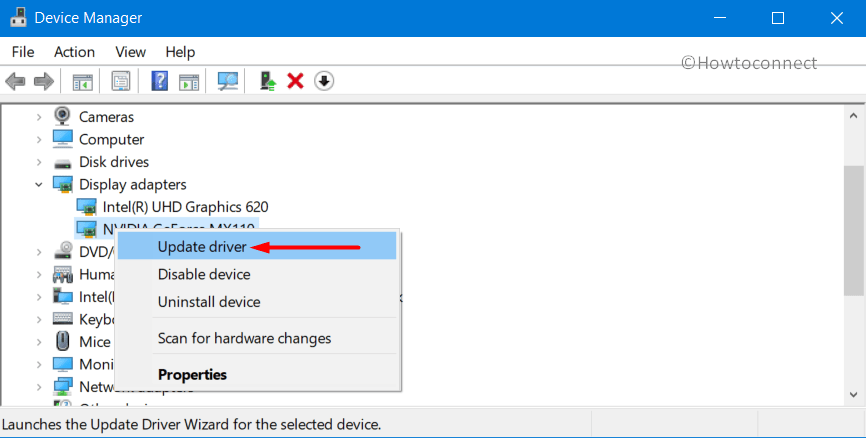
- Once Device Manager console is upfront, go through the devices list. Expand the device by double clicking where you notice a mark of exclamation.
- Upon expansion, perform a right-click on the driver and from the appearing menu, select Update driver option and allow the downloading begin.
- After the method gets over following the onscreen instructions, you will probably solve the existing BSOD error from the system.
3] Update Windows 10 by installing pending patches
Since the starting of Windows Microsoft exercises to push updates regularly for the OS to maintain security and include additional features. In the context of Windows 10, cumulative updates are the patches that contain fixes for bugs and issues. There might be something that the updates can potentially remove USB DRIPS BLOCKER SURPRISE REMOVAL LIVEDUMP. You might often keep these things pending because of the lack of time and suitable network on your Windows 10 device. An outdated OS is prone to get Blue screen error easily. Therefore, instantly give an attempt to update the OS first installing those cumulative updates. To receive them in System, the procedure is as follows –
Important – Before starting the method, make sure there is an active Internet connection rather a fast data transfer speed. Try using Ethernet cable or Wi-Fi. If currently, you are running the Mobile Data, ensure disabling of Metered connection first, contrarily, Downloading will not begin.
- Open Windows Setting.
- From the app interface, click on Update & Security.
- Go to Windows Update located at the left flank and jump on the alternate pane.
- On the right, never care for the “You’re up to date” dialogue and select Check for updates button.
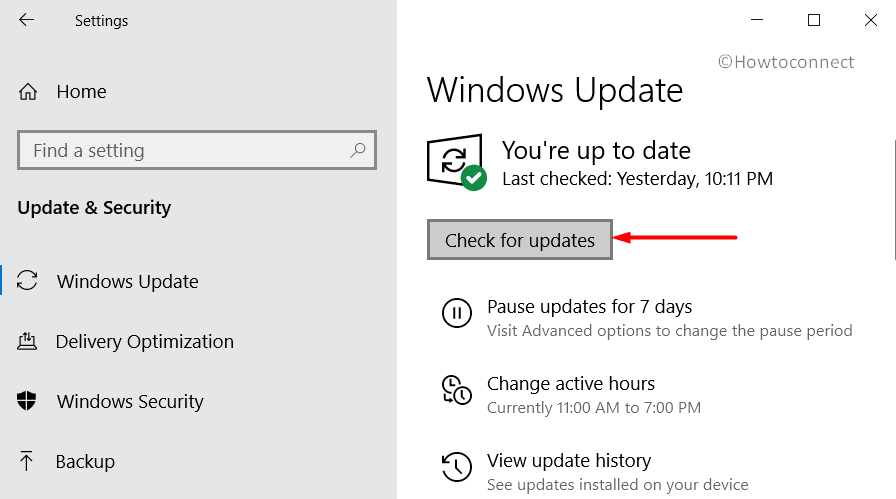
- System will search for the pending patches that will be visible here on the page. You will need to select the Download button under each.
- Once the Downloading is finished, you will be asked for a reboot to complete installation in most of the cases.
- Restart now the device and wait until the process finally ends.
4] Recover Corrupted System Elements and missing DLL files
Sometimes during system resources corruption DLL files also go missing. The result is USB DRIPS BLOCKER SURPRISE REMOVAL LIVEDUMP error. To reclaim these files from corruption, System File Checker would be super handy. Being carried out in the Elevated Command Prompt, this built-in utility can help you outstandingly. To continue, follow the underneath instructions –
- Click on the search icon or bar residing at the left of the taskbar.
- Type cmd.exe in the box provided here.
- Choose Run as administrator from the right side of the search result preview.
- After noticing User Account Control, give permission by selecting Yes.
- Let the elevated Command Prompt window come into shape and write the following –
sfc /scannow.
- Hit Enter.
- The tool will start working and replaces the corrupted system files with the original files from cache automatically.
- Wait a little as the process will consume approx 10-20 min.
- Lastly, restart the Windows to make these resolutions effective.
- Once returned back to the desktop, check if the Blue screen of Death error still exists in the system.
5] Uninstall problematic Windows Update patches
Windows Update when stops at the midway may throw Blue Screen error. As a part of resolution of the error, reset of those files only helps. You can uninstall those patches using below guidelines –
- Access to Windows Settings app by holding down Win+I keys together.
- Select Update & Security.
- On the consequent page, select Windows Update residing in the left pane.
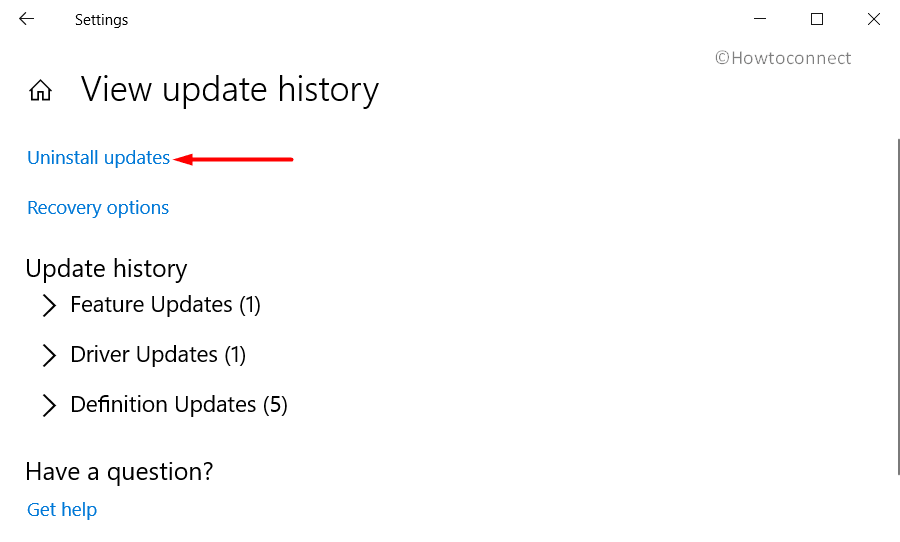
- Navigate to the right, click on the link saying View update history once you come across.
- Select the Uninstall updates link available on the next page.
- A new window “Uninstall an Update” will prompt up from Control Panel.
- Identify the most recently received patch in the list and select.
- Select the Uninstall option appearing at the top ribbon of the Window.
- Keep following the tasks shown on the desktop until these are deleted completely.
6] Delete Third party Anti-Virus Tool from Windows 10
Windows users intend to install anti-malware programs quite a lot before Windows Security made its way out in the system. Often these applications are free with basic features and offer great deals to prevent malware. But, as Windows Security is the best anti-malware tool in Windows 10, there is no need for those tools anymore. Additionally, using them can also be dangerous as they sometimes end up calling Blue screen error. Eliminating those programs is easy if you follow the below instruction –
- Press “Win logo+I”, the shortcut key combination to open Windows Settings app.
- Click on Apps.
- From the subsequent window, select Apps & features located at the left pane.
- Crossing over the corresponding right, reach out to third-party Anti-Virus tools in the list.
- Select the same and click the Uninstall button once seen in the extended pane.
- In case, UAC demands permission, select Yes to proceed.
- Follow the guidelines prompting on display to remove the tool completely.
7] Stop automatic Restart
As Windows prompt to reboot frequently you hardly find time gap to apply any solutions provided here. The Setting is intended to avoid impact of the OS crash on hardware but here presents an opposite scenario for you. So the first thing you need is to disable the automatic restart option from the core setting. Then, you will have ample opportunity to deploy resolutions for USB_DRIPS_BLOCKER_SURPRISE_REMOVAL_LIVEDUMP Error in Windows 10. Let’s see the method below –
- Start with saving and closing all the running ongoing files and folders.
- Hold down Windows logo and D keys at once to reach the desktop directly.
- Do a right-click on the This PC icon and select Properties from the list of options.
- System window from the control panel will develop immediately.
- Walk ahead and choose “Advanced system settings” link from the left pane.
- Once a new window rolls in namely System Properties, enter the Advanced tab.
- Move a little downward and select Settings found under the Startup and Recovery section.
- A new wizard comes out; navigate to System failure and unmark the box against the Automatically restart option.
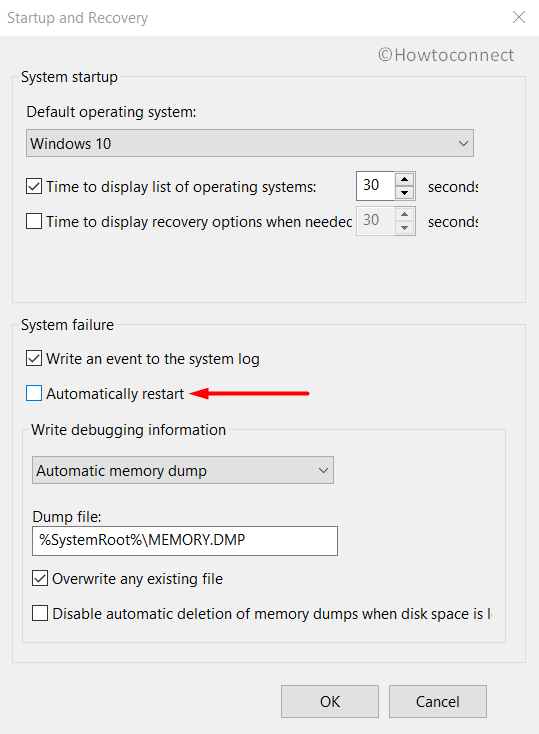
- Select the OK button from the lower part of the window to proceed ahead.
The changes will no longer allow the system to reboot repeatedly. In the meantime, you can employ the other workaround in an easy manner.
8] Run Blue Screen Troubleshooter
Blue screen errors are prevalent and a good number of devices using Windows 10, Microsoft planned out of the box. The result is a default tool named Windows Blue Screen Troubleshooter (now an online walkthrough method replaces this). With the release of Fall Creators Update this handy utility took place in Settings app Under Troubleshooting. You can rely on the built-in tool since it will potentially resolve the Stop Error issue. Here is how to implement the tool –
- Press the Windows key and pick the cog (gear-shaped icon).
- When the application is completely loaded, move on to Update & Security section and click on it.
- The succeeding page will show Troubleshoot subsection in the left pane; select this and then jump to the corresponding right.
- Here, step down to find Blue Screen option on the page and do a click on it once reached.
- Select Run the Troubleshooter.
Now, the utility will start identifying Stop error in the system and fix automatically once discovered. In the end, USB DRIPS BLOCKER SURPRISE REMOVAL LIVEDUMP Error will be fixed automatically in Windows 10.
9] Boot Windows 10 in Safe Mode
For resolving error USB DRIPS BLOCKER SURPRISE REMOVAL LIVEDUMP, entering the system in Safe Mode comes at the first priority. This is among the most common fix in respect of the issue. Upon application of this workaround, the device will load only the essential programs and you need to check the reason manually. Follow the guidelines to boot the system into Safe Mode –
- Right-click on the Start icon and choose Settings from the list appears there.
- When Windows Settings come on the screen, select Update & Security.
- After consequent page takes the shape, choose the Recovery subsection lying on the left.
- Cross the adjacent right, locate Advanced startup and click Restart now button.
- Once Windows completes the initial cycle of rebooting, it will ask you to select the next step. Choose Troubleshoot from the arriving screen.
- Proceed further, click on Advanced options and then choose Startup Settings.
- When the system starts showing that the device can be rebooted with the use of additional settings, select “Restart” to move ahead.
- After returning to the sign in screen after completing restarting the secondly, Press f4 in order to Boot into Safe Mode.
10] Kill Malware using Windows Security
Threats are all around living on the web and they are huge in number. They have a multilateral way of spreading vulnerabilities also on PC. Once got entrance within the system from suspicious websites or clicking a link in spam mail, they manipulate with system resources. In the whole process, these files are either corrupted or deleted and call in USB DRIPS BLOCKER SURPRISE REMOVAL LIVEDUMP. To deal with the invasion, you need to start Windows Security, the default anti-malware for the OS, and discard them. Here is the method below –
- Press Windows logo key, type Security and then hit enter.
- Once the application unrolls, select the Virus & threat protection.
- Now click on the link saying Scan options.
- Once all the options show up, select Full scan radio button and click on the Scan now.
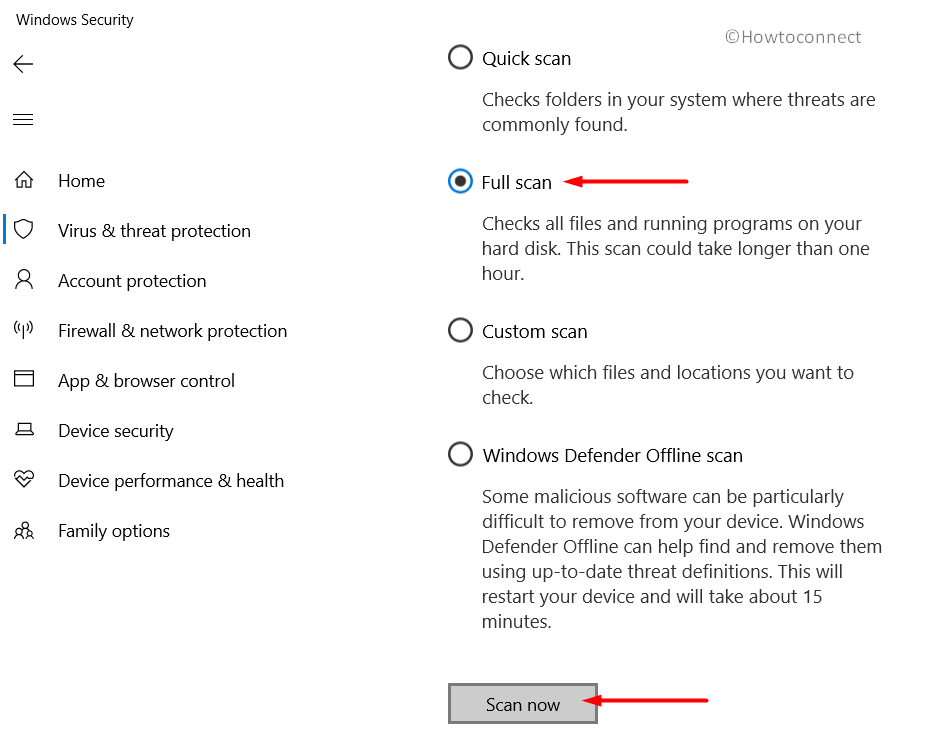
- The built-in tool will start detecting any virus component in the system. Once the scanning gets accomplished, the result will be displayed on the screen. If there are any indications of malware, select Clean Threats button to clear off them from the system.
- On the subsequent page, the tool will offer you three actions for the threat. Click Remove initially and then choose on Start actions to begin removal.
11] Update BIOS
BIOS is one of the most sensitive moreover core components in the PC. However, it is being a software component from the manufacturer, many hardware items are entirely dependent on this. You need to be more careful whiling modifying the settings. Outdated BIOS might also be a cause of USB DRIPS BLOCKER SURPRISE REMOVAL LIVEDUMP, therefore, you should now update the BIOS with below steps –
- Press Win+S, type msinfo32 in the blank search box and hit enter.
- When you will find an empty text area in the System Information window, type “BIOS Version” and also press Enter key from the keyboard.
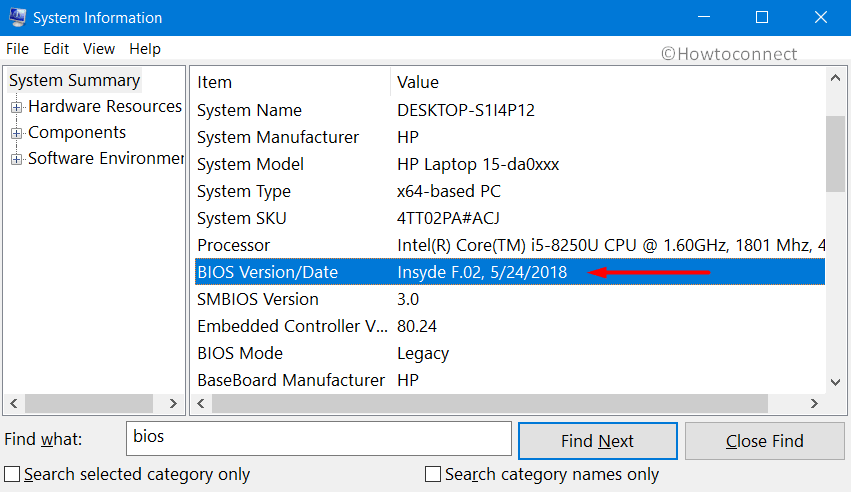
- You will experience the BIOS Version/Date installed on the PC.
- Now, Leave that information page as it is and launch any web browser.
- Explore and access the manufacturer’s website for BIOS using the information you have already seen in the systeminfo.
- If an updated version is available, initiate the Downloading of the latest on from that page. In case your device is a laptop, ensure the Charger is plugged in continuously till the installation is finished completely.
- Double click on the file and install this BIOS software on Windows.
- After concluding the process successfully, Restart the device and make these changes effective.
12] Fix RAM issues and Memory allocation
Incorrect allocating Memory often presents USB DRIPS BLOCKER SURPRISE REMOVAL LIVEDUMP Error in Windows 10. Therefore, you have to focus on resolving the possible RAM problems as well. Windows Memory Diagnostic is the most helpful utility to deal with these cases. Here is how you should move on –
- Combinedly press Windows and S to invoke Taskbar Search.
- When it exposed, type memory in the empty box and then select Windows Memory Diagnostic to open.
- On the subsequent small wizard, click on the “Restart now and check for problems (recommended)” option. This will allow Windows to reboot normally.
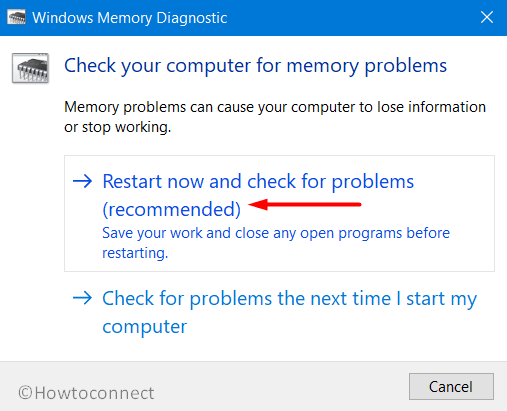
- After sign back, the tool will start checking memory problems in the system. It will additionally resolve detected problems automatically. The progress rate will be exhibited in real-time in percentage.
- As the percentage reaches 100, the device will again reboot automatically.
- After finishing the cycle and signing in, when you directly return back to the desktop, the result will be available in the notification area of System Tray.
13] Uninstall Similar Programs
Programs installed for similar functions often collide with one another and results in losing valuable data. USB DRIPS BLOCKER SURPRISE REMOVAL LIVEDUMP Error often occurs due to lost and corrupted files. Therefore, you need to remove these programs from the system using the below instructions –
- Hover the cursor to the left bottom end of the Taskbar and end up making a right click on Start menu.
- Click on the Windows logo on keyboard, type appwiz.cpl press Enter.
- After Programs and features wizard unfurls in the display, have a look in the list of installed apps.
- Locate the apps of similar kinds in the system causing USB DRIPS BLOCKER SURPRISE REMOVAL LIVEDUMP Error.
- Do a right-click on each one successively and select the Uninstall option.
- Follow the next steps according to the instructions that arrive on display to delete it completely.
14] Free Disk space
Commonly Temporary files are termed as junk and they really come to no use further. These files keep on storing on your every activity in the disk drive and occupy huge space. As space runs short, problems like USB DRIPS BLOCKER SURPRISE REMOVAL LIVEDUMP BSOD Error will make a way out. To stop the harmful consequences, you need to evacuate them using the Disk Cleanup tool. Here is how to use the built-in eraser utility –
- Summon the Run dialog by pressing “Windows logo + R” hotkeys together.
- Type cleanmgr.exe in the available space and hit the enter key as well.
- The Disk Cleanup will start calculating the amount juk that can be deleted. From the visible wizard, come down to bottom and hit the Clean up system files button.
- Now, in the Disk Cleanup for (C:) popup, look into Files to delete section and tick all boxes except Downloads.
- Select the Ok button from the bottom of this wizard and allow the cleanup begin.
- This method might take some amount of time, keep patience accordingly and let it finish normally.
- Reboot Windows and after logging in, check if the error persists.
Important – Before selecting the Ok button from the bottom, ensure you have nothing left in Recycle Bin. If something is here, restore them in respective locations.
15] Repair Windows Image Files in the system
Windows Image Files very easily fall in discrepancy even on a minute erroneousness. Corrupted data like those can easily show USB DRIPS BLOCKER SURPRISE REMOVAL LIVEDUMP Error in Windows 10. Therefore, we need immediate action against the issue. “Deployment Image Servicing and Management” aka DISM have the power to effectively resolve these. You have to follow the below instructions only to run the tool –
- Open Command Prompt as administrator.
- When in the black window, enter the following command at the place where a cursor is blinking –
DISM.exe /Online /Cleanup-image /Restorehealth
- DISM tool will power up after pressing the enter key.
- This will rectify all the trouble related to Windows image files eventually.
- The method might be a lengthy one, but thoroughly helpful. So, do not dismiss until it finishes normally.
- Once completed, restart the device and when signing back in, perform a check for USB DRIPS BLOCKER SURPRISE REMOVAL LIVEDUMP Error.
Hopefully, it will resolve the Blue Screen issue.
16] Perform System Restore
Windows registry hives keep records of all the programs you uninstall or install be get easily broken when anything misshapen during these processes. USB DRIPS BLOCKER SURPRISE REMOVAL LIVEDUMP maybe the outcome of the scenario. Fortunately, you can resolve this by a move back to earlier point. System Restore features you to jump back to a previous state when your PC was fine.Use below guidelines to perform system restore –
- Press Windows Key and after Start Menu appears, keep typing rstrui using the keyboard.
- Select the same to launch System Restore wizard.
- Move ahead to the aforesaid wizard, choose Next to proceed.
- On the following page, select Show more restore points to reveal all previous times.
- Choose the most recent one from the table and again do a click on Next button.
- Proceeding forward to the last page, click on the Finish button positioned at the bottom to start the restoring process and follow the onscreen instructions.
17] Repair Poor areas in the Hard Disk
Due to continuous and long-time use, Hard Disk generates poor areas in it. USB DRIPS BLOCKER SURPRISE REMOVAL LIVEDUMP Error in Windows 10 occurs in this case. Thankfully, Disk Checking tool can deal with these sectors once administered in the Elevated Command Prompt. To run the tool, move with the below guidelines –
- Simultaneously press Ctrl + Alt + Del keys until a new screen hits the display.
- Select Task Manager to open the app.
- In the UI, choose File option located at the top menu bar and also select Run new task option.
- Type “cmd” text in the blank field.
- Going down, check the box ahead of “Create this task with administrative privileges”.
- Finally, hit the enter key to access Elevated Command Prompt immediately.
- When in the dark window, type underneath command at the base of the blinking cursor. Hit Enter key and lat the Disk Checking Utility preview the disk status only.
chkdsk C: /f /r /x
To fix the poor areas in the volume, we need to add a few more prefixes with the command. They are-
C: designates the drive where the Windows 10 you have installed. For example, you are using other drives, type D:, E: or any.
f assigns fixing the detected areas found in the disk volume.
r refers to initiate the detect process to find out bad areas inside of the Disk volume.
x for dividing up the resources to facilitate the detection process.
- Pressing the Enter key after typing the above mentioned command at the winking cursor will start the Disk Checking Tool to fix the poor areas automatically. This might be a long and time taking, hold the nerve until it ends up completely.
- After it settles, restart the device using the usual way. See if there is any USB DRIPS BLOCKER SURPRISE REMOVAL LIVEDUMP Error present.
By now, you have probably resolved USB DRIPS BLOCKER SURPRISE REMOVAL LIVEDUMP Error in Windows 10. It’s simple since the workarounds are super effective ones. In another instance, if you couldn’t resolve the issue still, don’t be frustrated. A perfect way as last resort, you can execute a clean installation of Windows 10. If done with full perfection, there shall not be any more issues occurring next.
After making a decision that you will do a clean installation, ensure to connect the device with the internet initially. Take a backup for all the important files and fetch them out of the device in USB or additional hard drive. You may seek help from skilled professionals to avoid any hustle.
Methods:
1] Disconnect and then connect external drives
2] Update all Drivers
3] Update Windows 10 by installing pending patches
4] Recover Corrupted System Elements and missing DLL files
5] Uninstall problematic Windows Update patches
6] Delete Third party Anti-Virus Tool from Windows 10
7] Stop automatic Restart
8] Run Blue Screen Troubleshooter
9] Boot Windows 10 in Safe Mode
10] Kill Malware using Windows Security
11] Update BIOS
12] Fix RAM issues and Memory allocation
13] Uninstall Similar Programs
14] Free Disk space
15] Repair Windows Image Files in the system
16] Perform System Restore
17] Repair Poor areas in the Hard Disk
That’s all!!