No matter how much improved a laptop is in terms of performance, a non-functional touchpad ruins everything. Windows 11 touchpad not working has become an annoying problem in recent times although most users have experienced similar trouble at least once in their lifetime. Windows laptops mostly have this issue if it possesses anything below 8th generation Intel chip. Some users with AMD CPU face numerous hardware compatibility issues too including touchpad that cannot zoom, pan, or pinch.
Windows 11 touchpad issues render multiple problems like it might be completely non-functional, a slowly operating cursor, cursor jumping all over, and many others. Furthermore, you may get scroll not working and gestures not working troubles. Touchpad issues in laptops mostly occur due to accidental change of settings where experts figured out drivers incompatibilities plays a prominent role. Unless the touchpad is completely functional, we cannot really work on a laptop smoothly. However, you can use external peripheral to make the device functional at the same time perform few simple tasks that can fix the touchpad whether it is of any brand like HP, Asus, Dell, Lenovo, Acer, or other.
Windows 11 Touchpad not working
Here is how to fix Windows 11 Touchpad not working –
Way-1: Clean the Touchpad
It’s quite needless to say that, there won’t be dirt deposits on the trackpad. There will be a definite accumulation of grime, skin oils on the touchpad over time. This will make the touchpad unresponsive or the response rate will be a bit slower. In such a case, the first thing you need to do is cleaning.
For perfect clean-up, you can try with a soft piece of cloth better be moisten. Some cleaning agents are available too for this purpose containing isopropyl alcohol, you can use them if necessary to scrub the laptop’s part. When proper neatness is assured, you can try dragging a finger around the surface to check the response.
Way-2: Restart the laptop
Some temporary glitches in Windows 11 OS get easily fixed after running a simple restart to the machine. If the touchpad stops working, there will be difficulties in performing reboot. In that case, you have to access the keyboard shortcuts and do the same by following steps –
- Initially, save the ongoing tasks.
- Once on the desktop screen, press – Ctrl+Alt+Delete keys together.
- When Shut down menu appears, use the keyboard arrow key and choose – Restart.
- Press – Enter.
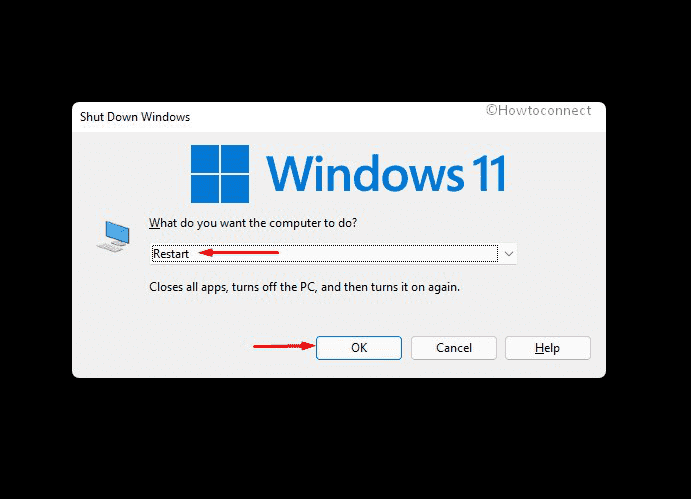
- After restarting, check if Windows 11 Touchpad not working issue is fixed.
Way-3: Enable touchpad using Keyboard shortcuts
Irrespective of brands, every laptop comes with some keyboard shortcut combination in order to enable or disable the touchpad. This is really necessary for the users who run an external mouse and does not want to have a conflict between this two. Therefore they can quickly access the hotkey combination.
It may too happen that, you have disabled the touchpad using the keyboard shortcuts and slipped up. Some of the Windows 11 devices have an Fn key that, in combination with one of the F1 – F12 function keys, can turn on or off touchpad. To find out which hotkey works for your system, press both of these at the same time.
Again, there are some laptop brands that have touchpad locking arrangements possibly a square on the top rightmost side of the touchpad. There might be indicating light as well to guide users. Illumination there hints the touchpad is enabled and off as disabled. You can check the light in that case and tap the square twice if it is found unlit.
Way-4: Check if the touchpad feature is enabled in Settings
Not only the Touchpad can be enabled or disabled using key combinations, but also the same settings are available in the Windows Settings app too. Some users have reported having Windows 11 Touchpad not working issue occurs after installing a Windows update. This may happen if the system itself turned it off while installation. Therefore, follow the below steps and check if the touchpad is enabled –
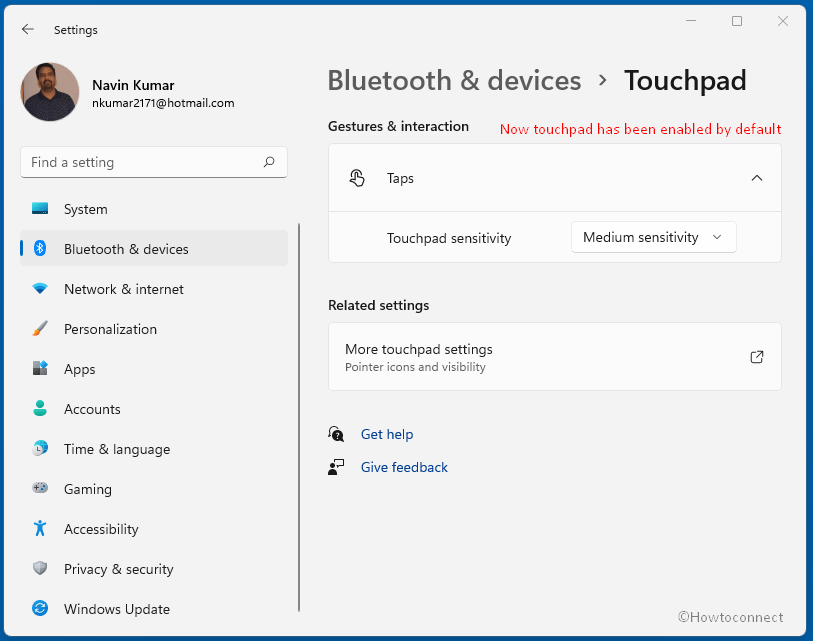
- Press – Windows key and I.
- In the Settings app, click – Bluetooth & devices.
- Select – Touchpad from the right pane.
- Turn on the toggle switch located beneath Touchpad as in the screenshot.
Way-5: Make sure Touchpad is not disabled from BIOS settings
Windows 11 Touchpad not working issue may also happen if there is a significant change in the BIOS settings. Most of the users are a bit unaware of these Settings as this is not so common in the regular functionality of a laptop. There are options to make the touchpad enable and disable from BIOS settings too.
In order to fix up any touchpad issue in Windows 11, you need to access the BIOS settings and enable it from there. For that, follow the below instructions –
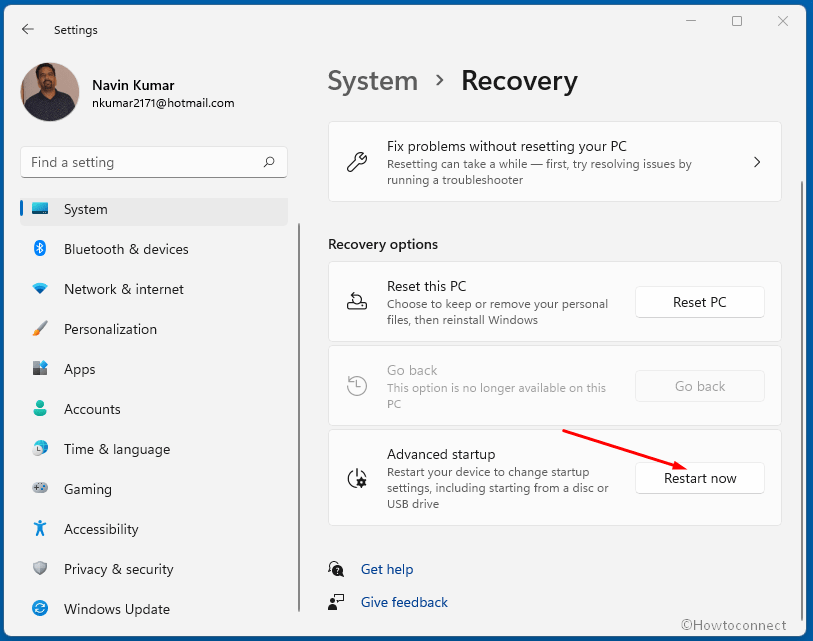
- Right-click on the Start button and select – Settings.
- Go to the right pane, scroll down and click on – Recovery.
- On the following screen, select – Restart now located under Advanced startup.
- Windows after restarting will show up a blue screen with a couple of options.
- Choose – Troubleshoot from here.
- From the following screen, click– Advanced options.
- Hit – UEFI Firmware Settings from next.
- Scroll to the bottom on the next screen and click – Restart.
- After Windows completes the restarting, you will be in the BIOS.
- Look for Touchpad settings here and check if it is enabled.
- If you see it in the Disabled state, click the same to make it Enabled.
Way-6: Update the Touchpad driver
After completing the above fixes and confirming Touchpad is enabled in your Windows 11 device, you have to think out of the box now. Until now, you have checked if the touchpad is not working because it is unexpectedly disabled. Start troubleshooting with the most important thing for controlling the hardware devices. Having said that, we have brought up the drivers who actually control the interaction between hardware peripheral and the software driving them.
In most cases, Windows 11 Touchpad not working is caused by the driver incompatibilities. When the program is outdated, you can expect a variety of issues into the device and ruining normal operation. Hence, you need to keep all of them updated but it is matter of relief that Windows 11 complete this task automatically. However, there are chances to be missed out and you better follow the guidelines to update the touchpad driver manually –
- Press Windows key and R together.
- Type – devmgmt.msc in the Run dialog box.
- Press – Enter key.
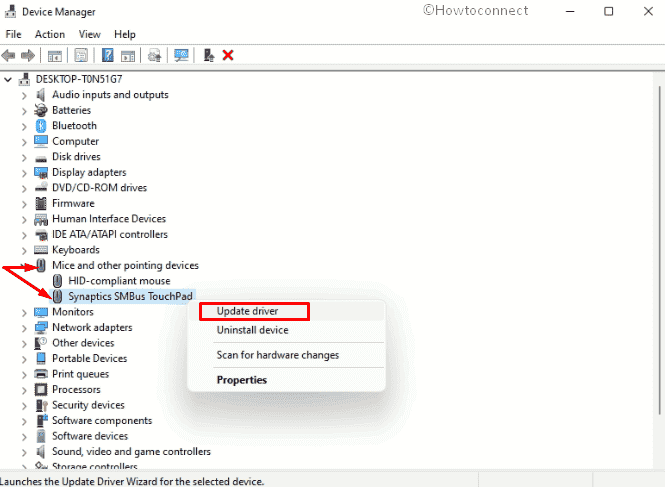
- When Device Manager appears, scroll down to Mice and other pointing devices.
- Expand the driver list by double-clicking the device.
- If your touchpad is not showing in Device Manager, click on Action from menubar
- Select – Scan for hardware changes.
- Now, right-click your touchpad driver from the list.
- Select – Update driver option.
- From the next window, select – Search automatically for drivers. At this point, make sure that your device has got a stable internet connection as the system will download the necessary update file for the driver.
- Follow the on-screen guidelines until the task finishes successfully.
- Once done, restart the computer and check if the touchpad is working properly.
Way-7: Reinstall the touchpad driver
There are times when updating driver is unable to fix up a problem coming from hardware peripherals. It’s not surprising since there are thousands of reports explaining how buggy update deteriorates a simple issue. Software vendors oftentimes release update files on their websites that are not worthy for the machines. Some files are uploaded with potentially dangerous bugs while a few come with missing components. If you install those to the system, it won’t fix Windows 11 Touchpad not working issue. Instead, there is a possibility to have more trouble with the Operating System.
This problem has been existing for a long time and Microsoft had better plans to bypass this. Device Manager has an option to Rollback the defective update and also allows to uninstall the same. If you are facing the unresponsive touchpad problem even after updating the drivers, try these options by following the below guidelines –
- Press – Windows + X.
- Select – Device Manager.
- Being moved to, locate – Mice and other pointing devices.
- Double-click the same to expand the driver list.
- Right-click the touchpad driver for your machine.
- Select – Properties option.
- On the following popup window, enter into the Driver tab.
- Click on – Roll Back Driver button to omit the current update and get back the previous version.

- After completion, restart Windows 11 and check if the Touchpad is working perfectly.
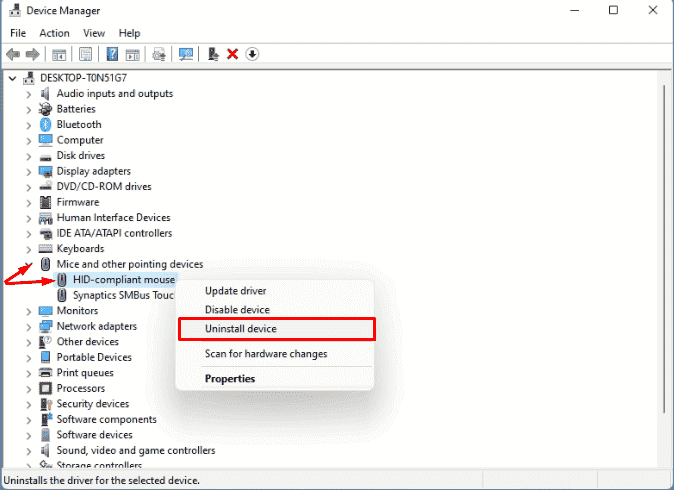
In case that doesn’t help, uninstalling will probably be the preferable solution. For that –
- From the Driver tab, click – Uninstall Device. This will completely remove drivers’ files and the registry entry of the software.
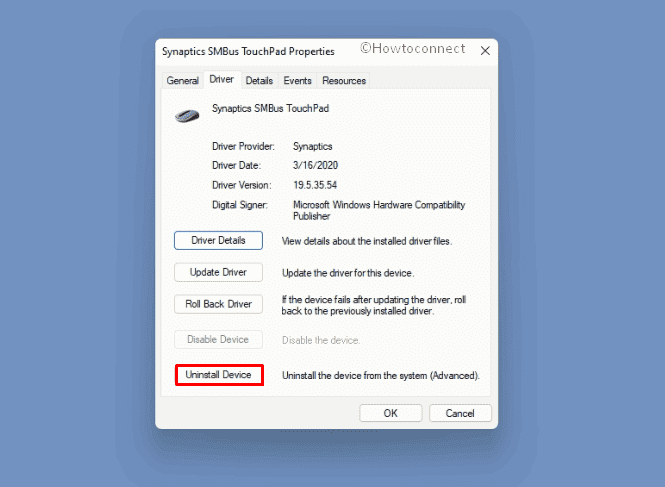
- Restart the Windows device to have the Driver with the default version.
Way-8: Tweak Windows Registry to make touchpad working
Registry Editor is a storehouse of all the hidden settings in the Operating System and a good number of users have fixed Windows 11 Touchpad not working issue just by tweaking this. But keep in mind that the resolution will be effective only when there is a suitable key in your system. If not, skip this solution and proceed with others.
Tweaking Windows Registry is professional work and regular users often find it difficult to accomplish. However, we are trying to show you the proper guidelines in the below section to do it accurately. Follow the steps precisely –
- Press – Windows + S.
- Type – regedit in the search bar.
- Press – Enter key to open Registry Editor.
- Select – Yes on the User account control prompt.
- Navigate to the following path –
Computer\HKEY_LOCAL_MACHINE\SOFTWARE\Synaptics\SynTP\Install- On the right hand side pane, double click on DeleteUserSettingsOnUpgrade DWORD.
- In case, the DWORD is not there, you can create one manually. For that, Right-click the empty space and select – New => DWORD (32-bit) Value.
- Double click the DWORD and set the value data to 0.
- Click OK to save the changes.
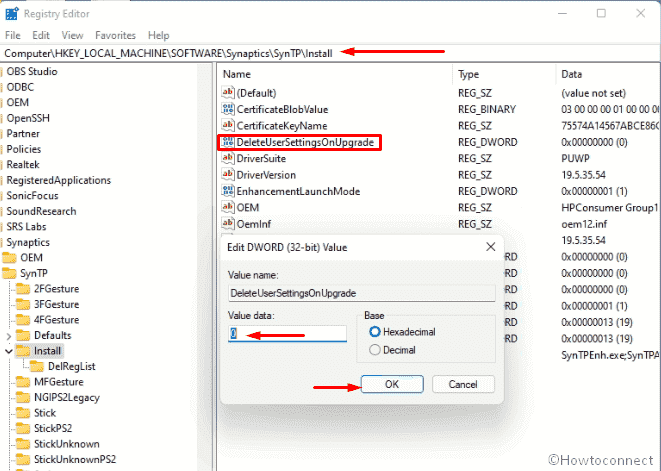
- Restart the computer and check whether the touchpad is working now.
Way-9: Run Windows Hardware and device troubleshooter
Hardware peripherals can render trouble anytime since they remain always in use. Microsoft experts have got it right and provided a much-needed troubleshooter. Windows Hardware and Device troubleshooter is a pragmatic tool to fix hardware-related problems without using any third-party resources.
In order to fix Windows 11 Touchpad not working problem, you can simply rely on the default hardware troubleshooter. To apply the utility, follow the below guidelines –
- Press – Windows key.
- Type – cmd.exe.
- Right-click on Command Prompt and choose – Run as administrator.
- To allow User Account Control, click – Yes.
- Copy-paste the following in the command prompt and hit Enter–
msdt.exe -id DeviceDiagnostic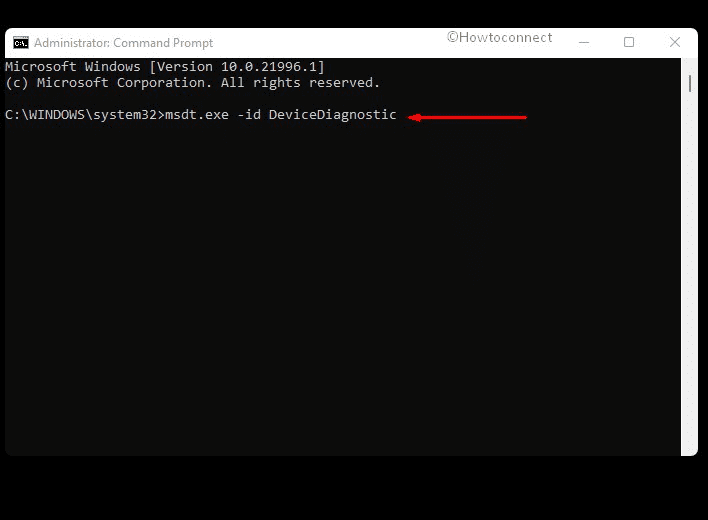
- When Hardware and Devices Troubleshooter prompts, click – Next.
- If the utility presents a list of display devices that have issues, select your Touchpad since you want to troubleshoot the same.
- Click – Next.
- If the tool comes up with an automatic repair, hit – Apply this fix.
- Follow the further instructions the utility says.
Way-10: Reset Touchpad
Sometimes Windows devices get troubles and users find it really difficult to trace out the root. Some problems do have unknown reasons as well and you cannot fix them normally. Microsoft Windows experts observed this and put Reset option for some of the hardware devices.
Resetting helps to bring back the original touchpad settings leaving no room for any problems to occur. You can go through the Settings app using steps for the same –
- Press – Windows + I.
- From the Settings app, click – Bluetooth & devices.
- Choose – Touchpad from the left side pane.
- Scroll down to the bottom in the right.
- Click – Reset.
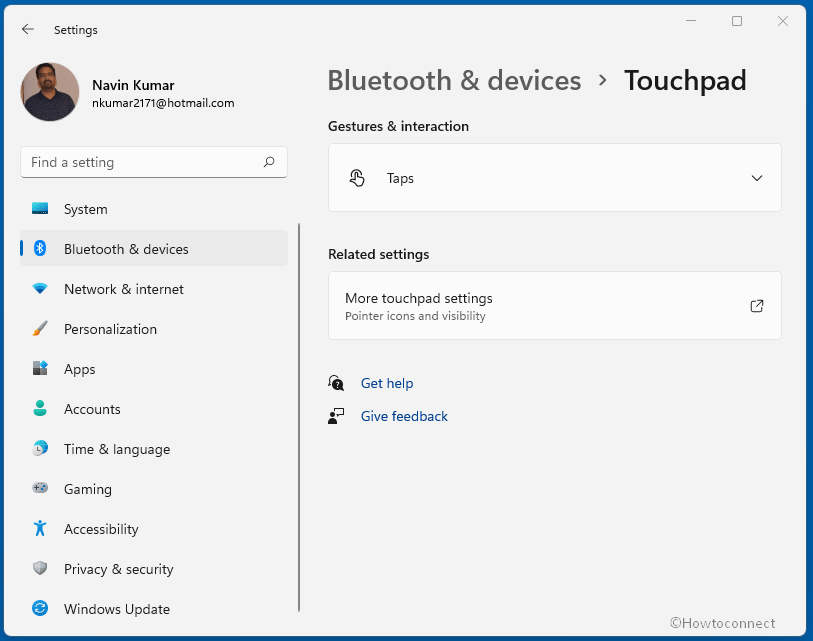
- Once the resetting ends, check if the touchpad is working properly.
Way-11: Stop tablet input service
Some users who have laptops with touchscreen functionality often find Windows 11 Touchpad not working problem. This may happen due to conflict between touchpad and touchscreen services. Windows has a service called TabletInputService which often has disputes with touchpad functionality. In most cases, the solution is pretty simple, just to disable the service. But users often get frightened to do so thinking that touchscreen will no longer perform properly. That’s not true in reality and disabling service never affected the work.
However, if you think of enabling the service, anytime you can do it from the Services app. Here are the guidelines to disable TabletInputService –
- Press – Windows key and R to call upon Run dialog.
- Type – services.msc.
- Click – OK.
- After the Services app opens, locate – Tablet PC Input Service or TabletInputService.
- Right-click the service and select – Stop.
- Restart the device and check if the touchpad is working normally.
- If the issue still persists, start the Service in the same way you have stopped it before. Select Start for now to enable the service.
Way-12: Uninstall Third-party anti-virus software
Third-party programs especially antivirus suits often modify the default settings in the system. Some hardware peripherals get affected by this and touchpad in the laptops may be non-functional as well.
Windows 11 has its own security system which is by far the best antivirus suite available. Yet many users who opt to have an additional protection tool end up having trouble. In order to fix Windows 11 Touchpad not working issue, uninstall the third-party antivirus program temporarily. To uninstall it, follow the below guidelines –
- Click Search icon present on the taskbar.
- Type – appwiz.cpl.
- Press – Enter.
- When Program and Features window appears, scroll to the third-party antivirus program.
- Right-click the app and choose – Uninstall.
- Click – “Uninstall” again for final consent.
- Follow the on-screen instructions to complete uninstalling the program.
- Once done, restart Windows 11 and check if the touchpad is working error-free.
Way-13: Uninstall other mouse drivers
We often prefer to have an additional mouse along with built-in touchpad on the laptops. But the external mouse drivers might lead to create conflict with the integral touchpad driver and cause Windows 11 Touchpad nonfunctional.
In order to fix the trouble, you may temporally uninstall the external mouse driver for the system. When the touchpad comes back to normal operation, simply restarting the system will install the mouse driver again. Follow the guidelines to accomplish this task –
- Press – Windows key and S.
- In the taskbar search bar, type – devmgmt.
- Select – Device Manager when appears.
- Locate – Mouse and pointing devices.
- Expand it to see the driver list.
- Right-click the external mouse driver.
- Select – Uninstall device option.
- Click – Uninstall when the popup prompts.
- Check if the touchpad is working normally.
- After settling down the issue, restart the Windows and the system will re-install the external mouse driver automatically again.
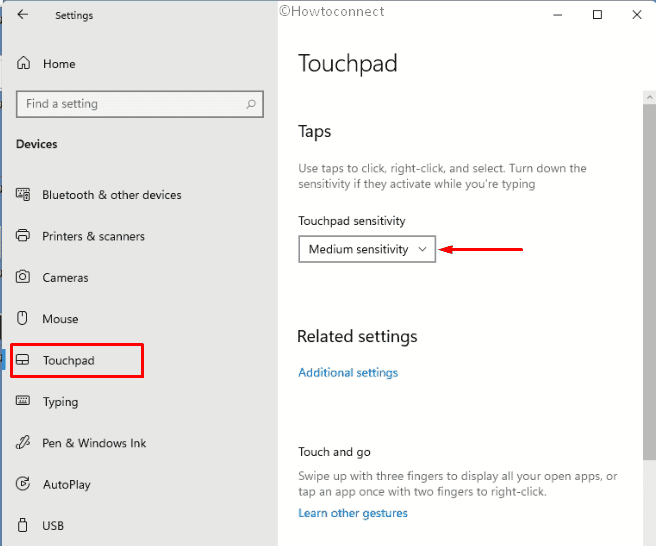
Way-14: Adjust the Cursor Speed and sensitivity of the Touchpad
Several times, changing in touchpad sensitivity settings works like a key to resolve the touchpad unresponsive problem. This is a simple task to do but serves big time in fixing the Windows 11 Touchpad not working issue. Here are the steps to change the sensitivity settings –
- Open Windows Settings app (Win+I).
- Click – Bluetooth & devices.
- Select – Touchpad.
- On the next page, click on Taps.
- Click the dropdown menu for Touchpad sensitivity and set it to – Medium sensitivity.
Way-15: Uninstall Windows update
Multiple users complain to get touchpad not working after Windows update. Microsoft pushes different types of updates to maintain the operating system such as some include improvements, security patches, and other comprise features.
Often the patches become buggy and start conflicts with the system resources or drivers. Touchpad problem in Windows 11 might be a result of the Windows update particularly occurring after its installation. In this case, you can uninstall the rollout until Microsoft officially fixes the touchpad bug –
- Press – Win+I.
- Click – Windows update.
- From the next page, Settings page, select – Update history.
- Next, click – “Uninstall updates” from the Related settings section.
- A window from Control panel will appear; find the most recently installed Windows update here.
- Right click on the update showing in the form of KB…….. and select Uninstall.
- Follow the instruction coming on the screen until the removal and restart your PC at last.
Way-16: Use System Restore
In case, the touchpad annoyance is obstinate and cannot be solved using the above workarounds you have an option System restore to get rid of. This will wipe out the recent modifications you made in your Windows and send it back to a specific point of time.
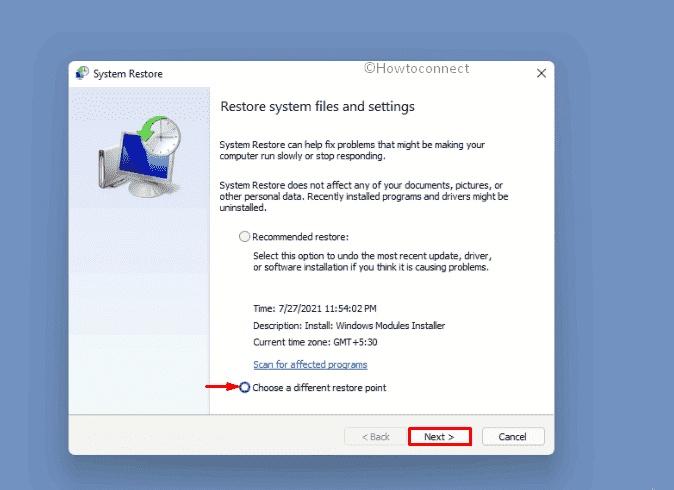
System Restore is a Windows default process to load the previous state of the Operating System without making significant changes to the device. The process will bring back one old point of Windows based on your choice and the problems will be no longer valid. To perform System Restore to an old point, follow the below guidelines –
- Press – Windows + R.
- Write – rstrui in Run command box.
- Hit – Enter.
- When System restore wizard opens, choose the option – Choose a different restore point.
- Click – Next.
- Check the box set before – Show more restore points.
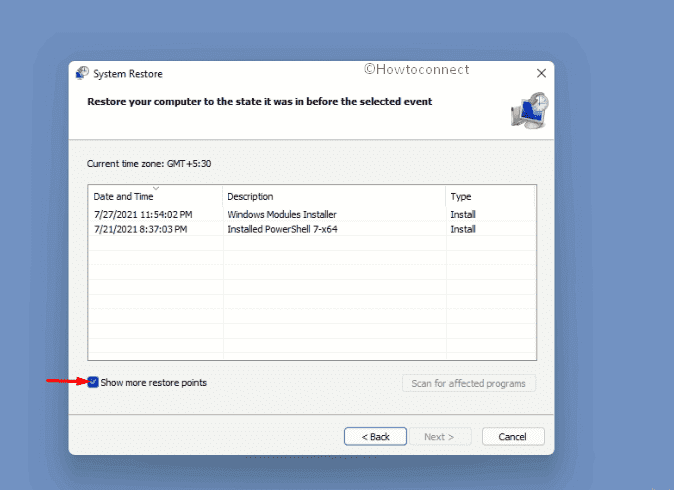
- Choose the most recently created restore point and appoint a click – Next.
- To begin restoring, click – Finish.
Methods list:
Way-1: Clean the Touchpad
Way-2: Restart the laptop
Way-3: Enable touchpad using Keyboard shortcuts
Way-4: Check if the touchpad feature is enabled
Way-5: Make sure Touchpad is not disabled from BIOS settings
Way-6: Update the Touchpad driver
Way-7: Reinstall the touchpad driver
Way-8: Tweak Windows Registry to make touchpad working
Way-9: Run Windows Hardware and device troubleshooter
Way-10: Reset Touchpad
Way-11: Stop tablet input service
Way-12: Uninstall Third-party anti-virus software
Way-13: Uninstall other mouse drivers
Way-14: Adjust the Cursor Speed and sensitivity of the Touchpad
Way-15: Uninstall Windows update
Way-16: Use System Restore
That’s all!!
Ahhhh, way 15 finally worked for me! My laptop is Huawei BTW. Thanks!
For me Asus x505z
Way 8 and 9 work .
Try it
Thanks
way 9 works for me. thanks a ton!
thank you it really helped, I was panic when my touchpad doesn’t work, thank you very much:))))