How to Automate .NET Framework 3.5 installation on Windows 10. Unfortunately, many professionals and users often see a message This application requires .net framework 3.5. This happens when they install a tool or attempt to run a software.
A Professional has developed a script on TechNet gallery which is useful for them. This VBScript will make the .NET Framework to automatically download on a machine whether it is equipped with Windows 10, 8 or 7.
Automate .NET Framework 3.5 installation on Windows 10
Step 1 – First of all, Download this VBScript through this link.
Step 2 – The download will end in a flash since it is only 2 Kb File. Hence, extract the VBScript file.
Step 3 – Open the Elevated command prompt with your favorable method, although you can do a right click on Start button and choose Command prompt (admin).
Step 4 – On the command prompt paste the following command
cscript path of the downloaded script
Note –scriptpath refers to the path of the Script where it exists.
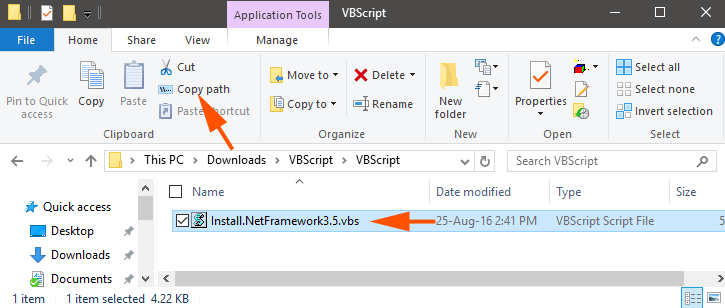
Step 5 – To know the path of the script open the folder where it exists, Select the script and click on Copy path.

Step 6 – after cscript add the path and hit Enter button.

Step 7 – Soon you see a message on Command prompt like Installing .NET Framework 3.5 online, please wait….. And after a while – Install .Net Framework successfully similar to the below screenshot.

Note – Before Starting to Automate .Net Framework 3.5 installation on Windows 10 ensure that network is active.
Conclusion
On Windows 8, numerous users were upset regarding the .Net Framework 3.5 installation. To solve their issues IT professionals were active and developed this script. But this script is applicable on Windows 10 and 7 too along with that of 8.
Most of all you avoid going the .Net Framework site and download manually it and afterward install. You need to only execute the cscript and the path and nothing else.
