Today, we are here to show How to Change Time in Windows 10 using some convenient methods from the default setup of a device. This may seem pretty easier and indeed it’s true but can harm drastically when the clock shows wrong information especially after changing a Time zone. Lives have been quite busy nowadays and you need to be ahead of timetable to cope up with hectic schedules. To let that happen, keeping an eye on the clock is much necessary and while using a computer, the last resort is the Time & Date shown in Taskbar. Being so necessary, we must ensure this clock is showing accurate based on time zone to avoid any unwanted situations in this corporate world.
Windows 10 has great artificial intelligence and it can accurately determine time zones and tweaks the clock accordingly. Yet, it often makes mistakes to show wrong information where the user needs to re-adjust the settings. Furthermore, often it’s necessary to observe the times in various zones for easier access and we need to set that manually as well. All these needs will be fulfilled in the below section where we will show two different ways to meet quarries about How to Change Time in Windows 10. Let’s begin –
How to Change Time in Windows 10
Here is How to Change Time in Windows 10 –
Method-1: Using the Clock from Taskbar
- Move the cursor to the bottom rightmost corner of Desktop and do a right-click on the visible time & date section.
- From the appearing menu bar, select Adjust date/time.
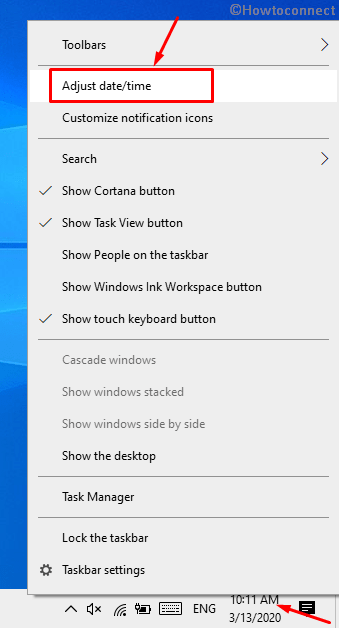
- In a moment, you will be redirected to the Time & Language section from Windows Settings app.
- With Date & time selected automatically from the left pane, straightway move on to the adjacent right.
- Head over to Set time automatically and toggle the slider to turn Off this option.
- Proceeding to Set the date and time manually area, click the Change button.
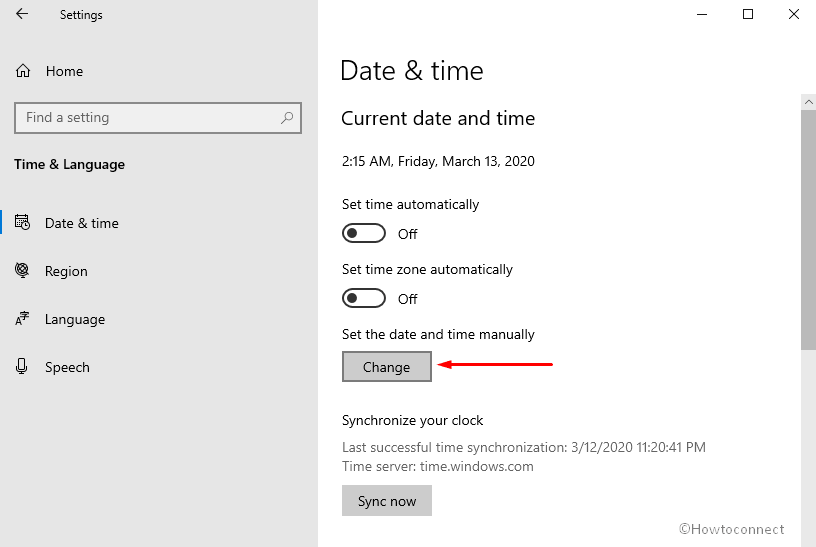
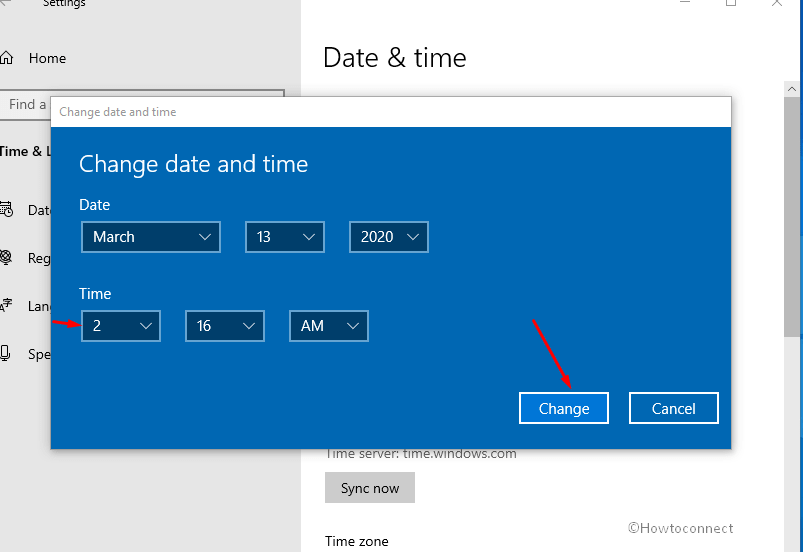
- When a new Change data and time window will be displayed, adjust the date and time respectively from here.
- Once done, hit the Change button to save these changes.
Method-2: Using the Windows Setting app
- Press Windows and I hotkeys together to invoke the Settings app.
- When the UI is upfront, click “Time & language” tile from there.
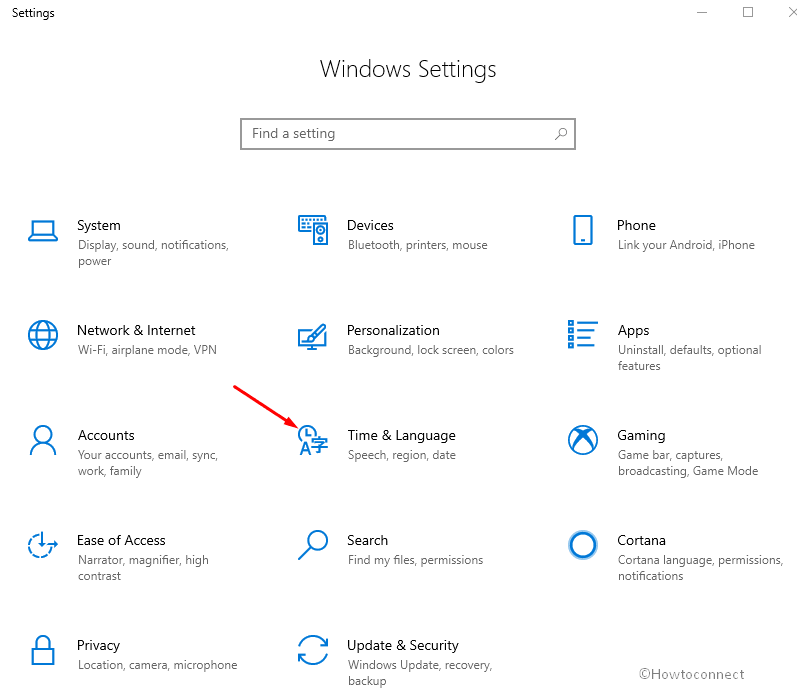
- Moving on the succeeding window, select Date & time from the left side pane.
- Jump to corresponding right side and head over to “Set time automatically” region.
- Turn Off this feature by moving the slider to left.
- Move ahead to the Set the date and time manually area eventually and hit a click on the Change button under it.
- In a second, a blue window will be displayed where you can adjust the date & time by picking from dropdown menu.
- Finally, click the Change button from this window to save the time set just now.
These are the two methods to guide How to Change Time in Windows 10, yet one more thing to be discussed adhered to this idea and can serve a big deal as well. In the below section, we will show the guidelines to set click for various time zone. Let’s proceed –
Bonus Tips: Setting up a New Clock for a Different Time Zone
- Press Windows key and click the Gear icon to open Settings app.
- When the app area loads, select Time & Language tile
- When shifted to the next page, select Date & time located at the left pane and move alongside right.
- Hover to the extreme right and click on Add clocks for different time zones link attached.
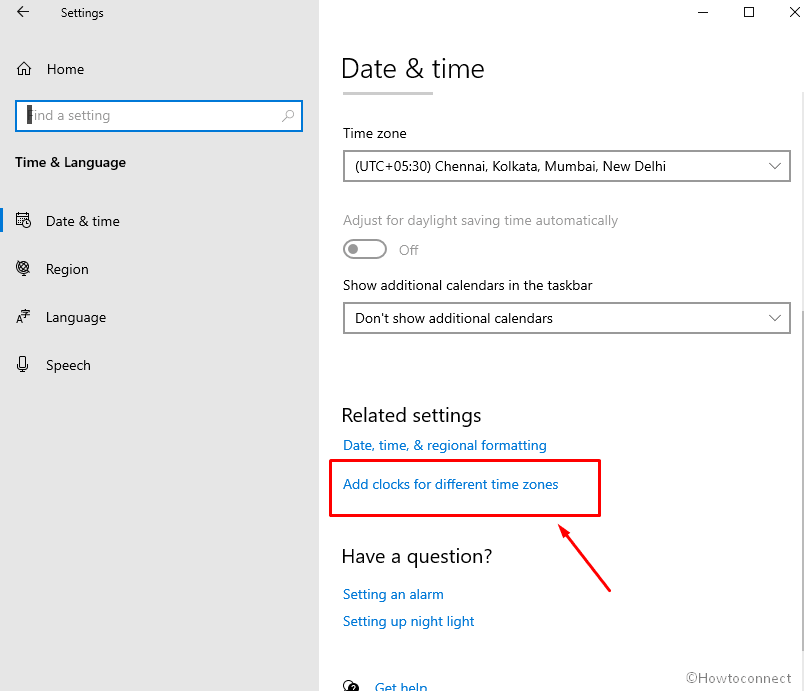
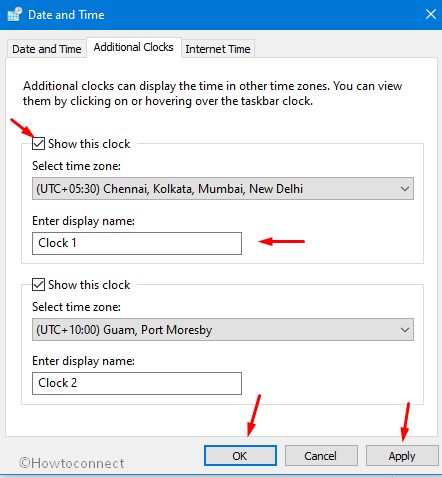
- After a new pop up window is visible on display, enter into its Additional clocks tab.
- Move down a little and put a checkmark on the box set for Show this clock option.
- Proceed forward to Select the time zone area and choose the desired city from dropdown menu.
- You can also change the tame of this clock from Enter display name section.
- In the same way, another clock can be set for one more time zone from the next segment in the current window.
- Lastly, click the Apply button followed by hitting Ok to save the changes.
- Coming back on the Desktop, you can see clocks in different time zone simply by placing the cursor on the time & date located at the Taskbar.
That’s all !!!!
