You can easily Customize Automatic Maintenance in Windows 10 or 11 and ensure that the system’s performance is at peak and healthy as well. The good point of this feature is that it does not affect the energy efficiency of the device while operating. By default, the maintenance process works late at night when the PC is idle and plugged in.
Usually, this automated feature runs a decent range of tasks but they are different on every computer. However, you can manage this setting going through Control Panel and optimize it accordingly. Let’s move on to details.
Automatic Maintenance in Windows 11 and 10
To Customize Automatic Maintenance in Windows 11 or 10, you can change its default set time, or choose to manually trigger or stop the activity, or fully disable the feature. So, in the below sections, you will go through each of the customization options separately.
How to Change the Schedule of Automatic Maintenance in Windows 11 or 10
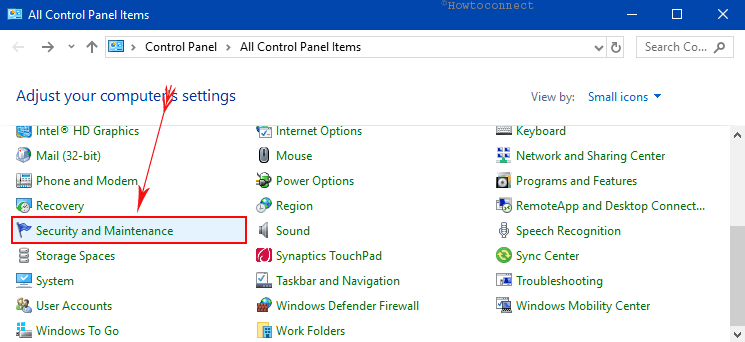
Step-1: Click on Search and type cp. Select Control Panel once it appears as the Best match.
Step-2: Make the Control Panel applets into small icons view and select Security and Maintenance as shown in the below screenshot.
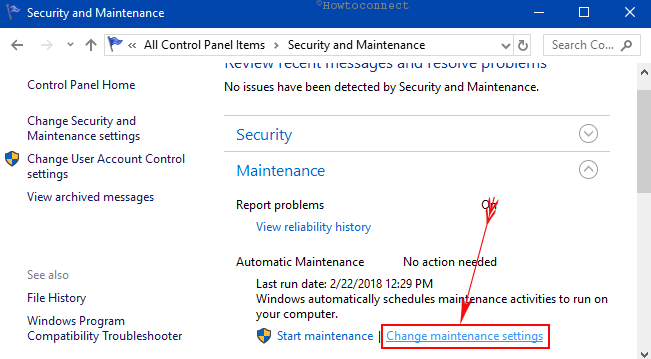
Step-3: Click Maintenance on the following screen.
Step-4: Scroll down and click on Change maintenance settings underneath the section Automatic Maintenance (see screenshot).
Step-5: On Automatic Maintenance, click the drop-down menu beside “Run maintenance tasks daily at” and change the time settings as per preference.
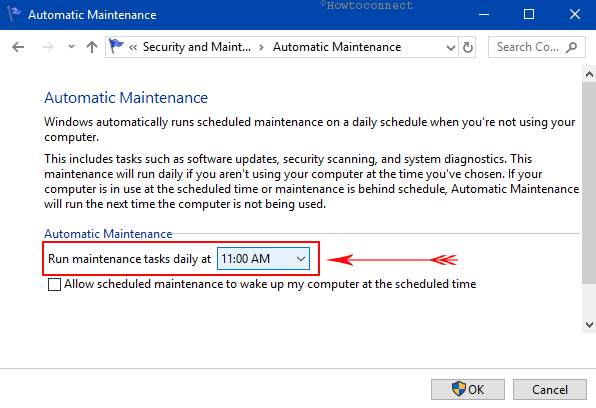
Note- Windows will only be able to perform Automatic Maintenance if the computer is in sleep mode but plugged in with power.
Step-6: To avoid the distraction of night sleep, just uncheck the option namely “Allow scheduled maintenance to wake up my computer at the scheduled time“.
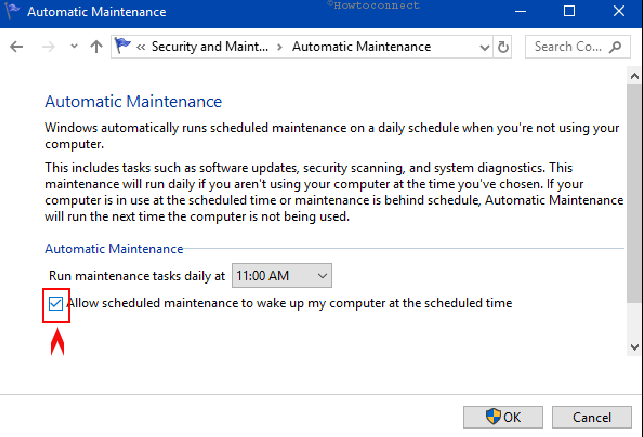
Step-7: Finally, select Ok to make the changes effective right away.
After completing these steps, Windows will run the Automatic Maintenance at the assigned time for a maximum of one hour daily at the same time.
How to Manually Start and Stop Maintenance in Windows 11 or 10
If you engage the computer with a heavy workload and you want to maintain the system immediately, then you can manually trigger the maintenance.
i. Open Control Panel using any of your ways and go to Security and Maintenance.
ii. Next, expand Maintenance and straightaway go to the Automatic Maintenance section. Here, click Start maintenance as depicted in the given picture. This will continue till finished even you are actively working with Windows.
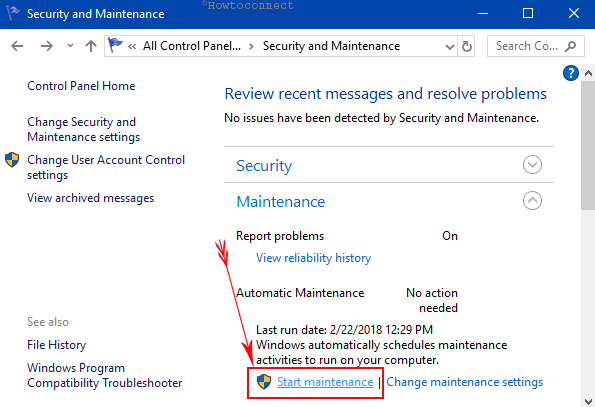
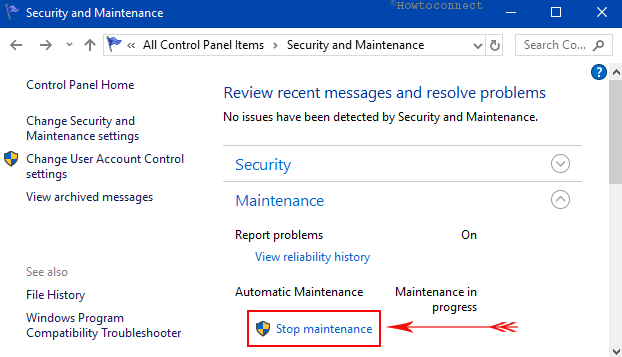
iii. A text Maintenance in progress will appear immediately.
iv. To abort the activity, simply click Stop maintenance (as indicated in the screenshot).
Run and Stop Maintenance using v cmd command in Windows 11 or 10
Another possible way to run or stop this auto maintenance feature is by using special “MSchedExe console” tool on Windows 11 or 10.
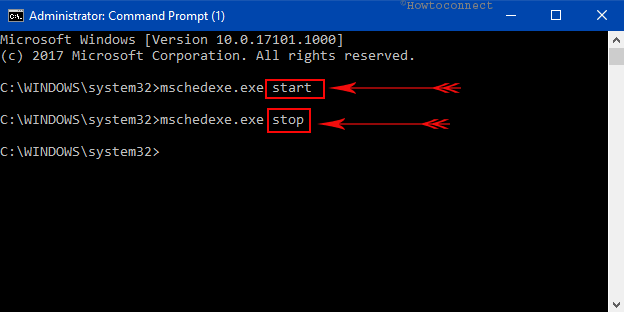
I. Type cmd on search field and right-click on the result. Choose Run as administrator and click Yes upon the prompt of UAC.
II. To immediately run maintenance, type in or copy/paste the below line of command and press Enter.
mschedexe.exe start
III. Now, when you wish to abort the ongoing maintenance activity, use the following command.
mschedexe.exe stop
Disable Automatic Maintenance in Windows 10 or 11 by regedit or Registry Editor
The effectiveness of this scheduled maintenance is beyond any question and thoroughly necessary. However, you might find it causing problems like the distraction of work or unexpected crash or any, you can disable this feature too.
While you Customize Automatic Maintenance in Windows 11 or 10, another important section is to completely “turn off” this feature. You cannot disable this in normal process and you need to tweak the registry entries. Since it might cause unnecessary damage to the device; we always recommend saving a backup of your whole system before proceeding.
1. Type regedit in the Search beside Start menu. When you see the same on the top, click on the result.
2. Navigate to the following path from left pane in the Registry Editor:
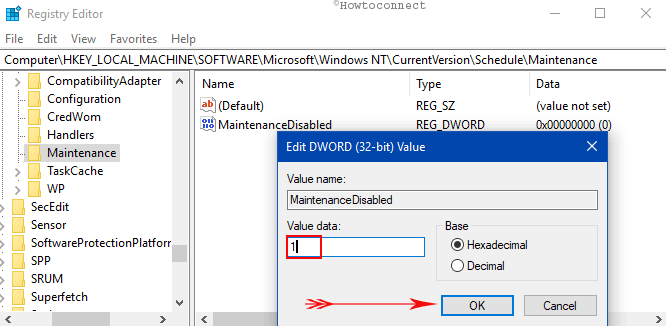
HKEY_LOCAL_MACHINE\SOFTWARE\Microsoft\Windows NT\CurrentVersion\Schedule\Maintenance
3. Once you reach Maintenance, put a right click on it. Select New moreover, click DWORD (32-bit) Value from the list.
4. Name this new key as MaintenanceDisabled and press Enter key to save it.
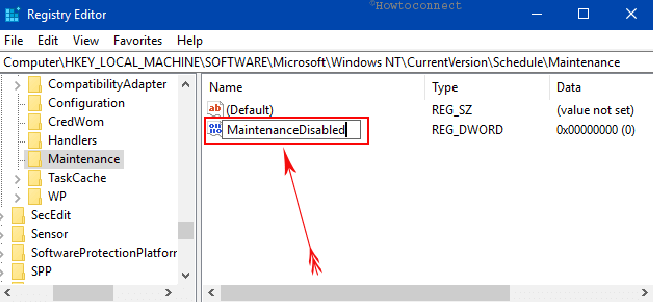
5. Now, double-click on MaintenanceDisabled. On the Edit box, assign 1 as its Value data and lastly, click Ok to save the changes.
6. As the last thing, simply Reboot your PC.
Automatic maintenance is then disabled for your system. However, there is also the scope to get back to it, see ahead –
7. Follow the above guidelines and reach up to MaintenanceDisabled in step 5 above.
8. Double-click to edit it and set 0 as Value Data, else Delete the DWORD. Choose Ok to save the changes.
Therefore, this change will delete the new registry key and system will turn the Automatic Maintenance enable again by default. Change the set time following the guidelines we discussed first.
What is Automatic Maintenance?
As the term says, Automatic Maintenance is the maintenance tasks done on Windows all by itself at a set period by the OS only. Tasks such as scanning for malware, optimization of disk drives, “Defrag Hard Disk“, diagnosis, updating of applications/drivers, even scheduled updating of Windows. The reason to do so is to keep the system updated as well as in well-functioning condition. Besides, this maintenance ensures faster operation repairing fragmentation in disk drives.
Few things you need to know about this specific maintenance feature –
• The default time set by the OS to perform this activity is at 2 AM. If it finds the PC is connected to a Power source and sit idle almost, the feature will wake it up to carry out the tasks.
• It will run for only an hour for a day and if cannot finish a task, will resume the same in next scheduled hour.
• There are some tasks labeled as Critical. In case of those, Windows will not leave unfinished during the maintenance period.
• If the PC is powered Off or you are working actively during the maintenance hours, artificial intelligence will perform Automatic Maintenance after the working hours so that it doesn’t affect the working period.
• If the system is at sleep and getting a power source, Windows 10 or 11 will wake the device up and perform the maintenance activity. Will put back the computer to sleep once it finishes the task.
So, that was all about how you will Customize Automatic Maintenance in Windows 11 or 10 pretty easily!!!