Do you want to know How to remove Skype chat history on Windows, iOS, Android, moreover on the Web application? If your device is accessed by many users, then there are chances for your private data to fall into the wrong hands. So we are providing the ways to delete individual data, instant message, clear entire chat history of this messaging app across the platforms.
You will find this article How to Remove Skype Chat History in 6 sections keeping Operating Systems in mind –
Section1 – Android
Section2- Windows Desktop Version of Skype
Section3 – Windows Built-in Skype App
Section4 – iOS Phone
Section5 – Skype history MAC
Section6 – For Skype Web
How to Remove Skype Chat History
For Android Devices
The Android devices, such as smartphones are quite widespread among the users. Operating Skype on such gadgets is little different from other device platforms. It offers you three different scenarios to remove its chat history. So, if you want to know How to Remove Skype Chat History especially for Android devices, then let us go through it in depth.
To Delete Individual Chat
Step 1 – First of all, launch “Skype” application on your smartphone. Out of the three tabs, go to Chats.
Step 2 – Browse the conversations carefully and see which individual chat history you wish to delete.
Step 3 – Keep a hold on that contact/conversation. From the list of options, tap Delete chat as indicated in the below image.
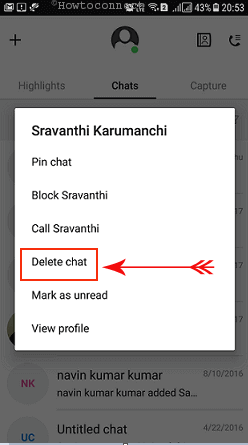
Step 4 – You get to see a tiny confirmation pop-up, tap Delete.
To Remove Instant Message
It is always an easy task to delete a single message that you have recently sent to a particular contact in Skype. To avail this facility, you have only 60 minutes after sending the message. Because the option to Remove the chat disappears after the time span of 60 minutes. So, to instantly do away with that message, read the below series of steps.
Step 1 – After you had sent the message, tap and hold it immediately. It displays few options, you need to make a tap on Remove.
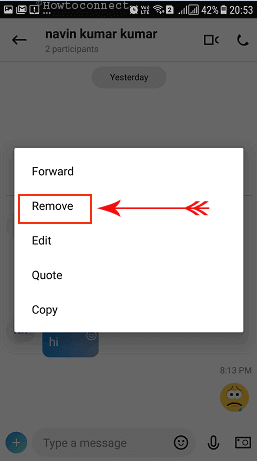
Step 2 – Remove Message pop-up appears on the smartphone screen, tap on Remove.
To Clear Entire Chat History
In Android devices, there is no direct option available to clear off the entire chat history of Skype in a single click. But wiping out the whole chat history will also eradicate all the data and cookies related to the application that was stored on your phone. A single disadvantage of this process is that you need to sign into the Skype again as it permanently wipes out the cookies.
Step 1 – On your Android phone, the “Settings” application. Here, out of various categories look for Apps and tap on it.
Step 2 – You can now notice all the installed applications, locate and tap on Skype.
Step 3 – When the screen displays the App Info, tap on the Storage option (see snapshot).
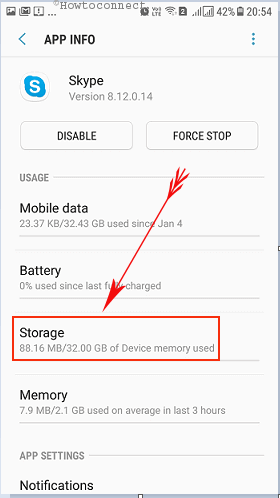
Note – In the older Android versions, the interface may differ a little bit. In that case, go to Settings => Application Manager => Skype => Force Stop => Clear Cache.
Step 4 – Tap on CLEAR DATA and CLEAR CACHE button to completely wipe out the Skype conversation records as shown in the given image.
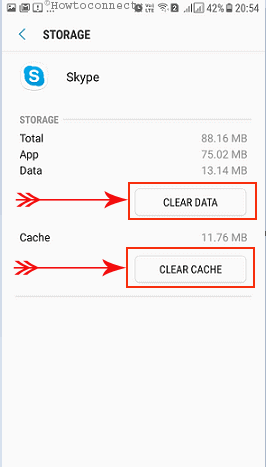
Step 5 – A pop-up will appear saying that all the data will be deleted permanently, tap on Delete. Now, again sign into your “Skype account” and enjoy its services.
For Windows Desktop Version of Skype
To Delete Full Chat History
Many Windows users are using the desktop version of Skype on their computers. So, most of them prefer to learn How to Remove Skype Chat History on the desktop version. However, wiping out the full chat history here is pretty simple and straightforward. To do away with the personal Skype conversation records, follow these steps.
If you find mess up in the messaging app see – Fix: Skype Messages Out of Order.
Step 1 – Open the main window of Skype and click Tools on the menu bar of the program and from the drop-down list, select Options.
Step 2 – Go to the IM & SMS on the left sidebar of the following screen. On its adjacent right portion, click on the button namely Show advanced options.
Step 3 – Just beside the option “Keep history for“, click the button namely Clear history.
To Clear Instant Message
Step 1 – To do away with the instant message, first get into the Skype.
Step 2 – Open the chat whose immediate chat you prefer to clear off. Next, right-click that specific message and make a click on Remove Message as depicted in the below image.
For Windows Built-in Skype App
The latest version of Windows 10 includes “built-in Skype app” for its users. They don’t need to download and install the setup file separately. One can easily get it from Microsoft Store. So, if you want to understand How to Remove Skype Chat History in its built-in version, read the below steps.
To Wipe Out Instant Chat
Step 1 – On the Skype app, choose the contact whose recently send the message you wish to clear. Next, make a right-click on that specific piece of text.
Step 2 – This displays few options, click Remove (see screenshot).
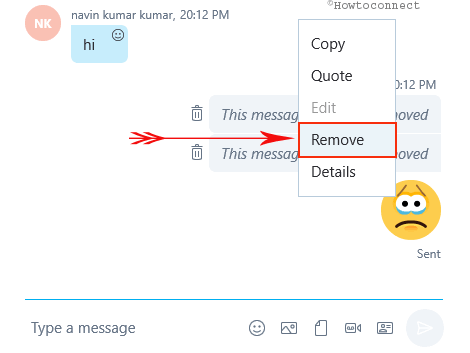
Step 3 – You won’t receive any confirmation pop-up here. You will see a trash icon with a text – This message has been removed.
To Remove a Single Chat
Step 1 – On the Skype app, look for the conversation on the left side pane. Go through the contacts and pick up the one whose total Skype conversation you wish to send to trash.
Step 2 – Right-click that contact and click on “Delete Conversation” option.
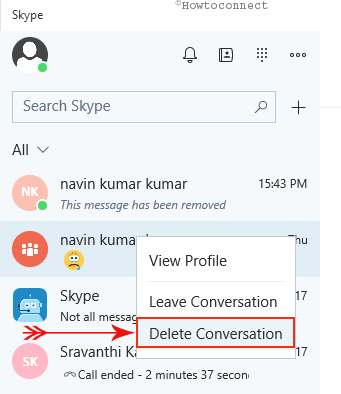
Step 3 – A dialog box will appear for your approval, hit on Delete.
To Clear Full Chat History
The UWP app of “Skype in Windows” 10 does not provide any direct option to delete skype chat history permanently of your account. But there is a way around to it. You need to go to Skype history location and manually erase the main.db database file. This is the file which stores the local chat history is stored.
Step 1 – First of all, sign out from Skype and ensure that it is not operating in the background.
Step 2 – Now open File Explorer and paste skype history location into address bar and press Enter –
Skype history location –
%localappdata%\Packages\Microsoft.SkypeApp_kzf8qxf38zg5c\LocalState\
Step 3 – After reaching the folder, double-click your Skype name. Here, locate and delete the file main.db. This will immediately expunge full chat history from your Skype app. However, there is a drawback to doing so. Once you sign in again, the past 30 days chat history gets restored from the ‘Skype Cloud server’. The conversation that took place before one month will not be downloaded.
If you are using this OS, you may like to read How to Enable Skype Dark Mode in Windows 10.
For iOS Devices
Skype is widely popular amongst iPhone and iPad users. If you are one of them, you may feel the need to have knowledge on How to Remove Skype Chat History on these gadgets. Let us see how it works!
To Delete a Skype Conversation
Step 1 – Sign into your Skype account on your iOS device and on the left pane, tap on History.
Step 2 – The recent conversation list will be displayed. Choose the chat you prefer to wipe out and swipe towards the right.
Step 3 – Finally, tap on the red Delete button to do away with the conversation.
To Remove the Whole History
Step 1 – Tap on Recent to view all the latest call history, conversation, and text messages.
Step 2 – Next, tap the Edit button at the top. Now, tap the (–) button next to each contact and keep deleting the entire chat records.
For MAC
Delete All Chat Records
Step 1 – “Launch Skype” on your MAC OS and from its File menu go to Preferences.
Step 2 – Here, click on the Privacy tab. It will display various options, hit the button namely Delete All Chat History. This will remove everything such as text messages, voice/video calls, SMS and file transfer history as well.
Delete Skype Conversation for a Specific Contact
Step 1 – Just execute a right-click on the contact and hit the option Delete Conversation.
Step 2 – On the next confirmation pop-up, approve the process and finish the removal of the chat record. As an alternative, choose the contact from the left sidebar and click the Conversation tab. From the menu that drops down, hit the option Delete Conversation.
Clear Recent Skype Conversation
Step 1 – This is too simple, just switch to the Conversation tab and from the list of options, click Clear Recent. You will see that all the active conversation from the Skype sidebar will be closed.
For Skype Web
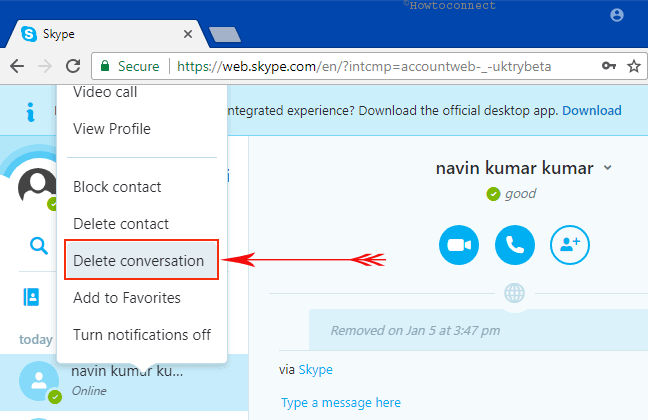
Step 1 – On your preferred web browser, ‘log in to your Skype account’. On the left side pane, right-click the contact and make a hit on Delete Conversation.
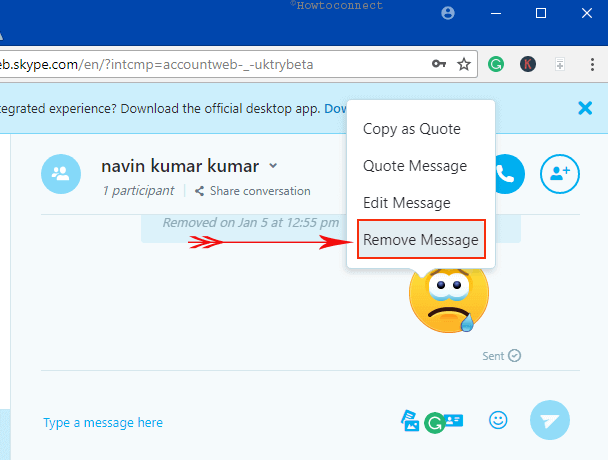
Step 2 – Now, to erase a specific message, appoint a right-hit on it and choose the option ‘Remove Message‘.
For reference, read our tutorial on How to Access Skype in Edge Browser.
Skype messenger app is widely popular especially in transmitting text and video messages. Every single message that you send gets stored somewhere deep in your system. It remains intact until you take any action. So, whatever your reason may be, Skype makes it easy and effortless to delete all portions of the chat records.
Conclusion
So, in this tutorial on How to Remove Skype Chat History, we tried to cover all the possible and popular devices where this application is widely used. Whatever device you use, this article will help you in wiping out the chat records. This is pretty important for those devices where multiple users use it. It eventually helps you to keep privacy in your conversation. Hopefully, you will be able to maintain your conversation private and secure. If you have more tips on this Skype history, you are most welcome to share your thoughts in the comments section below.
On the current Mac version (V8), there is no Privacy tab in the Preferences. I can’t find any way to limit the length of Chat history it keeps, nor to delete all the history.
Does anybody know of a way? I believe this facility was in previous versions, but V8 has been nothing short of a dog’s breakfast.
Any help appreciated!