You’re here, so we’re assuming you ran into that horrible KERNEL_SECURITY_CHECK_FAILURE blue screen situation. Well, you’re at the right place. This BSOD issue could be caused by a range of activities, and computer components. However, the main cause of this situation is corrupted data structure, virus attack, low disk space, memory problems, and more.
Some other possible reasons for KERNEL SECURITY CHECK FAILURE could be missing system resources, DLL files, etc. And these issues occur because of some malware or accidental deletion of files or the presence of similar programs. Moreover, some system changes or faulty update installation could also be equally responsible for this. This particular Blue Screen of Death error has 0x00000139 as its bug-check value and following are the solutions to fix it up –
KERNEL_SECURITY_CHECK_FAILURE BSOD Windows 10 Solutions
Here is How to Fix KERNEL_SECURITY_CHECK_FAILURE BSOD Windows 10 –
1] Prevent Automatic Restart when PC runs into KERNEL_SECURITY_CHECK_FAILURE
This is not a fix, rather workaround to a situation caused by BSOD. Whenever your PC runs into some major errors, it would often end up in auto shut down or reboot. It is programmed this way in order to prevent damage to the system. Anyway, this can be quite frustrating for some users to have the Windows shut down without getting the chance to save anything they’ve been working on. So, the best call you have is simply stopping this automatic feature to prevent such situations if you’re confronting KERNEL_SECURITY_CHECK_FAILURE.
Step-1: As you have been facing BSOD issues frequently, so, prioritize saving your work before anything. After you save, close or minimize the running processes/ applications. Then head to the Desktop by pressing Win + D keys.
Step-2: On the desktop, right-click on This PC icon. Then, from the fly-out menu, select the Properties option.
Step-3: As you select the Properties option, the System window would appear. Then, choose “Advanced system settings” from the left pane.
Step-4: The System Properties window will appear now. There, beneath the Startup and Recovery section, there would be a Settings button on which you need to click.
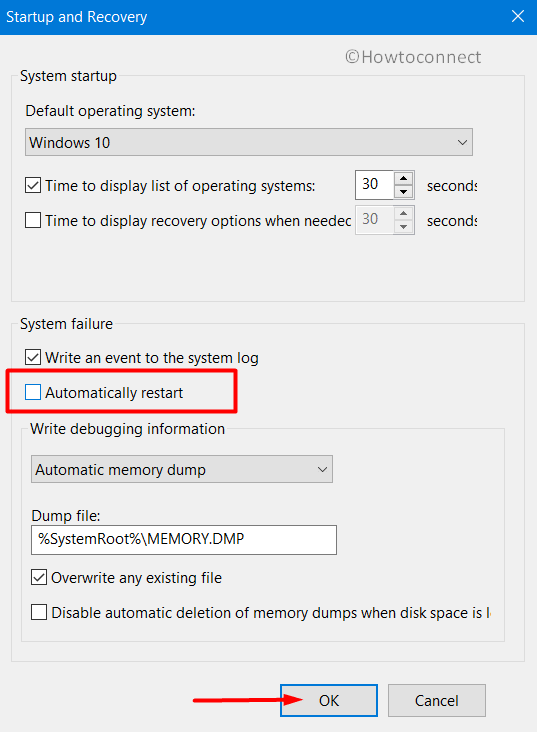
Step-5: Another wizard will appear now separately for ‘Startup and recovery’. Here, navigate to the System failure section. You can see a box corresponding to “Automatically restart“. Uncheck it.
Step-6: Lastly, click on the OK button in order to save the changes.
With this, the OS will not reboot all by itself and you will get time to try other workarounds to resolve KERNEL SECURITY CHECK FAILURE.
2] Trigger the Blue Screen Troubleshooter
Troubleshooting is certainly one of the simplest yet practically helpful ways of dealing with any errors in your system. Moreover, Windows has got its own utility specially meant for dealing with BSOD issues. So, no need to look for any extra tool from the Store for this purpose. However, note that for the Blue screen troubleshooter feature to be present, your system needs to be on Windows 10 Fall Creators Update or later. Below given are the simple steps with which you can use to run this built-in troubleshooter –
- Enter “Win + I” hotkeys to open Windows Settings app. Then, navigate to the Update & Security tab.
- Choose the Troubleshoot subsection you see on the left of the following page.
- Now, scroll down to the Blue Screen option and click it.
- Click on the ‘Run the Troubleshooter’ button there. This will initiate the troubleshoot feature and would possibly diagnose and fix the root of KERNEL_SECURITY_CHECK_FAILURE in the device.
3] Dettach any connected External HDD or hardware and reconnect after resolving
There have been many instances of users facing the KERNEL_SECURITY_CHECK_FAILURE blue screen error due to problematic Hard Disk Drive or external hardware. Though these kinds of issues are quite frustrating, in this case, users would have an easy way out. This workaround is quite simple enough. All you need to do is disconnect that external hardware or HDD. It’s not even for long. There is no problem in reconnecting the same soon after the issue fixes. Here is all that you need to do –
- Just disconnect any connected external hardware from your computer.
- Now, Restart Windows 10 PC – by clicking on the power button on the start menu and selecting ‘Restart’. When the reboot completes, see if KERNEL_SECURITY_CHECK_FAILURE persists.
Once you get rid of the issue, go to the hardware’s manufacturer’s website and look-up for an update for its driver.
4] Get all the latest update patches
For a healthy, trouble-free, smoothly functioning computer, it is quite essential that you keep the system update with the latest cumulative updates that Microsoft offer for you every month. Why is that? Well, these latest ‘updates’ usually come with some added security and fixes against potential vulnerabilities as well as the bugs in the system causing various errors including the blue screen. Thus, by updating Windows, you can possibly avoid or fix many tricky situations with the computer.
Just note that, while you are downloading and installing the latest updates, connect to high-speed internet. This will prevent troubles like incomplete or partial installation etc. Check out the below steps for checking any pending updates and getting them –
- Get access to the Settings app.
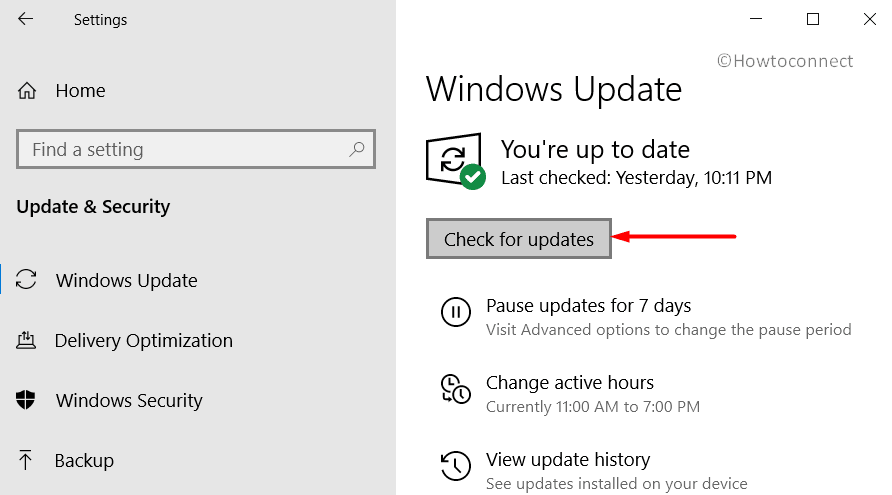
- In the Settings homepage, click Update & Security. On the page that comes next, go to Windows Update subsection the left-hand side.
- On the right side, click on Check for updates. This will trigger a check for any due updates.
- If you see the lists of new patches available, just click on the Download button under them.
- Once installed, your system will prompt for a reboot to apply the update changes. Click on Restart.
This might resolve the KERNEL_SECURITY_CHECK_FAILURE issue for you.
5] Fix KERNEL_SECURITY_CHECK_FAILURE by Getting into Safe Mode
Another way to try fixing KERNEL SECURITY CHECK FAILURE BSOD error is by booting the OS in Safe Mode. By doing so, you will have an option to keep operation to minimal. This means the default and basic setting and only the important files will be available. Here is how you can do it –
- Open Run dialog box and you can do this with a joint press on “Win logo + R” shortcut keys.
- Type in msconfig in the text box and press Enter or click on the OK button. This will open the System Configuration window on the computer.
- Click on the ‘Boot’ tab.
- Perform a click on the checkbox corresponding to ‘Safe boot’. From the further boot options that appear, select Minimal.
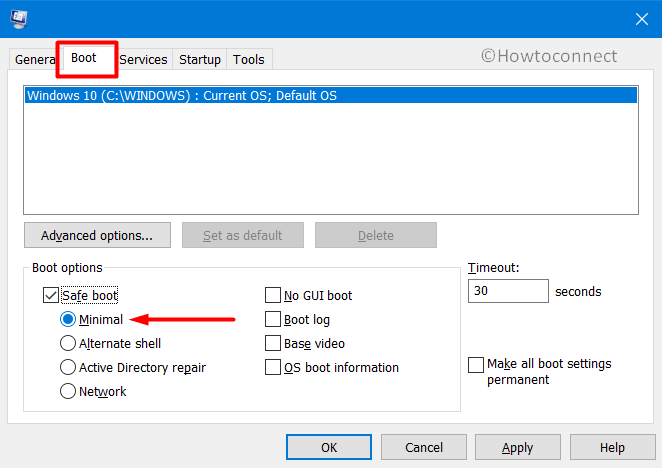
- Click on OK button for saving the changes you made. Finally, close the application and restart your device.
- As your system reboots, press F8. Select the Safe boot choice from the ‘Advanced boot’ menu.
- Then, enter Safe Mode and see if the issue persists.
By entering minimal safe mode, only the basic settings and essential files would be there. So, in case the issue is no more, it would mean that the problem was probably with some of the changes in settings or system. You can either reset them or restore to a no-error point (steps for system restore is given in a later section.
6] Clean up any Malware in the system all in Windows Security
Malware is just about everywhere – the PC you borrowed from someone could have a virus, the non-secure site you downloaded movies from could have some threats. And, soon as any kind of virus or such malicious stuff enters into your computer, some sort of trouble follows. Therefore, it would be a good idea for computer users to frequently scan for any kind of threats in the system. Malicious software of some kinds can cause serious troubles to the functioning of the system. Furthermore, system/disk corruption from malware attacks is one of the basic causes of KERNEL_SECURITY_CHECK_FAILURE.
Well, we’re grateful that Microsoft’s operating systems now have its own security utility – Windows Security. You can easily scan and clean-out any malware-threats on the system with this security app.
- Type ‘Security’ in the search box on the taskbar. Then, double-click and open Windows Security from the results that appear.
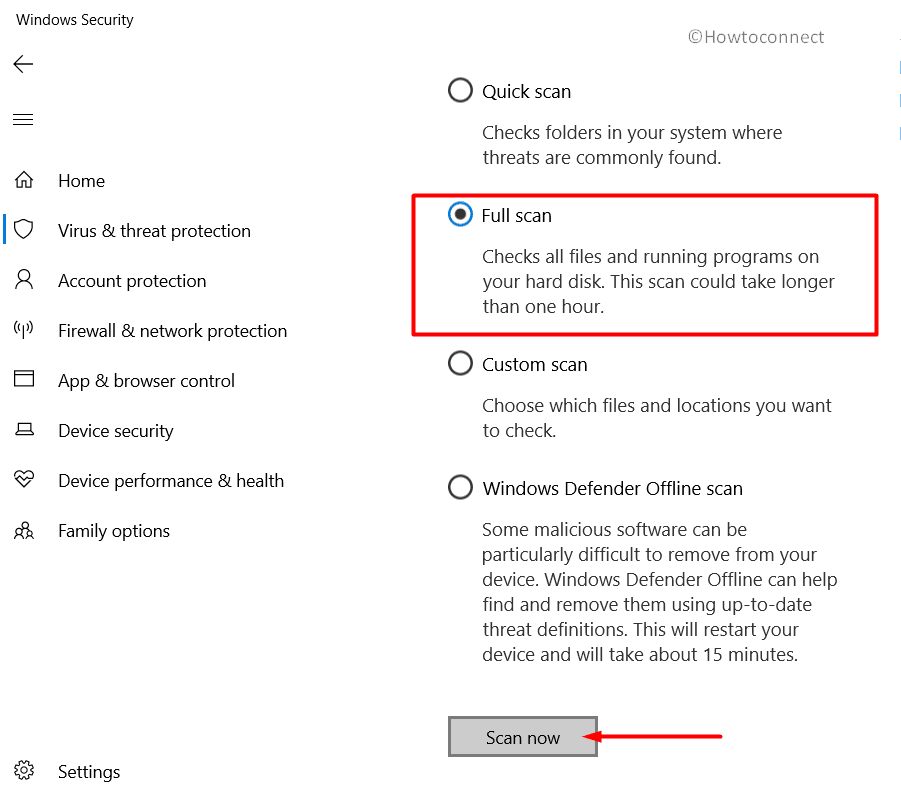
- Select the Virus & threat protection option in the main interface of the app. Click on the link Scan options on the adjacent side.
- Go ahead with the radio beside the Full scan option. To initiate the detection, hit the Scan now button at the bottom.
- Windows Security would start searching through every file in the system for defined viruses and system threats. The whole process may take a few many minutes.
- Once the process is over, you will see the scan results and diagnosed threats. In case any malware is found, click on the Clean threats button you see in the window.
- It would further lead you to a page where you will come across three more options, from which you must select Remove. Then, hit Start actions to eradicate all the virus components.
7] Update outdated drivers to resolve KERNEL_SECURITY_CHECK_FAILURE
You should update any badly-functioning old driver. This itself can be a savior in the many types of errors and computer malfunctions scenarios. Outdated drivers can result in several errors including KERNEL SECURITY CHECK FAILURE. Well, you might have probably found the advice to keep device drivers up to date before too. You may check for old drivers and update then through the Device Manager. Here, the devices with outdated drivers will be indicated with a yellow mark. Therefore, finding the driver causing the problem wouldn’t be too hard. Here are the steps you must follow to update the drivers for fixing KERNEL_SECURITY_CHECK_FAILURE error –
- Get access to the Run dialog and type devmgmt.msc. Then press the Enter key or click on the OK button.
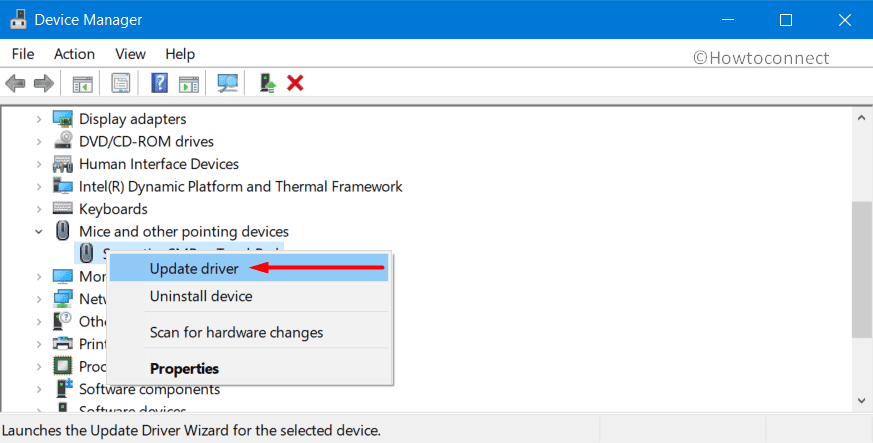
- In the Device Manager console, check through to see whether there is a yellow exclamation mark on any device. In case there is any, expand that device by clicking on it.
- Make a right-click on its drivers one at a time and from the fly-out menu click on the option Update driver. Then, just follow along with the on-screen instructions. The system itself will take care of the rest and will get the update for the chosen driver.
- Do this for every old device driver.
A quick note for non-pros: You shouldn’t tweak with every random driver. Also, be very careful while you update any drive- especially if you are a rookie computer user. In case something goes wrong, it can cause troubles for the associated devices. Roll back to the previous driver immediately in case something goes wrong while you were trying to update device drivers.
8] Delete Windows Update files whose installation wasn’t complete
Yet another cause of KERNEL_SECURITY_CHECK_FAILURE can be the termination of Windows updates before completion. Though patches install automatically, a bad network connection or other interruptions may cause the trouble.
So make it a point to delete any incomplete Windows updates or update files. This is how you can do it:
- Right-click on Start and click on Settings.
- Click on Update & Security. From the left section of the page, select Windows Update.
- Click on ‘View update history’ option.
- On the next page, you should be able to find the option Uninstall updates.
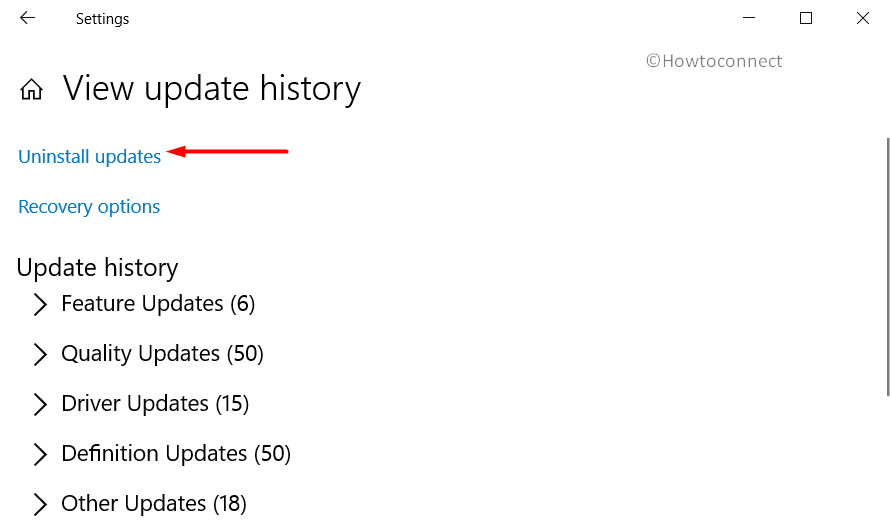
- Choose the latest patch and click the Uninstall button from the top ribbon.
9] Use sfc /scannow for getting any missing system files back in place
KERNEL_SECURITY_CHECK_FAILURE BSOD can also be due to missing system files and corrupted Windows components. Thankfully, Microsoft has a solution for this case as well. System File Checker aka SFC can help you recover the missing system files and fix the corrupted Windows system.
Follow the below steps to use the File checking utility –
- In the searchbox type ‘cmd‘. Right-click on Command Prompt and select “Run as administrator”.
- Allow the program to make changes when prompted by the User Account Control dialog.
- The Elevated Command Prompt window will open. Type the following command and press Enter –
Sfc /scannow - This command will kick start the check for corrupted elements and all system files. Now, this can take some time. The tool will hunt for the corrupted Windows components and fix them by itself. Also, any missing files will be replaced.
- Once the process is complete, reboot your system.
10] Uninstall Duplicate programs causing KERNEL SECURITY CHECK FAILURE BSOD
Presence of similar or duplicate applications may create conflict if their requests collide. Blue screen errors like KERNEL_SECURITY_CHECK_FAILURE can be kept away by making sure that you don’t have any duplicate or similar apps on your PC. You can find and then uninstall these apps very easily by following the given steps –
- Perform a right-click on Start and choose Run from the Win+X menu.
- In the text-box, type appwiz.cpl. Press Enter and you will see the Programs and Features window.
- Find and select the applications that are similar and may be causing the problem. Remove those by clicking on the Uninstall button you see on the top bar.
- When prompted, allow uninstalling. Then restart your PC.
11] Resolve the Memory issues with the system
Memory issues can be trouble. They can even lead to KERNEL SECURITY CHECK FAILURE as well as other blue screen errors. The Windows Memory Diagnostic utility in the OS is what you can try to manage the troubles with memory. Here is how you can use this utility –
- Firstly, open the Settings app in your PC.
- Type ‘memory’ in the search box of the application. From all the options that appear as results, choose “Diagnose your computer’s memory problems”.
- Finally, choose the “Restart now and check for problems (recommended)” option there.
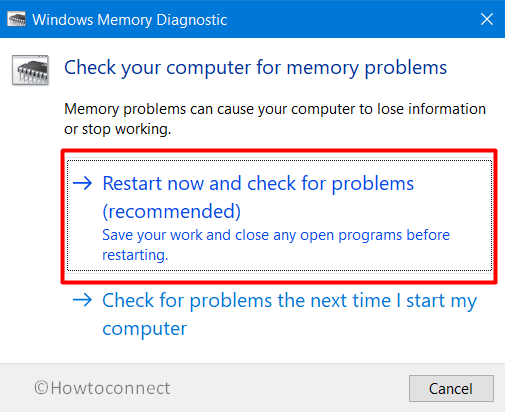
Your device will restart. After the PC reboots, a blue screen will appear and scan for memory problems will start.
The system will restart again automatically after the scanning process completes. You must be able to find the results of the scan after it sign-in.
12] Delete the junk files and other temporary files
Piling up trash or junk files (cache and temporary files) in your computer system can be trouble. As work on or use the PC and internet, a good lot of useless junk and temporary files can gather up in the system storage unless you occasionally delete it. As these files load up, storage space and system efficiency shrink. This, in turn, would give way to errors.
To manage this situation, use the Disk Cleanup utility. This tool can help free up some space covered by the temporary and junk files. Cleaning up the junk files on the system is one of the proven ways to fix some BSOD issues. Let’s see the steps you need to follow for using the Disk Cleanup utility –
- In the search box type “cleanmgr”.
- From the results, double-click on the Disk Cleanup Desktop app to open it. The small popup window that appears would require you to select a Disk.
- Select the Disk Drive (e.g. C:) that you want to clean up.
- Your system will now calculate the total junk-occupied space in your system which you will be able to retrieve through clean up. Click Clean up system files button and it might take a few seconds.
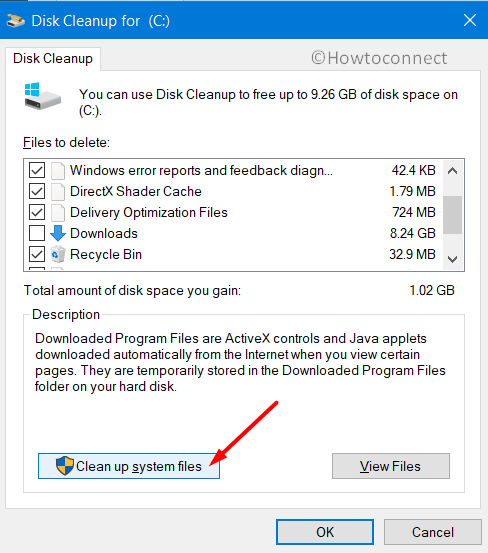
- In case you have some important files in the Download folder (or any other important folder), uncheck it before clicking “OK”. A better alternative is to create a backup of the important files to another folder beforehand so that you can delete the rest of trash in those folders.
13] Uninstall the third Party Antivirus Tools
People use different third-party Antivirus tools in order to safeguard the system from malware. But now that you have Windows Security application (as discussed above), use it rather. More importantly, third-party anti-malware can sometimes cause conflicts (though they’re trusted). It may even give way to blue-screen errors like KERNEL_SECURITY_CHECK_FAILURE. So, try removing such third party programs to fix BSOD –
- Press “Win+X” and with this, the Power user menu will open.
- Select Apps and Features from the flyout menu.
- Select the third-party antivirus programs and then click on the Uninstall button which you can see in the extended pane.
- Confirm uninstall and follow any on-screen instructions to remove the program completely.
14] Run the Disk checking tool to detect and fix KERNEL_SECURITY_CHECK_FAILURE
Blue screen errors like KERNEL SECURITY CHECK FAILURE can also be the result of the system fatigue. Continuous use of the computer may tire it, resulting in many functional issues including BSOD errors. Disc Checking Utility is handy for this problem. Try the below steps, if you have been using your computer for a long time and facing some troubles –
Step#1: Go to the Search box and type the word ‘cmd‘ in it. In the search results, you will find Command Prompt.
Step#2: Right click on it and then click on “Run as an administrator”.
Step#3: The system will ask permission for allowing the program to make changes. Click on Yes to allow.
Step#4: The Elevated Command Prompt window will appear. There, type the following command –
chkdsk C: /f/r/x
Step#5: Press Enter. This command will trigger the Disc Checking Utility and the process will start. Wait till it completes and then r3estart your computer.
15] Roll back to a previously created restore point
At times some of your recent activity may give way to blue screen error but you might not be able to spot what. In such scenarios, the best alternative is restoring your system and undoing all the recent activities. This option may possibly resolve the problems your PC is facing by bringing your system back to error-free condition. However, the downside of going for ‘System Restore‘ is that it will also erase your recent work and files. So remember to take a backup of your recent works before you perform it. To reset or restore your system follow the below-given steps –
Note that you need to have a previously created restore point for this to work.
- In the Cortana box on the taskbar, search for System Restore.
- From the results, select System Restore and enter the password, if prompted.
- Then, just choose a restore point and reset the system by following the instructions displayed on the screen.
Methods:
1] Prevent Automatic Restart
2] Trigger the Blue Screen Troubleshooter
3] Dettach any connected External HDD or hardware
4] Get all the latest update patches
5] Get into Safe Mode
6] Clean up any Malware in the system all in Windows Security
7] Update outdated drivers
8] Delete Windows Update files whose installation wasn’t complete
9] Use sfc /scannow for getting any missing system files back in place
10] Uninstall Duplicate programs
11] Resolve the Memory issues with the system
12] Delete the junk files and other temporary files
13] Uninstall the third Party Antivirus Tools
14] Run the Disk checking tool
15] Roll back to a previously created restore point
That’s all!!