Solve M7702-1003 Error Code Netflix On Windows 10. – Are you facing issues while streaming your beloved media on Netflix on Chrome internet browser? Multiple users report various similar problems while running their favorable Movies or TV Shows in this application on Windows 10.
You well know Netflix is a globally popular service and people admire it for media content. But unfortunately few users confront M7702-1003 Error Code Netflix when on Chrome on Windows 10. If you want to fix the error then follow the steps carefully.
M7702-1003 Error Code Netflix On Windows 10
Update Widevine Content Decryption Module
Before you update the component, ensure to disable the anti-virus and /or firewall software of your PC. This is necessary to do because in many instances the installed antivirus or firewall may stop the Widevine Content Decryption Module component from updating completely and accurately.
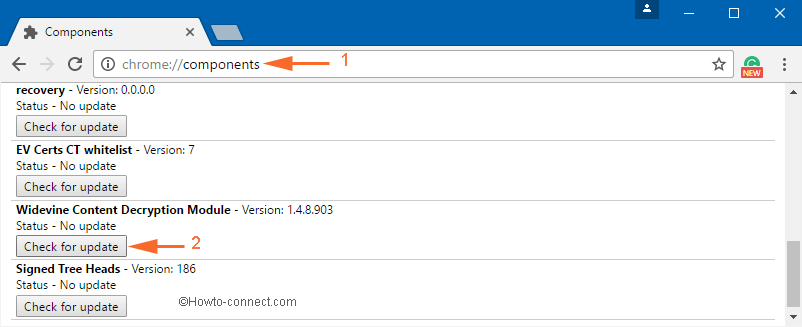
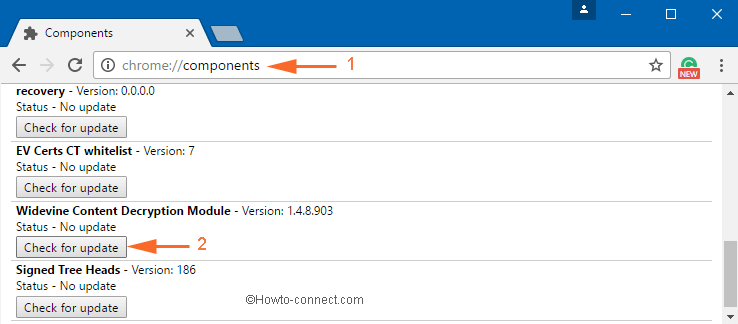
Step 1 – Launch Google Chrome and write the following on its address bar chrome://components. Press Enter to see the result.
Step 2 – Now, a list of various components will appear on Chrome. Find Widevine Content Decryption Module in the 11 Components list.
Step 3 – Check for updates appears just below the component, click on it.
Step 4 – A message Status – Component updated will come up after the update is over. So, restart the browser and see if M7702-1003 Error Code Netflix occurs.
Note – In case, the message Status – Component updated fails may appear. So, to resolve this, first of all, quickly reboot your computer, then try out the above steps exactly.
Enable Widevine Content Decryption Module Plug-in
Step 1 – On the address bar of the Chrome browser, write the following – chrome://plugins and continue by pressing Enter key.
Step 2 – In the Plugins, locate Widevine Content Decryption Module and click Enable.
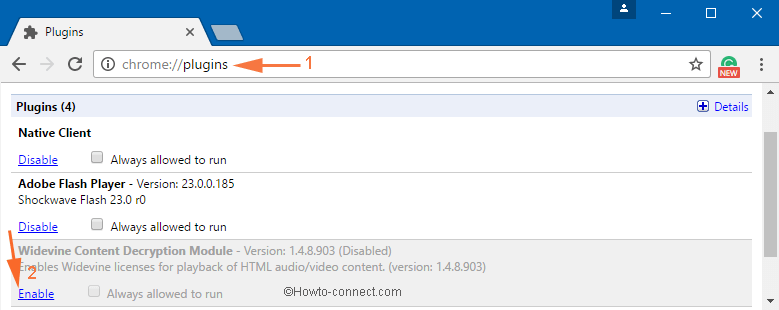
Note – In case, you don’t see Enable, click the checkbox next to the option Always allowed to run.
Step 3 – After you have enabled the plugin, launch Chrome, and try a video. Check if you have solved M7702-1003 Error Code Netflix On Windows 10.
Delete Widevine Content Decryption Module folder
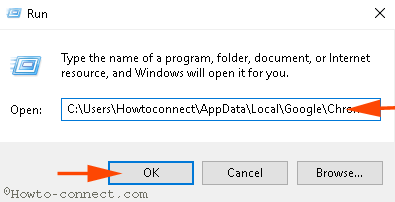
Step 1 – Close all the active Chrome browsers. It is best to note down or print out the following steps.
Step 2 – Press Windows key along with R, write C:\Users\Howtoconnect\AppData\Local\Google\Chrome\User Data in the text box and click Ok.
Important – Replace Howtoconnect with your own username on Windows10.
Step 5 – Inside User Data, locate WidevineCdm folder. Select it and press Delete.
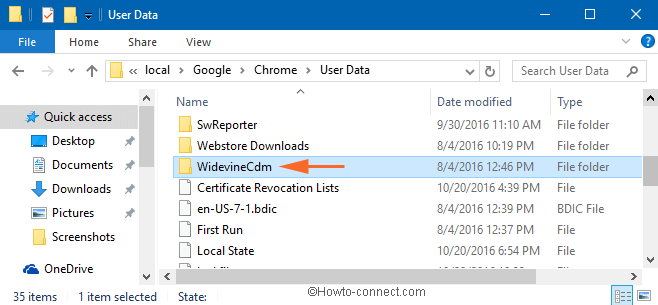
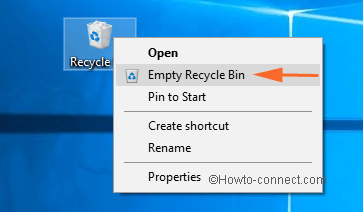
Step 6 – Now, head to the Recycle Bin. Right-click on it and click “Empty Recycle Bin“.
Step 7 – Once you have removed the WidevineCdm folder from the PC, launch the Chrome browser.
Step 8 – On its address bar, write chrome://componentsand Press Enter to proceed further.
Step 9 – Locate Widevine Content Decryption Module (written with version number) component and just below it, press “Check for update“.
Step 10 – Once the update is over, a message called Status – Component updated will show up. Finally, ensure that the solution of M7702-1003 Error Code Netflix On Windows 10 works.
Conclusion
So these are the ways to Fix M7702-1003 Error Code Netflix On Windows 10. When you will update the respective component on Chrome hopefully you will not get the Netflix error anymore.