If you discuss the Start menu, both these terms are referred to the most popular jargon that are over and over again utilized in the computer world, today. It acts as the foremost gateway to all the programs that are installed on your digital device. Start menu on Windows 10 always acts as a user interface component between you and the device.
Accessing the Start Menu
In general, the Start Menu of Windows 10 machine can be unfolded by hitting the Start button from mouse pointer or mouse pad. It is basically placed at the bottom of the left hand nook of your system.
What do you see After Accessing the Start menu?
The left pane of the menu reveals An ‘All apps’ button which can be noticed at the bottom. This is a vital feature and exhibits you a huge list of all the programs settled in alphabetical order installed on the computer.
There is a ‘Search’ bar situated directly underneath the button of All apps. You will meet with this as a useful feature permitting you to enter the name of the program or file, which you are exploring and get the results exhibited on the menu.
You can catch a sight of the Power button just above All apps in the right hand pane. Pressing the button unwinds a tile which enables you to discern 3 options leading to Restart, Sleep, and Shutdown a machine.
While on the right flank, you will experience the menu thoroughly covered with tiles and each tile refers to an application. From the menu, you will be able to access important applications straight away only after hitting.
Tips to Make Changes in Windows 10 Start Menu
It has been kept versatile so you are able to Make Changes in Windows 10 Start Menu without any hitch as per your preferences and convenience. It is possible for you to change its size, remove or add items, altering the background color, and everything that you wish.
Few specifically handy but grandly tips which could give you mileage to Make Changes in Windows 10 Start Menu is illustrated underneath.
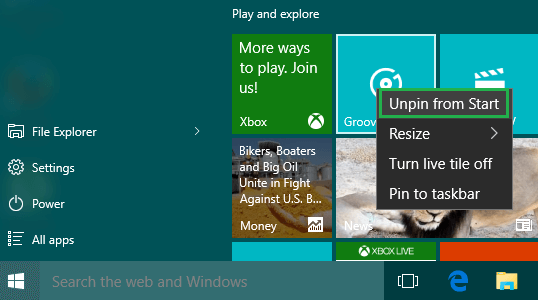
Tip No 1: Process of removing tiles and making the Start Menu appear like Windows Vista or 7:
- Move your mouse pointer to the right flank of the start menu and perform a right click on a tile thereupon choose the option Unpin from Start.
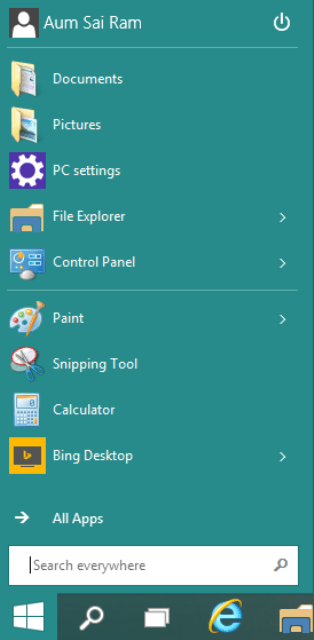
- Once you Unpin each of these live tiles successively, you will be able to view a slender Start Menu without any live tile and the display will appear very similar to Windows vista or 7 Start Menu.
- It is possible for you to invoke all the installed programs and applications by hitting on the choice All apps by going to the bottom of Start Menu. The aforesaid actions are well enough to transform its appearance seemingly pretty identical to the Start Menu of Windows 7 when you strike existing ‘All apps’ button lying at the bottom.
How to Change Windows 10 Start Menu Look like Windows 7
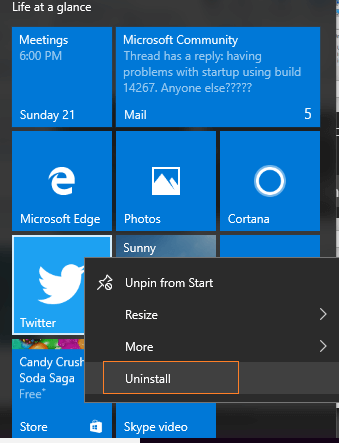
Tip 2: Uninstall Applications
- The Menu permits you to uninstall applications straightforwardly via the tiles situated at the right segment. You can reach the choice by implementing a right click thereafter navigating to the context menu.
How to Completely Uninstall Software From Window 10 – Beginners
Tips 3. Pin or Unpin the Applications
- This facility very vital when you care for both of the easy navigation and the look of the start menu. All you need to administer a right click on a specific tile and punch Pin to Start or Unpin from Start.
Windows 10 – How to Pin to, Unpin From Start Menu, Start Screen
Tip 3: Resize the Start Menu of Windows 10
- Resizing the menu is at your fingertips. Simply hover your mouse pointer over the left edge of the menu, press hold and drag towards the left.
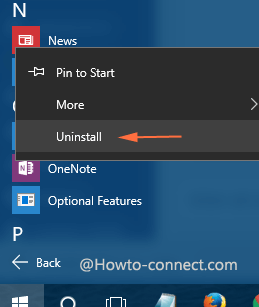
Tip 5: Uninstall Items via Left Side of Start menu
- Yes, it is possible to do. Mere, perform a right click on desired application and move off with Uninstall. A tiny sized pop up written Uninstall will hang to be hit.
Tip 6: Unpin items from left hand side of the Start Menu
- For this purpose, solely drag-n-drop the opted item to the left flank of the Menu which will sufficient to displaying instantly.
Tip 8: Display or hide recently added and most used programs of your choice
If you intent that it should manifest recently added or most utilized programs in the left flank then pursue
- Hit the Settings symbol visible at the start menu.
- Punch the Personalization block at the settings app spread over the screen.
- Head towards Start tab in the right sidebar and hit it thereupon drag both the sliders for Show most used apps and Show recently added apps to on mode.

Tip 10: Changing the Background color of your Windows 10 Start Menu and its Transparency
- You must be aware that by default, the menu showcases dark black color. In this context, you apply theme oriented accent color into it. This task can be accomplished once more through the Personalization block lying on the settings app.