Procedures to Manually Remove Viruses on Windows 10. During a vulnerable attack, Until you take preventive measures like the disconnection of the internet, etc, a cluster of scripts piles up in different folders. Main tasks start now since hoards of malignant files reside deep into the directories. To Search all the malicious data manually and remove them is not less than climbing a high mountain.
So, here we are writing ways which could help you to Manually Remove Viruses on Windows 10.
How to Manually Remove Viruses on Windows 10 quickly
Stop the Aggressively Increasing Infection First
Before we talk about the removal procedure, it’s very important things to do when virus attacks:
- Disconnect Internet as soon as possible,
- If any pop up asks to confirm or choose between Yes or No don’t touch it.
- Close the running browsers and applications.
After you take the above measures, you could stop the aggressively increasing infection.
Recognize the Infected Files or Stored Malware
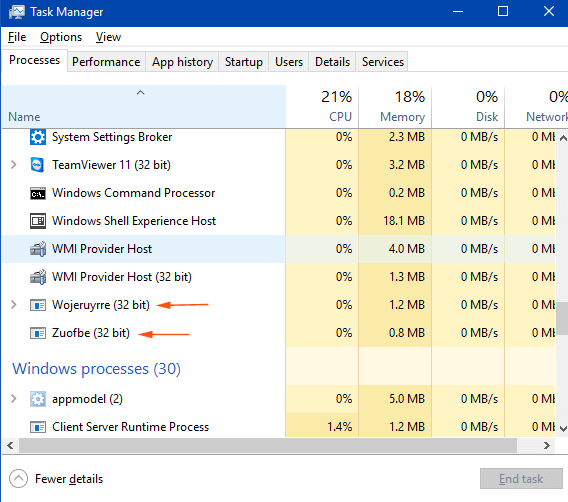
If you know the file system and arrangement in Windows 10 you can easily recognize the scripts and malice. To trace out the files, open task manager, and observe the Tasks in processes column. See for the awkward type names which do not generally exist in Windows 10.
You can observe the name alike to the names showcased in the screenshot below:
Step 1 – Perform a right-click on the tasks one by one you think as suspicious and select Open file location.
Step 2 – This action opens the folder where the suspicious file exists and highlights it.
Step 3 – Right-click on the file and opt for Delete in the context menu.
Few files are deleted simply, but more files deletion ends up with error notes.
Errors and solutions when Delete Infected Files
Here you encounter mostly two types of error messages –
a) The action can’t be completed because the folder or a file in it is open in another program,
b) Access Denied – you will need to provide administrator permission to delete this file
Solution: The action can’t be completed because the folder or a file in it is open in another program
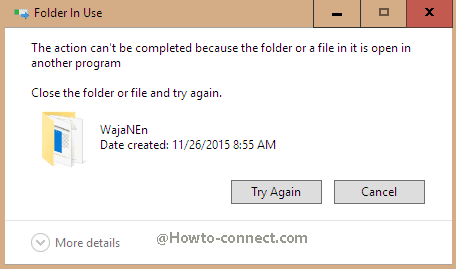
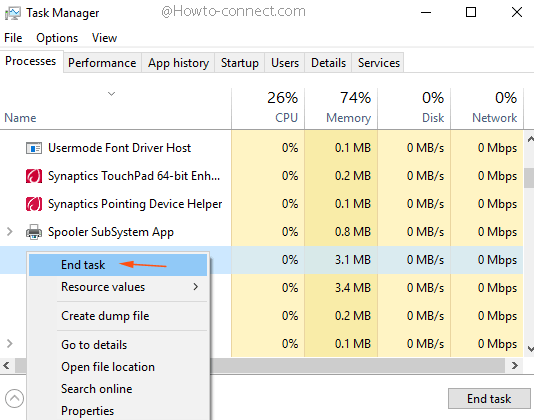
Step 1 – Execute a right-click on a vacant space at the taskbar and move off with Task manager located at the lower portion of the context menu.
Step 2 – In the Processes tab, locate the files which you are unsuccessfully deleting. Right-click on the suspicious file and choose End task.
Step 3 – Move back to the malicious file and delete it.
Solution: Access Denied – you will need to provide administrator permission to delete this file
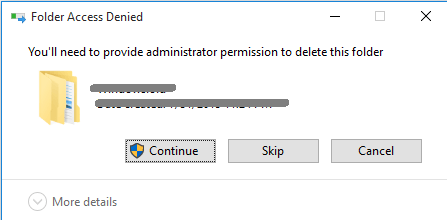
Step 1 – For eradication of this error, you require changing Permission for yourself. Hence make a right-click on the malicious file and select Properties.

Step 2 – Switch to Security tab and click on Edit button.
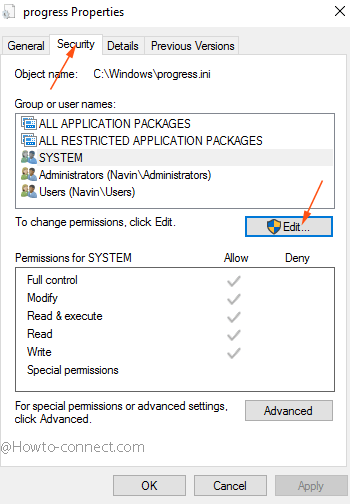
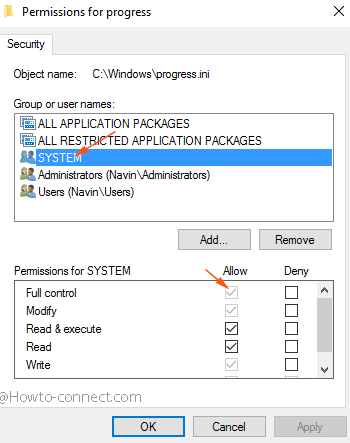
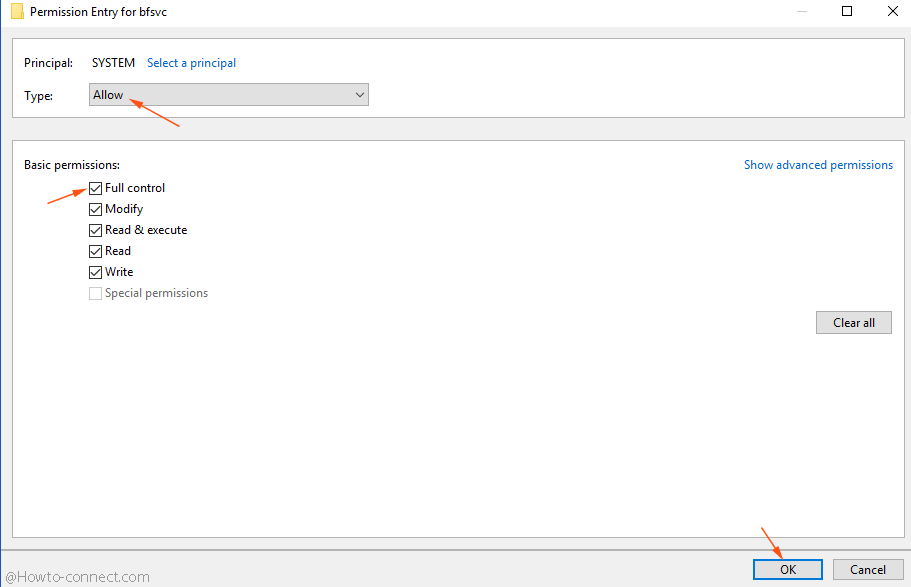
Step – 3 – Upon the emergence of the Permission Wizard, ensure to take Full control for System. For this, In the Group or user names block, hit on System and in Permission for System check the box adjacent to Full control in the Allow column.
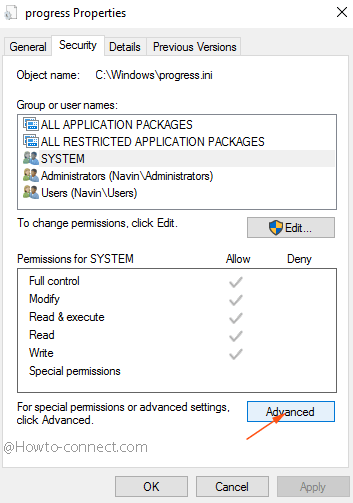
In case, you notice all the columns in Permission block greyed then
Step 4 – Press Advanced button underneath the Permission block.
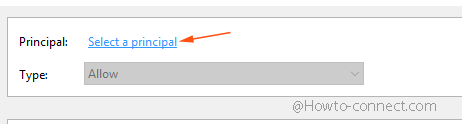
Step 5 – Advance security settings for the file appears, click Add button at the bottom part of the wizard.

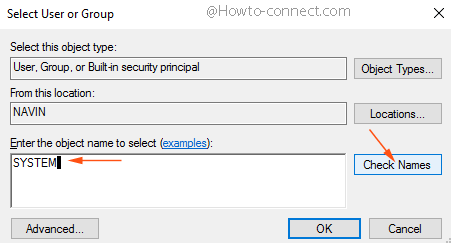
Step 6 – In front of Principal, click on the link Select a Principal.
Step 7 – On Select User or Group wizard, below Enter the object name to select, write the name for which you like to render permission. Write username.
Step 8 – Click Check Names button which will convert the text into a link and finally click OK button.
Step 9 – In front of Type, choose Allow in the drop down.
Step 10 – In the lowers box, check all the boxes for basic permission, and lastly click OK.
Step 11 – Return back to the malicious file and try to delete it.
Still, you fail to Manually Remove Viruses on Windows 10, few utilities like ADWCleaner, MalwareByte will certainly help you.
Use Command Prompt to Manually Remove Viruses
To Manually Remove Viruses on Windows 10, the command prompt roles efficiently as a pain reliever.
First of all, Trace out whether which virus is affecting your Windows 10 PC. (However, I suggest you to find the Virus files or setups through Task manager since it is easier one).
Step 1 – Open elevated command prompt (If you are unknown to the process click the link).
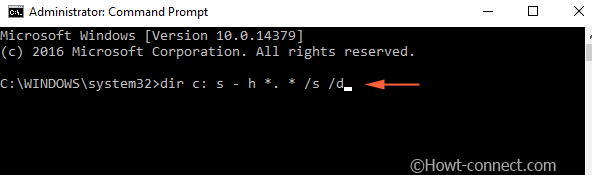
Step 2 – Copy dir c: s - h *. * /s /d paste into the command prompt and hit on Enter. We speculate here that Windows is installed in the C drive of your system if in another one Replace with c.
Step 3 – This will present a gigantic list of all the system files in C directory. Trace out the setup or file comprising unusual names.
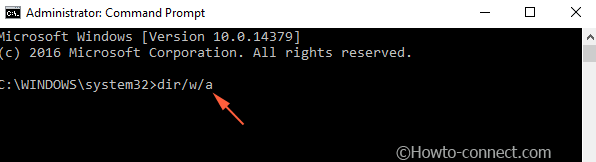
Step 5 – If something hidden files exist in the drive, copy dir/w/a, paste into the command prompt, and press Enter.
Step – 5 – Scroll downward on Command prompt to reach the bottom, copy
Step 4 – Once you locate the virus file, type del virusname and tap Enter.