How to Enable or Disable a network adapter on Windows 8. You can enable Network Adapter or Disable Network Adapter through Network Sharing Center or Device Manager or Command Prompt. Network adapter is an important hardware of the computer system; it connects the PC to the Internet. Network Adapter is also known as Ethernet add-in cards for PC. Network Interface Controller is also known as NIC and LAN card i.e. Network interface card, network adapter, LAN adapter. Nowadays Ethernet and wireless network adapters both are attached to integrated circuit chips pre-installed on the PC. Network Adapter helps you to connect to Internet through wire as well as without wired means wireless network.
Way to Enable or Disable Network Adapter through Network and Sharing Center
- Firstly Ensure that your PC is working properly, It doesn’t matter what is your PC Operating system.
- Open your Control Panel.
- In Control Panel, Click on the Large icon then choose Network and Sharing Center then Change adapter settings on the left side. (As seen in the screenshot below)
- Under the Network and Sharing Center, you have to click Change Adapter Settings.
- You can see you have a network adapter then you can apply right-click, and do some work as given below:

- To enable the network adapter, click Enable. You will have to write administrator password or approve confirmation, type the password, or approve confirmation.
- To disable the network adapter, Here you will also have to approve the confirmation or write the password.
- This is a simple way to enable or disable Network Adapter.
Way to enable or disable the Network Adapter through Device Manager
- Firstly open the Control Panel.
- Click on the Device Manager Icon to choose the Network Adapter.
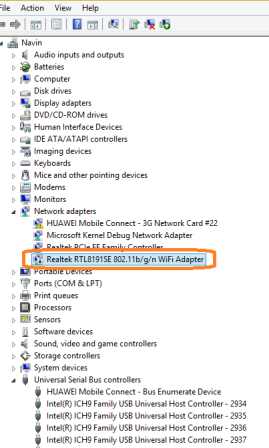
- After that, you have to choose the option of network as like (Realtek RTL8103E Family PCI-E Fast Ethernet NIC (NDIS 6.20),). Right click and choose Enable option on the toolbar if you want to enable but if you want to disable you have to choose Disable option on the Toolbar and click yes to work properly. (See ScreenShot)
Way to Enable or Disable the Network Adapter by using Command
- Open the elevated Command Prompt by using RUN (Windows bottom + R), and type the CMD in RUN

- Now you have to enter the command as given below and press enter. This will give you network adapter names on your PC.
netsh interface show interface

- After that, you have to write your “network adapter name” admin= ENABLE for enabling the network adapter but,
- If you want to disable the network adapter by using command prompt you have to write the “network adapter name” admin= DISABLE after that Close the Command Prompt by using EXIT Command.
OR,
- Open the elevated Command Prompt by using RUN (Windows bottom + R), and type the CMD in RUN
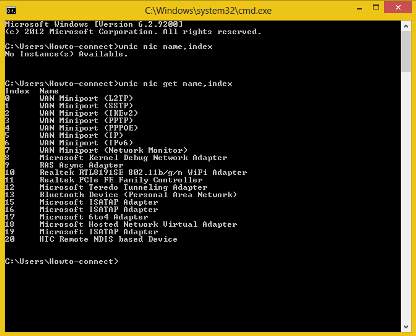
- Now you have to enter the command as given below and Press enter; This will give you a list of all network connections on your PC with Index Number for each item.
wmic nic get name, index
- After that, you have to write command into the command prompt which is given below then Press Enter.
wmic path win32_networkadapter where index=index-number call enable
- This command helps you to Enable the Network adapter but if you want to Disable the Network adapter then you have to Type the command into Command Prompt as given below:
wmic path win32_networkadapter where index=index-number call disable
- If you do all the instructions as given above then you have to close the Command Prompt.