6 Procedures to Open Troubleshooting In Windows 10. – When you confront an issue on Windows 10, a universal solution Troubleshoot is always ready. Whether the Network, Brightness, Blue screen, Audio, Printer, Update or any other problem occurs you think to run troubleshooter first. So it’s relevant to learn how you would open this trouble reliever tool on your Windows 10.
Windows 10 renders the troubleshooting tool for almost all the components. All the tools are kept a single location and you can access them quite easily. See the guide –
Open Troubleshooting In Windows 10
In pursuance of accessing the Troubleshooting, Control panel, Start search, Settings search, and Folder location help.
From Control Panel
Step 1 – Click on Start button, type control, and then press Enter. Instantly you will find the control panel which will be used to open troubleshooting.
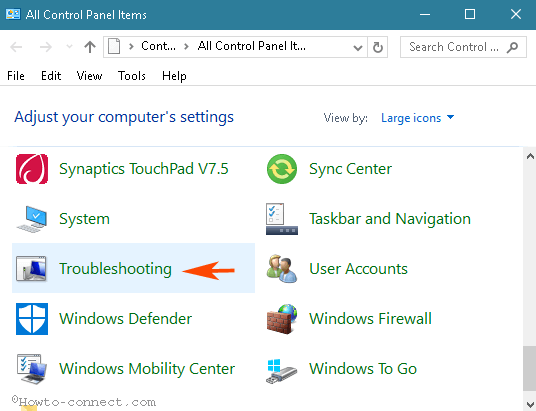
Step 2 – Locate Troubleshooting on the applet and double click on it.
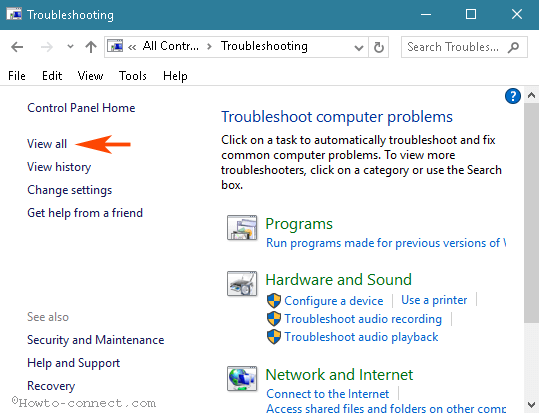
Step 3 – In the left pane of the appearing Window, click View all. Now you can see a list of Troubleshooters, so double click on either one in order to open.
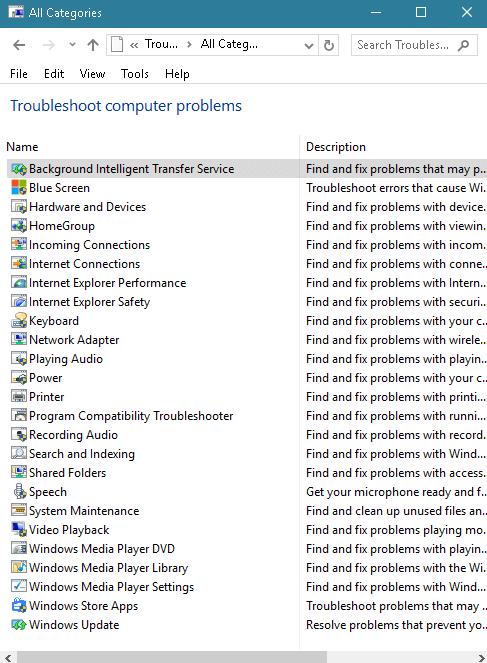
Step 4 – You see the list of Various Troubleshooting tools in the below screenshot. Simply double click on the Troubleshooter from the list that you need to start.
Open Troubleshooting In Windows 10 from Start
Step 1 -Click on the Start button and type troubleshooting and press “Enter”.
Step 2 – Once the Troubleshooting Window comes on the screen, click “View all” in the Left pane.
Via Settings app
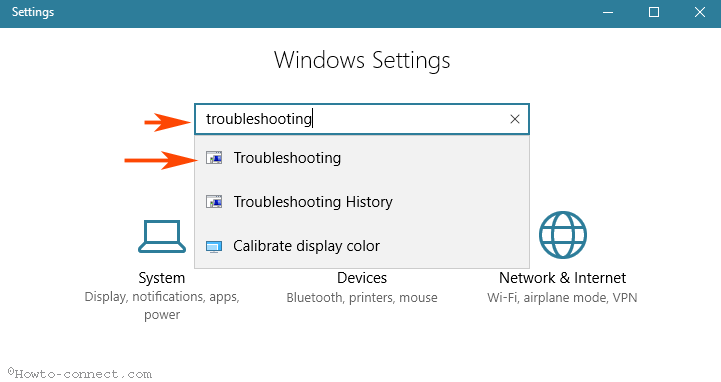
Step 1 – Click Win and I all together, type troubleshooting, and then press Enter.
Follow Step 2 of Method 2 to open the Troubleshooting list.
Using System Configuration
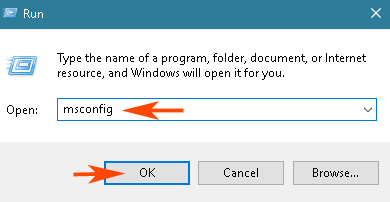
Step 1 – Click Win+R, type msconfig, and press Enter. Consequently, you will notice that a System configuration window is appearing on your computer’s Screen.
Step 2 – On System configuration window on the screen, click on Tools to switch the tab.
Step 3 – Various tools list appears here, so select Windows Troubleshooting. Finally, click on Launch to open Troubleshooting window.
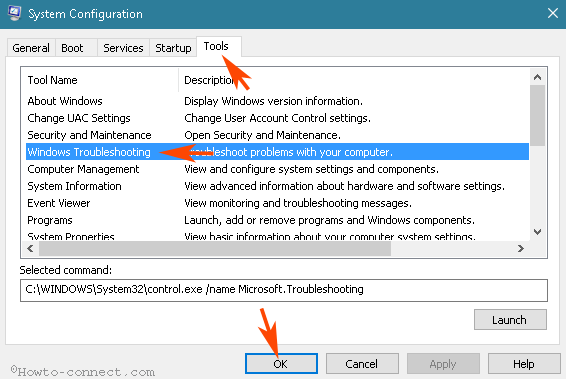
Once more follow Step 2 in the 2nd method and navigate to the list of troubleshooting tools.
Open Troubleshooting In Windows 10 through Folder Location
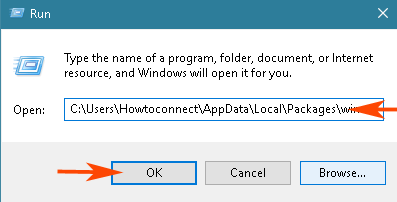
Step 1 – Press the shortcuts pair Win and R keys side by side and launch the run dialog box.
Step 2 – Copy the path from below, paste into the stipulated space in the run command and press Enter.
C:\Users\YOURUSERNAME\AppData\Local\Packages\windows.immersivecontrolpanel_cw5n1h2txyewy\LocalState\Indexed\Settings\en-USImportant – replace YOURUSERNAME with your original username on the computer before clicking the Enter button.
Step 3 – You notice a list of elements that help you to open different pages of Settings. Locate the element that accesses Troubleshooter. Commonly the element is
Classic_{08EB53B7-3384-473A-8D2C-6C0E71F3BF34}
Step 4 – Double click on the above element and Press “View all” located in the right pane. Once you see the list, select the troubleshooter that you need.
Using Another Folder location
#Step 1 – Click Win and R keys jointly. You will experience the run box on the desktop.
Step 2 – copy
C:\WINDOWS\System32\control.exe /name Microsoft.Troubleshooting
paste into the provided location next to Open in the run box and press “Enter”.
Step 3 – Click View all in the left section.
Conclusion
So, these are the 6 easy ways to Open Troubleshooting In Windows 10. The first 3 methods are very simple even a beginner can follow without any trouble and the last 2 are helpful to experienced Windows 10 users. If you know extra ways kindly share with us through a comment.

A C/windows32progame screen comes up, then my mouse freezes, Ctrl+Alt+Del, neither will Esc work? Where shoud I look to solve my problem?