Despite being one of the most effective utility, you might be thinking to Permanently Disable Command Prompt in Windows 10 because of safety issues. Commands (cmd.exe) comes handy when users need to utilize MS-DOS commands to accomplish advanced tasks, manipulate Windows operating system along with programs and troubleshooting of various problematic processes. So, to stop every user, including the Administrator from accessing this built-in tool, we will show you two simple ways to do it.
Methods to Permanently Disable Command Prompt in Windows 10
Things might reverse either way if bestows in wrong hand using this utility for running a command that might cause harm to the Windows or make drastic changes in the computer. However, making Disable Command Prompt in Windows 10 involves some tweak in Local Group Policy Editor as well as Registry Editor. We will show them in details upon proceedings.
Method-1: Via Local Group Policy Editor
Method-2: Through Registry Editor
Method-1: Via Local Group Policy Editor
Step-1: Perform a combined press of “Win+R” hotkeys to open Run dialog box in Windows 10.
Step-2: Type or copy-paste gpedit.msc in the text box and press the OK button.
Step-3: Once you Open Group Policy Editor, navigate to the below-given path on its left sidebar.
User Configuration => Administrative Templates => System
Step-4: Upon reaching to System, slide over to the right side panel and look for the policy Prevent access to the command prompt under Setting.
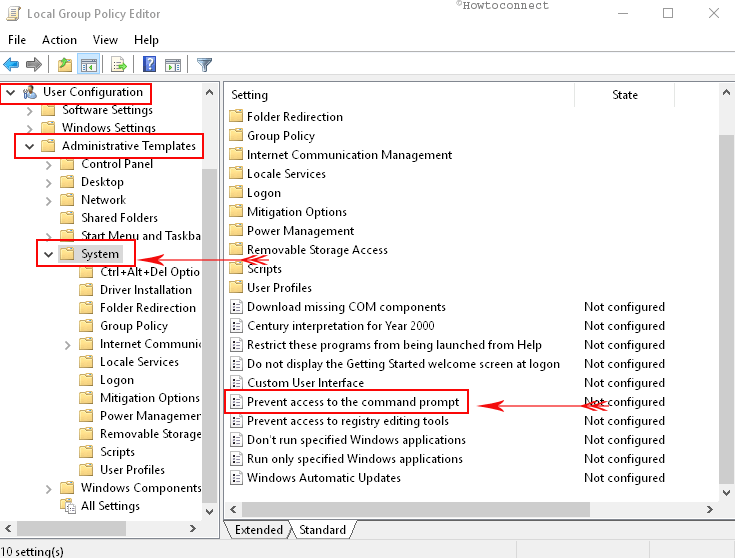
Step-5: Once you find it; make a double-click on it to modify its settings.
Step-6: Now, select the Enabled option from the left and hit the Apply button first then Ok to continue disabling Command Prompt permanently.
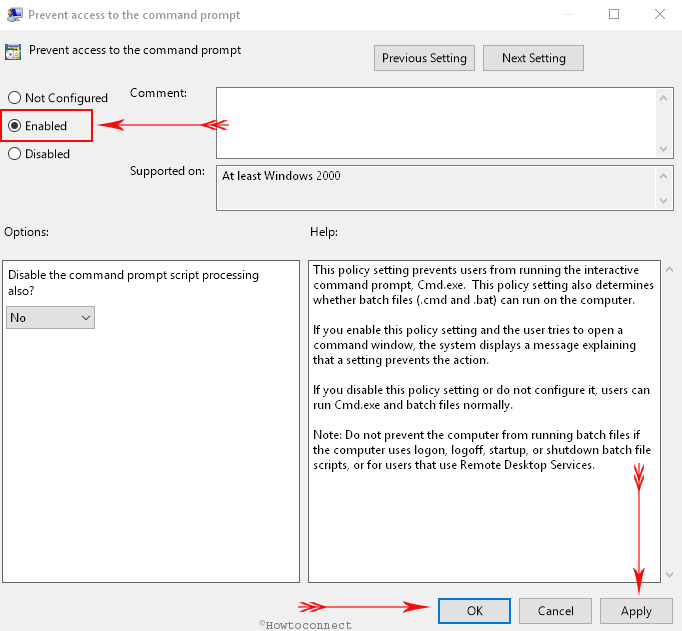
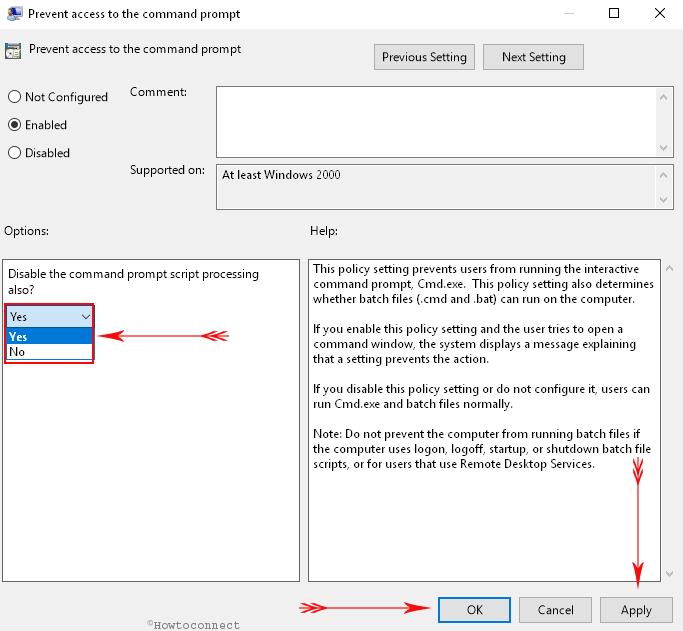
Note – If you want to disable the Script execution too, simply choose “Yes” from the drop-down menu below “Disable command prompt script processing also” under Options segment.
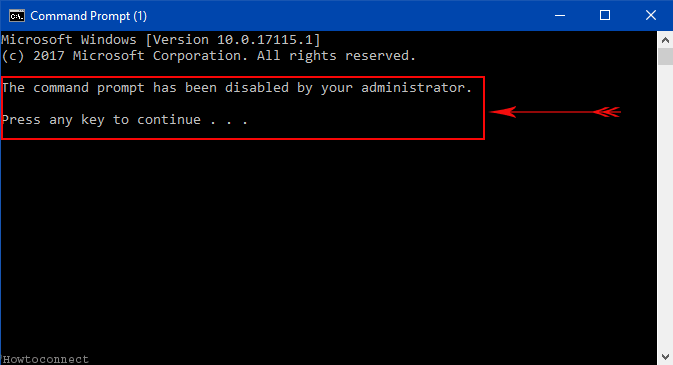
Therefore, Command Prompt will be permanently disabled from your Windows and cannot perform anymore task. If you attempt to execute a command here, it will display the below-given message –
“The command prompt has been disabled by your administrator. Press any key to continue”.
However, for instance, if you feel the necessity of enabling the Command Prompt again, follow the same guidelines up to Step-6 and select Disabled.
Method-2: Through Registry Editor
1. Perform a click on the Cortana search bar and type regedit in it.
2. Select it once appears in the search result to Access Registry Editor in Windows 10.
3. Now, navigate to the following path from the left pane of the Registry:
HKEY_CURRENT_USER\Software\Policies\Microsoft\Windows\System
Note- If you see the System key is missing under Windows, you need to create it. To do so, go through the below procedure:
i. Make a right click on the Windows key, hover the cursor over New and then choose the Key option.
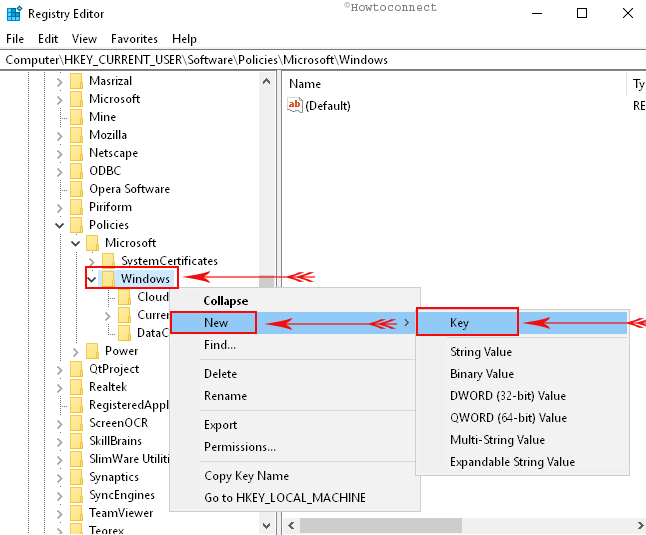
ii. Name this key as System.
4. Now, jump over to the adjacent right side and check if there is a DWORD DisableCMD is present or not.
5. If you cannot find it, you have to Create a New DWORD Value. So, put a right click on System key, select “New” and then click “DWORD (32-bit) Value“.
6. Name the new DWORD as DisableCMD and perform a double-click on it.
7. The value data is 0 by default represents Command Prompt is enabled. As you need to disable it completely, change the value from 0 to 2 and select Ok button to save the changes.
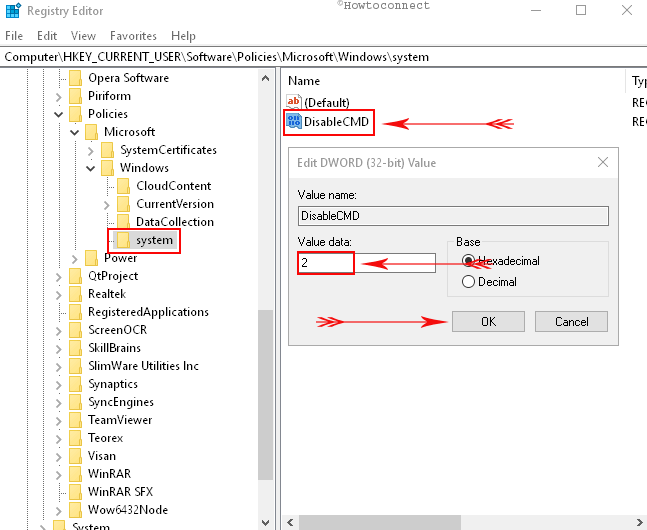
Therefore, with an easy registry tweak also, you can quickly Disable Command Prompt in Windows 10. If you want to enable it again, follow the exact same procedure and put the value of DWORD DisableCMD to 0 again.
That’s it, so simple and easy rather. Isn’t it!!
