You may view an unnecessary watermark just above the right end of the taskbar that hints to activate your Windows 11 or 10. The annoying symbol ruins your desktop look and reveals that you don’t possess a genuine Windows version as well. Usually, it appears when you are unable to activate your OS by providing the correct key. And most of the time, a pirated version of Windows is responsible for this. However, the best way to get rid of it is to actuate the operating system with a valid product key. But despite you don’t own a legitimate digital license you can pretty simply Remove Activate Windows 11 or 10 watermark Using Registry Editor.
Buying a valid copy of Windows 11 or 10 is enough expensive and everyone can’t afford it. Most importantly no one wants to pay for a product that can be obtained free. As a result, a substantial number of people are using the forged Windows OS to save some bucks. Moreover, it only hampers the look and makes you feel that you are using an illegal one. Without wasting any more single second, let’s get started with the procedure of dispelling the watermark. Related –
Way to Remove Activate Windows 11 or 10 watermark via Registry Editor
Here is How to How to Remove Activate Windows 11 or 10 watermark Using Registry Editor –
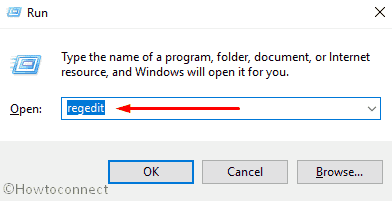
Step-1: Press Win+R hotkeys simultaneously and let the Run dialog appears. When it shows up, type regedit in the void text field and then hit Enter.
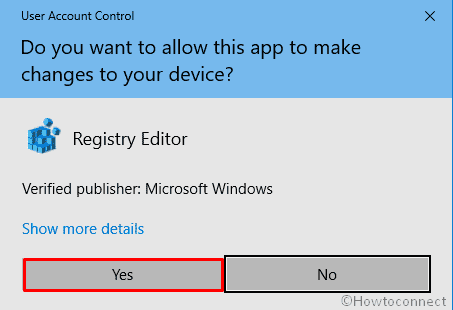
Step-2: If a UAC prompts up, click on Yes to give affirmation.
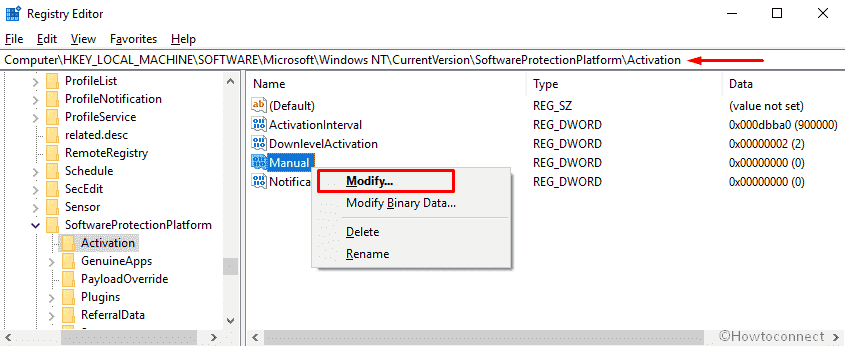
Step-3: Next, navigate the following path in the Registry Editor –
HKEY_LOCAL_MACHINE\SOFTWARE\Microsoft\Windows NT\CurrentVersion\SoftwareProtectionPlatform\Activation
Step-4: Shift to the right pane and in order to edit the Manual DWORD key, make a right click on it and select Modify.
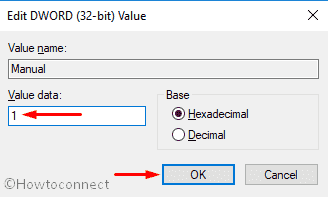
Step-5: Put 1 in the Value data box and either hit Enter or click on OK to save the changes.
Once done, close the Registry Editor and Restart your computer.
That’s all. But keep in mind, it’s not a permanent solution to Remove Activate Windows 11 or 10 watermark as it would return soon. In that situation perform the same procedure again.