Screenbird is possibly one of the best web app for everyone who wants a screen recorder. It is a screen casting tool that runs in browser and renders to record whole complex of screen. While comparing to other browser-based screen recording tools, Screenbird is not limited to record within the browser window only, but the recorded videos can also be stored to computer drives or transferred to USB stick as well as uploaded over the internet for sharing purpose.
If you use trial version of Screenbird tool, it lets you to upload 2 hours and 30 minutes lengthy videos to any cloud storage directly. Please note, Screenbird runs in your internet browser with support of the Java plugin and high-speed internet. Without installing java first to your computer, Screenbird will not start to work.
How to use Screenbird on your computer?
- To run Screenbird, at first install updated java plugin from prompted pop-up. Visit Screenbird.com
- Then go to screenbird.com in your browser. It might take a minute to load at the start. Once it is successfully loaded, you will get a rectangular control bar on your desktop screen. This control bar can be minimized or stopped simply. By default, it is configured to record your whole screen but you can set limited recording area also.

- If you are using Screenbird on the laptop, it will record audio from mic automatically during recording time. On the desktop computer, you need to install mic based headphone or only mic.
- In the control bar, a timer lets you see how long you have recorded. Here, you can stop or pause the recording session at any time. As soon as you stop recording, Screenbird will load your screencast and permit you to watch it preview.
- Next, you notice the recorded preview launches in another window on the desktop screen. Then click on Play button underneath left panel besides desktop taskbar to see it.
- In the right panel, you will see a Finalize button. Don’t click on it until you are satisfied with what you watch in the recorded preview.
- In order to resume recording again of the existing part, go to control bar and click on the Record button (Red sign) from here.
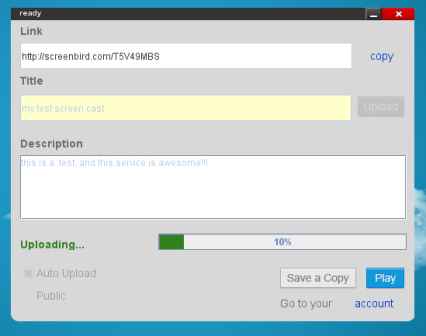
- After finishing the record action, click on finish button. Next, Screenbird asks you to type a title and description and it will take some minutes to do encode process.
- Once the video has been encoded, click on the Upload button to start uploading it to Screenbird’s cloud storage.
- Here, you will get a share link of recorded video and click on copy link to share the video with others.
- If you want to save the recorded video to your hard disk instead of uploading it to cloud then click on Save a Copy button. Thus, the video will be stored in MP4 format to target locations.

Conclusion
Screenbird app provides free of cost service by default. If you use Screenbird using a premium account then it will facilitate you to upload up to 500 minutes of videos and also share them to YouTube.
