When you Set High Blocking Level for Cloud Protection in Windows Defender, it aggressively scans and stops threats. Windows 10 aims at giving the highest level of possible security to the users. It protects the device from all kinds of threats such as viruses and even ransomware.
Windows Defender undoubtedly does a pretty good job in maintaining the health of the device yet nothing is completely effective. With a high blocking level of protection, Windows Defender becomes more capable of marking suspicious files. You can see an interesting guide How to Schedule Windows Defender Full or Quick Scan on Windows 10 in this concern. To know the procedures to set High Blocking Level for Cloud Protection in Windows Defender Windows 10 carefully follow this guide. You will find here 2 ways.
Set High Blocking Level for Cloud Protection in Windows Defender Windows 10
Using Group Policy
Join Advanced MAPS
Step 1 – Click Win+R to open the Run box, type gpedit.msc and press Enter.
Step 2 – Once the Group Policy opens, unfold the following folders one after another.
Computer Configuration => Administrative Templates => Windows Components => Windows Defender Antivirus => MAPS
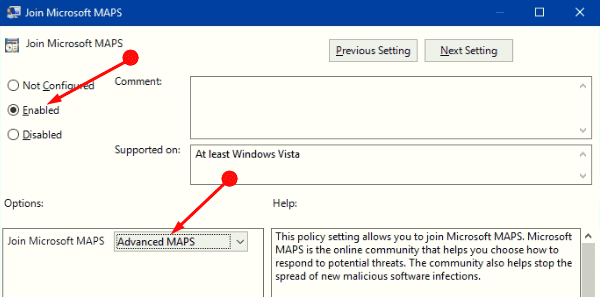
Step 3 – After reaching the MAPS option, move out to the adjoining pane double-click on the Join Microsoft Apps.

Step 4 – In the next screen pick Enabled option and then move to the drop down box to select Advanced MAPS.
Set High Blocking Level for Cloud Protection
Step 5 – After enabling the MAPS program use the Group Policy again to expand keys.
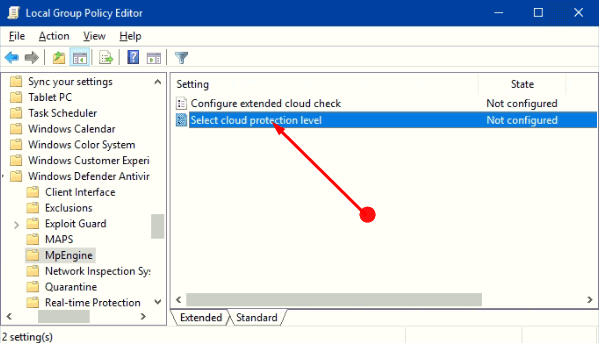
Computer Configuration => Administrative Templates => Windows Components => Windows Defender Antivirus => MpEngine
Step 6 – After MpEngine click twice on the Select Cloud Protection Level in the right pane.
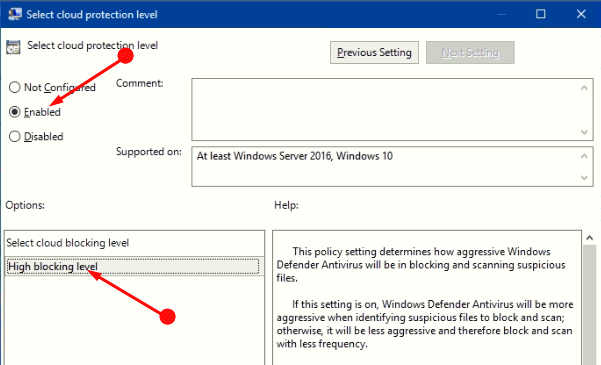
Step 7 – Then in the next screen, select Enabled as the option and reach to the drop down for choosing High Blocking Level.
It is noteworthy mentioning here that selecting the high-level option forces Windows Defender to block and scan files more frequently. The only drawback is that it at times leads to false allegations on files which are safe.
This policy setting determines how aggressive Windows Defender Antivirus will be in blocking and scanning suspicious files.
If this setting is on, Windows Defender Antivirus will be more aggressive when identifying suspicious files to block and scan; otherwise, it will be less aggressive and therefore block and scan with less frequency.
Policy Setting help
The specific Policy settings for Select Cloud Protection Level suggests the following –
1. For more information about specific values that are supported, see the Windows Defender Antivirus documentation site.
Note – This feature requires the “Join Microsoft MAPS” setting enabled with a view to functioning.
2. Possible options are –
(0x0) is the option for default Windows Defender blocking level.
(0x2) indicates High blocking level – aggressively prevent suspicious while “optimizing client performance” (more chance of false positives).
(0x4) High+ blocking level – aggressively stops suspicious and apply extra protection measures (may impact client performance)
(0x6) Zero tolerance blocking level – hiders all suspicious executables.
Set High Blocking Level for Cloud Protection in Windows Defender on Windows 10 Home
Using Registry Editor
If a user uses a Windows 10 Home PC and would like to increase the Defender level then they need to modify registry keys as Group Policy Editor is not available.
But before proceeding a short note of warning to the users is that if any incorrect actions are taken in the Registry Editor then the PC might stop working. Hence one needs to be extra careful while changing the registry keys and should also take a back up of the data. It is also advisable to create a system restore point.
Step 1 – Launch the Run box (Win+R) and type regedit in the appropriate space. Do not forget to press Enter to execute the command.
Step 2 – Now unfold the given keys one after the another.
HKEY_LOCAL_MACHINE => Software => Policies => Microsoft => Windows Defender
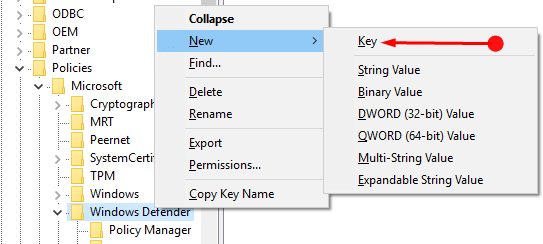
Step 3 – Now input a right click on Windows Defender entry and choose the option New followed by Key. Click on the option Key and name it as SpyNet.
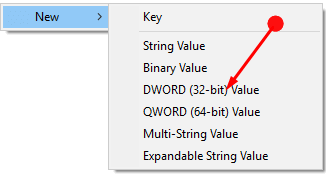
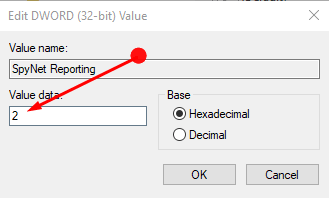
Step 4 – Then move to the adjacent pane and make a right click in the vacant area. Here, click on New and then DWORD (32 bit) Value. Name this key as SpyNet Reporting.
Step 5 – Double click on the newly created key and change the value of the key to 2. With this procedure, the user can join MAPS.
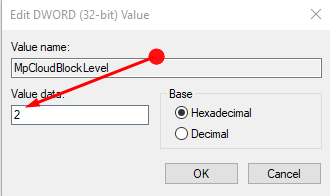
Step 6 – Now create another key in the Windows Defender and name it as MpEngine. In order to perform, right click Windows Defender and select New followed by Key.
Step 7 – In the right pane of the MpEngine key create another DWord 32 Bit value key and name it MpCloudBlockLevel. Even here input the value of the key as 2.
Step 8 – Now close the Registry Editor as the setting of the high blocking level is completed.
Concluding Words
So Set High Blocking Level for Cloud Protection in Windows Defender in Windows 10 to fight against the dubious software and files. It makes the device more capable and the user is free from the worry of the threats.