Guide to Show and Hide WiFi Networks on Windows 10 with Steps. – While passing through an area Windows 10 device displays all the available WiFi networks available in the range. This helps you connect to the appropriate network to your device. But this feature clutters the Network flyout and also Manage known network WiFi setting field with the crowd of unknown networks. A similar article might help you – How to Filter Networks to Show or Hide them on Windows 10.
Thankfully few commands are available Show and Hide WiFi Networks in Windows 10 to get rid of this crowd. See this guide –
Ways to Show and Hide WiFi Networks in Windows 10
Showing all the available networks
If you want to see all the available wifi networks then continue with the following steps
Step 1 – Right-click on the Start button on the taskbar to view a list in front of you.
Step 2 – Read for the option Command Prompt (Admin) and then select it. See if you are unaware – How to Launch Elevated Command Prompt on Windows 10.
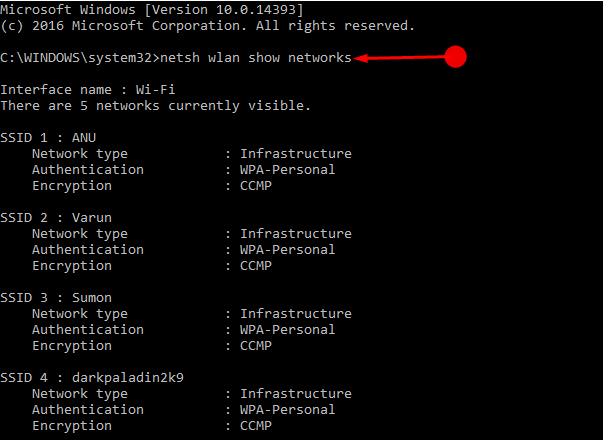
Now you will see the Command Prompt panel. Here either type or copy-paste the following command
netsh wlan show networks
Once you run this command, you will all the wifi enabled networks in the console.
Whitelisting and Showing the useful networks
If you want to whitelist the network that you are using then run the following command
netsh wlan add filter permission=allow ssid="YOUR SSID HERE" networktype = infrastructure
Note – Replace YOUR SSID HERE with the name of the network you are using.

As you run this command it will whitelist the network you require.
Hiding other Networks
Suppose you don’t need any one of the displayed networks then an option exists to block it. But it is noteworthy here that once you block this network you cannot revert it back again. Even then if you want to block that particular network then use the following command.
netsh wlan add filter permission=block ssid=”notmynetwork” networktype=infrastructure
Note – Replace notmynetwork with the network that you want to hide.

Hiding other networks
If you wish to hide other networks except for the whitelisted ones then copy-paste the following command. Press Enter
netsh wlan add filter permission=denyall networktype=infrastructure

Once you execute this command, entire other networks will go hidden barring the whitelisted network.
Reverting back the Hidden networks
Now if you want to see all the available networks around you then you can redo the above-given command. For that, just type or copy-paste the fresh command given below and press Enter.
netsh wlan delete filter permission=denyall networktype=infrastructure

This will show you all the available networks barring the network that you’ve blocked via the third command.
Conclusion
Hope you will find this article helpful in solving your queries about showing and hiding the networks. Using these few commands cause to cheer up after you Show and Hide WiFi Networks in Windows 10 as per your requirements.