In this article, we will discuss the way to Sign in and Sync Sticky Notes 3.0 in Windows 10 to recover the tasks list across all devices pretty easily. Currently, the ability to use this feature is available only for the Windows Insiders who are using Skip Ahead. After signing in with Microsoft or Work account, you will be able to synchronize all the previous notes directly to the cloud.
In addition to the sync feature, Sticky Notes 3.0 also carries multiple capabilities. It introduces a dark theme Charcoal Note, a new home to store all notes, improvised formatting bar, and so on. Starting with Anniversary Update, Sticky Notes is a Universal Windows Platform (viz UWP) which comes with lots of features. However, it’s synchronization, as well as backup process, is automatic after you successfully sign into the app. So, let us head towards the steps and see how to make this sync and backup process of notes in Windows 10.
Way to Sign in and Sync Sticky Notes 3.0 in Windows 10
Here is How to Sign in and Sync Sticky Notes 3.0 in Windows 10 –
Sign in Process of Sticky Notes 3.0
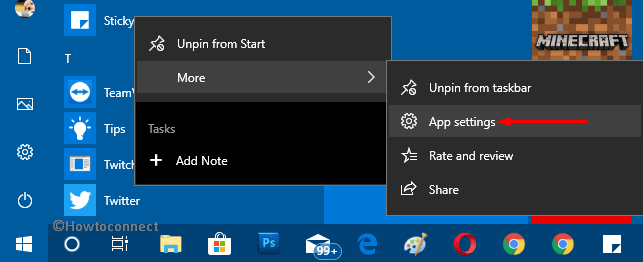
Step-1: Launch Start Menu and navigate to the S section. Locate Sticky Notes and perform a right-click on it.
Step-2: From the context menu, hover the cursor over More and click the option All settings.
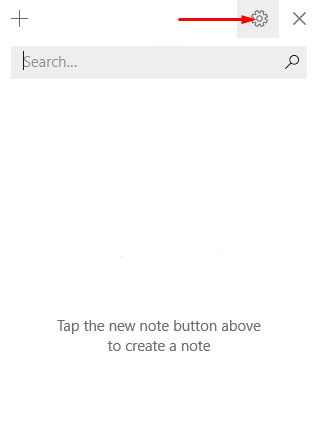
Step-3: Or if Sticky Notes is already opened, click Menu icon (…) that appears on the top right of the note. Select All Notes followed by a click on Settings gear icon.
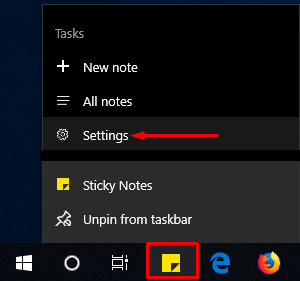
Step-4: Alternatively, if Sticky Notes is pinned to the taskbar, do a right-click on it. The Taskbar context menu will display few options, click Settings.
Step-5: All the above ways will launch Settings pane of Sticky Notes on the PC screen. Click Sign in button under the option Sign in to sync your notes to the cloud. Usually, this will display your “Microsoft” or “Work account” that you regularly use. Click Continue.
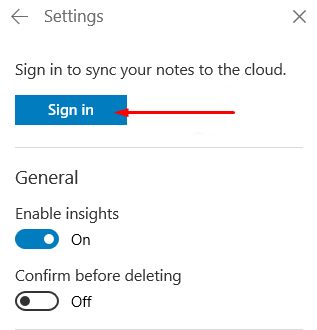
Note: In case, you cannot list out your account, or prefer to opt for another account, click either “Microsoft account” or “Work or school account“.
Sync Sticky Notes 3.0
Step-6: Once you provide credentials, you will be signed into Sticky Notes right away. Now, all the Notes will start syncing automatically from all devices where you are using this same account.
After you successfully Sign in and Sync Sticky Notes 3.0 in Windows 10, you will be able to retrieve all your old notes at a single place. However, you need to entrench that you are using the Skip Ahead feature of Windows Insider to avail this facility of the app. Else, you need to wait until Microsoft launches it for everyone.