Does your computer always gets crashed with Blue Screen of Death errors? If so, then it keeps creating minidump files on your system everytime BSOD occurs. So, you can Use BlueScreenView to Detect the Cause of Blue Screen. It is a freeware that helps you to scan those minidump files that gets stored on your PC. Moreover, it displays details of all the crashes in a single interface.
Most of the time Blue Screen Troubleshooter rescue us from these problems. Usually, it occurs because of hardware malfunction such as power supply issue, faulty memory or overheating of components. Today we will talk about how you can find the cause of system crash from BSOD by using BlueScreenView.
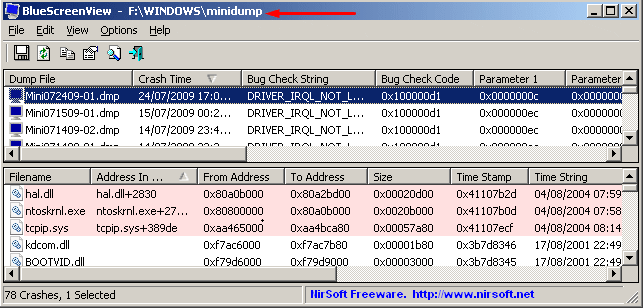
Use BlueScreenView to Detect the Cause of Blue Screen
Here is How to Use BlueScreenView to Detect the Cause of Blue Screen –
Step-1: Go to this link and download BlueScreenView. The developer offers you to grab the application or download it with a full install or uninstall support.
Step-2: When you have downloaded the file, browse to Downloads folder to get it and Install it.
Step-3: Now launch BlueScreenView. Once you open it, it will automatically start exploring minidump files.
- On the top pane, you will see the shorted list of ‘minidump files’ those were created during BSOD system crash.
- And in the bottom pane, it will display faulty application or hardware which might be responsible for Blue Screen of Death.
Step-3: Make a right-click on any line and select either Google Search – Bug Check + Driver or Google Search – Bug Check + Parameter 1 or Google Search – Bug Check in order to explore its solution online.
But if you want to see the same blue screen that was showing during crash then follow the below procedure –
Step-4: Perform a click on Options and then hover your cursor on “Lower Pane Mode“. When you see the expanded options, select Blue Screen in XP Style.
Step-5: To view the details of BSOD problems, make double click on any line from top or bottom pane.
Step-6: If you think it’s confusing then you can also view only the driver files that are responsible for this issue. To do so, navigate to Options > Lower Pane Mode > Only Drivers found In Stack.
Step-7: Now do a right-click on any minidump file. Then select either HTML Report – All Items or HTML Report – Selected Items in order to send a report to a technician.
Step-8: Besides that, if the crashes are unable to load your Windows, you can test minidump files by transferring it to another computer. To do so, make a click on Options and then select “Advanced Options“.
Step-9: Next, do a click on Browse and select BlueScreenView in order to search the minidump files to the “C:\Windows\MiniDump” transferred folder.
For reference, you can also see our article to find 5 Ways to Remove System Error Memory Dump Files in Windows 10.
That’s it.