It is very simple to Use Rufus to Install Windows 10 operating system. You can use this tool if you prefer dual boot or clean upgradation with ISO image file. However, Microsoft’s utility is the most popular tool in this regard and users prefer Rufus when they find an issue with this but the earlier offers only single boot. You can bypass the problem of this tool with the instructions – Reset Media Creation Tool in Windows 10.
To execute a dual boot or clean install, you first need to download Windows 10 ISO image for either 32-bit or 64-bit as per preference. Once you download it, you have to make a bootable media using any of the applications preferably Rufus, the most famous and reliable one. Find another utility by following the guide Use Etcher SD Card and USB Drive Burner On Windows. So, if you are eager to have a fresh OS, follow the series of steps in the tutorial.
How to Use Rufus to Install Windows 10
Download Rufus
Step 1 – Reach out to this page to grab this software, Rufus.
Note – Rufus is a portable one that does not need any sort of installation.
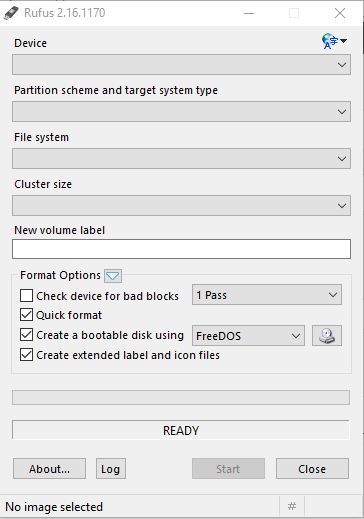
Use Rufus to Install Windows 10
Step 1 – At the first place plug in any 4GB+ USB drive into the computer. Kindly ensure to backup the data of the USB.
Step 2 – Click on the Rufus utility to proceed with the creation of bootable. Click the Yes button in the UAC prompt to launch the tool.
Step 3 – Here, in the Device segment, select the just inserted USB, also choose the MBR break-up type of BIOS or UEFI computers as per the device.
Step 4 – Now, click the File system section to fill up that blank. Put in FAT32 (default) there because it is the safest way for the reason as it works for both BIOS and UEFI.
It is important to mention here that in case you are completely assured that the device works with BIOS then put in NTFS as it has a faster installation.
Step 5 – Then move ahead to the New Volume label option and put in the value. Then press the CD/DVD icon and reach out to Windows 10 ISO image file.
Step 6 – Finally, click the Start button and let the tool begin the creation.
Step 7 – The software will now prompt a warning box. Lastly, click the OK button to continue with the task.
In the end, you receive a bootable USB flawlessly with Windows 10 which will ultimately be used to install the OS. Now, give an attempt to boot the device with the bootable media that you have generated using Rufus.
Here, you may like to learn How to Boot Windows 10 From USB Flash Drive.
Concluding Words
Thus the conclusion is that this is not that difficult to Use Rufus to Install Windows 10. In that case, you can always give this application a try. Since it is a portable one it will not reserve any space in the device. Therefore we would highly recommend to give a shot to Rufus.