WPD is a tweaker that blocks Windows 10 Privacy violations. This application lets you customize Local Group Policy Editor, Services, and Tasks to prevent data collection and transmission. You can block multiple IP addresses of Microsoft where the spied data are sent. The most important, you can use WPD to Manage Windows 10 Privacy. See a very useful guide – Handle Your Privacy From the Official Microsoft Dashboard on Windows 10.
All this happened when Microsoft revealed details about collecting of Telemetry in April, this year. After that Windows 10 lost some of its Die-hard and some average users (based on reviews) left the version and preferred working with earlier versions of Microsoft Windows. Having discussed all this, let us discuss the main section that we have today. Yeah! It’s WPD. So here you will get to know how to use WPD to Manage Windows 10 Privacy.
What is WPD?
WPD is a program that lets users to easily change privacy related settings and other features in Windows 10. Another program is also available for the same purpose and you can compare both using the article How to Overcome Privacy Concerns on Windows 10 with W10Privacy.
Microsoft released this program only for its Windows 10 users and playing with privacy settings has become a game ever since. You can run it from anywhere and requires no installation.
Most of the settings have sliders by their side. The slider may be blue or faded white, which shows if the setting is enabled or disabled respectively. Simply clicking may change it to the alternate (Enable or Disable).
Follow a detailed guide to customize the built-in settings to Avoid Privacy Issues on Windows 10.
Use WPD to Manage Windows 10 Privacy
Step 1 – To use WPD, download it from its official website and open the same.
Step 2 – When you complete the installation, WPD reveals four sections Privacy, Firewall, Apps, and Tweaker. Each Section includes bunch of important settings
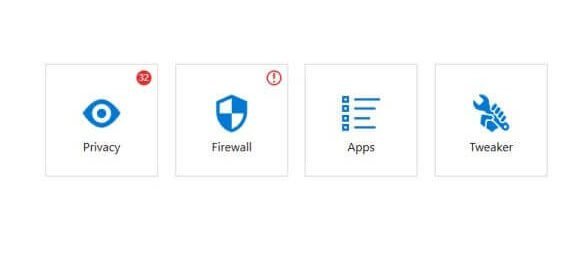
Step 2 – Go to each section one after another and try to perceive the Settings under them. You can also find the details of each section of WPD below.
The Privacy Section
WPD privacy group has 3 sections namely, Group Policy, Services and the Scheduler. Each section has a range of options with specific entries in Scheduler and Services assigned for a particular entry in Local Group Policy. There lies a question mark next to each entry/option clicking which you can simply activate them anytime. Just a short description of the option and that’s it.
Some of the features bear sense from their very names. Others seem a bit out of the general predictions. For example, Telemetry is useful for others features also but roles of Throttle additional data and Consolidator remain unclear. You can either manually change settings or can simply click switch all button to engage all controls in one operation.
The Firewall
This section lets users add IP address to the customary Windows Firewall to block any future connections with Microsoft servers and third-party applications.
It has three sub-sections namely Windows telemetry, Windows Update, and Third-Party Apps. You can either switch one or all of them in a single click. There is a small icon beside every group using which you can copy all the IP addresses of that particular group to the Clipboard. Through this, you can simply cross-check the list of IPs that you want to apply to the Windows Firewall.
The Third Group
Uninstall, lets you delete one or more Windows applications permanently. Simply select the apps that you want to remove and delete them. Moreover, you can also delete all of them using a single switch/click.
Tweaker – the Final Section
It is a list which showcases you tweaks that you may apply anytime. It gives you the power to allow or disallow Windows programs from using some specific data sets and other hardware like camera, contacts or microphone. So, you can modify these settings directly. This provides a sense as if you yourself are a developer.
Step 3 – Go to the setting which you like to enable on WPD and toggle it to On.

Privacy issues in Microsoft’s Windows 10 have led it to so many negative reviews and user experiences. But since Windows 10 has so much extra to work with, the topic seemed to have cooled down quite a bit. While it has such a huge user base already, there are still a lot who don’t want to use it just because it fails badly in keeping things secret.
Final Words
We hope this guide will help you to Use WPD to Manage Windows 10 Privacy. WPD is the same thing for Windows 10 users Just like, how you get Developer options in your Android smartphones (tap “About Phone” 7 times). Its drawback is that it does not create a backup before any changes are made. It is thereby recommended to have a Backup restore point, or on a better note, a complete backup of the system before using this application. We have already written about how you will backup windows 10.
thanks, bro, fixed it.
fix link in Step 1