We bring you another interesting utility of Windows 10: Disk Management. Talking about the new Windows 10 is an on-going discussion as there are lots of things to explore. To give a brief about Disk Management, it is the tool that lets you carry out the basic works of the disk utility even without buying any extra software. You can do the tasks like creating a hard disk partition or resizing it or even remove it if needed. In short, you can manage all the activities related to the disk partitions in Disk Management. Well, in this article we will showcase you all the details of the Disk Management so that you can have a clear idea about this utility and you will also be able to figure out the things that you can perform.
So, to begin the tutorial, we will see how to access Disk Management in Windows 10.
How to Access Disk Management in Windows 10
First Way: Power Menu
- The easiest way to access Disk Management in Windows 10 is the Power user menu. All you need to do is to make right click on the Start Menu icon and in the arrived list of commands, you will see Disk Management. Perform a click on it to open.

Second Way: Search field
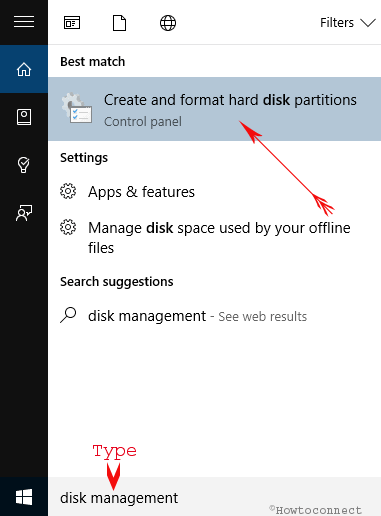
- Another way, t0 access Disk Management in Windows 10 will be from the Cortana search field. There, you need to type disk management and the results list will have one option called Create and format hard disk partitions. Click on that and Disk Management window will arrive.
Third Way: Computer Management
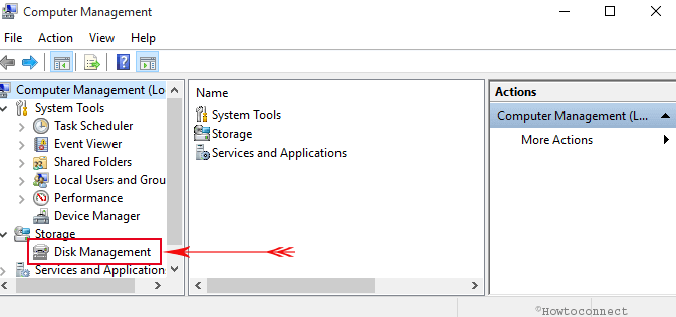
We present you another way to access Disk Management in Windows 10. If you don’t know how to get into the Computer Management, we recommend you to take a look into our article of Computer Management.
- So when you are into Computer Management, the left column of the window shows you some list of items. Make a click on the Storage and you will see Disk Management listed under it. The middle panel of the Computer Management will list you the details of the Disk Management.
Quick Look at the Disk Management
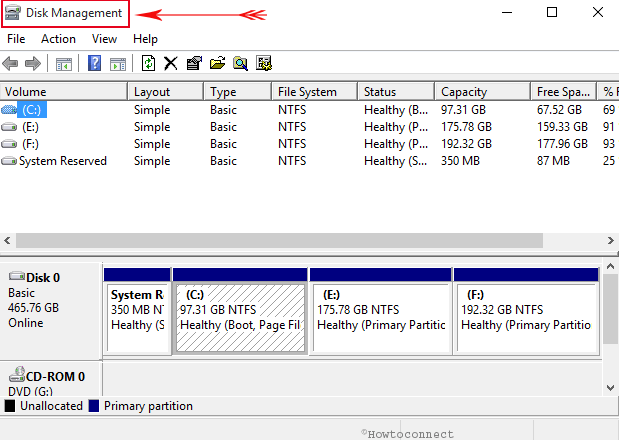
Apply any of the above-mentioned options and you will get access to the Disk Management window. Well, after its arrival on your screen you will see the list of disk partitions with details like their name, size, and status. Make a note of one thing that the Disk Management utility will only be able to control file systems that suit the operating system of Windows like NTFS or FAT16/FAT32. But of course, it can view the partitions of other types, like the ones created by Linux or different operating systems.
How to Delete a Disk Partition with Disk Management in Windows 10
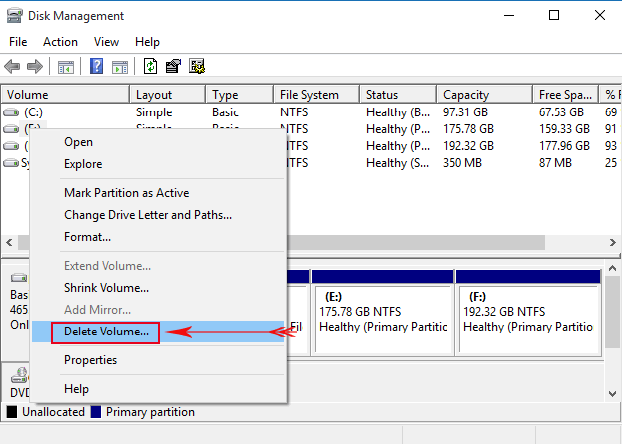
- For definite reasons, you might wish to remove a certain partition of your hard drive. You can create some space to expand a current partition or even renovate the partition with a separate size or file system. So, look at the partition that you wish to remove. Execute right-click on it and choose Delete Volume command.
- A Delete simple volume wizard will pop up and will wait for your confirmation before preceding the removal process as you should know that the removal process might delete all the data. Grant it the permission by clicking on the Yes button.

- After its removal, in the Disk Management utility, you will see the removed partition as Unallocated or Free space.
How to Create a Disk Partition with Disk Management in Windows 10
- If you find a free space on your hard drives, you can utilize that space by creating another partition. Now you will see the unused or unpartitioned space as Unallocated or Free space as already mentioned above. Now, to create a partition there, make right-click on it and choose New Simple Volume.
- This action will lead to the popup of New Simple Volume Wizard where you need to click on the Next button. In the next action, you have to mention the size of the partition. You can wish to set the whole free size or can even use a part of it as the partition. Click Next.
- Now in the next step, you will see three options to choose from. You can even allow a drive letter to your partition or choose to mount it in an empty NTFS folder or omit allotted any drive letter or drive path. Choose your preferred option and then make a click on the Next button.
- Here, you will be queried for the information that by what means the partition will be formatted. Make a point that if you wish to utilize this partition, it has to be formatted. The preferred and default is to use the NTFS and most of the time, it is used.
But in case you don’t wish to format the partition, you have the option to choose Do not format this volume. Now, if you have decided that the partition will be formatted, choose the option that says Format this volume with the following settings. Select NTFS for the File system and set the Allocation unit size to its Default and then label the volume in the Volume label field. The label that you provide will be displayed after the drive letter when you view it in the File Explorer. So, decide whatever option you wish to choose, select it and click on the Next button.
A detailed summary of the partition’s settings will be displayed in the following screen of the New Simple Volume Wizard. Take a look at the details and when satisfied click the Finish button.
Once it is done, get back to the Disk Management window and you will see the new partition is on formatting. Depending on the size of the partition and the performance of your computer, it will take a few minutes.
After the completion of the formation, you will see the partition listed with the others.
How to Format a Partition with Disk Management in Windows 10
- You can perform a format on the already created partition, but you should know that it will wipe out all the data from that particular partition. Right click on that partition and select Format option to do the formatting.

- As stated above, provide the Volume Label, File system, and Allocation unit size in the Format window of the selected drive. Here, also, the volume label will be exhibited after the drive letter when you see it in the File Explorer. Click Ok.

- Again Ok button, when asked for confirming the procedure as the data stored on the drive will be wiped out.

- Here also depending on the size of the partition and pace of your PC your formatting will be completed.
How to Resize a Partition: Expanding and Contracting with Computer Management in Windows 10
Considering the free or unpartitioned space just ahead or after the partition, you can also expand and contract the FAT16/FAT32 and NTFS partitions with Disk Management. You don’t have to format the partition when you go for the expansion as it is not necessary.
- So, make right-click on it and choose Extend Volume Wizard.
- The Extend Volume Wizard will appear where you need to click on the Next button. It will show you how much space is free that you can add up to your present partition. Choose the amount of size you want to add up and click Next.
- You will see the short abstract of the changes. Click Finish.
- See the newly expanded size of the selected partition in Disk Management.
- Many users might need to contract a partition. There will be some files present on the disk that will restrict you from contracting the volume when you try for the one that holds Windows operating system. If you want to contact the partition that holds Windows operating system, you will see it in another article which we will cover soon. Now, look for a partition, right-click on it and choose Shrink Volume.

- It will take quite some time by the Querying Shrink Space window to scan whether the volume is capable of shrinking or not and also how much disk space can be retained.

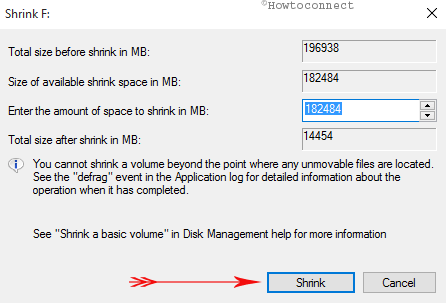
- After this, it will ask you for how much space you wish to take out of the partition. Put the desired amount of space in the respective fields and click on Shrink button.
- Get back to the Disk Management window and see your partition in the smaller size with extra space.
How to Change a Drive Letter and Label with Disk Management in Windows 10
- Right click on the drive whose drive letter and its label you wish to change. Among the list of arrived options, you will click on the Change Drive Letter and Paths option.

- Another window will emerge with the partition and concerned drive letter that you wish to change. Click on Change button.

- In the next step, use the drop-down menu and choose your preferred drive letter and click on Ok button.

- Disk Management will wait for your confirmation to carry out the changes. Click Yes.

- Take a look into the Disk Management and you will see the drive letter changed.
- Now, we will see how to change the label of the partition. And to make it happen, right-click on the partition and choose its Properties.

- The Properties window of the selected partition will open up. Take your attention to the General tab. You will see a disk icon in the General tab and a field next to it where you will provide a new label to the partition. Click Ok.

In the End
So we have learned that Disk Management in Windows 10 will make our work easy while handling the disk partitions. Share the settings or management secrets with your friends and help them in managing their disk partitions. Many more advanced things are there to see and they are mostly put into use by the advanced users. We will soon bring you more of Windows 10 till then enjoy the experiments!
You may like to Read:
Windows 10 – How to Open and Use Disk Cleanup
Change the attribute in the drive for flash drive. You can get hep from http://ccm.net/forum/affich-32531-i-can-t-open-my-flash-drive-files-to-see
I just want to know how to access my flash drive to save and retrieve files on it. So far, I do not see an icon when I go to Save As to even save on it!!! Very frustrating. I thought this was to be an upgrade…..not something to add more headaches to my day! Sorry….very upset!