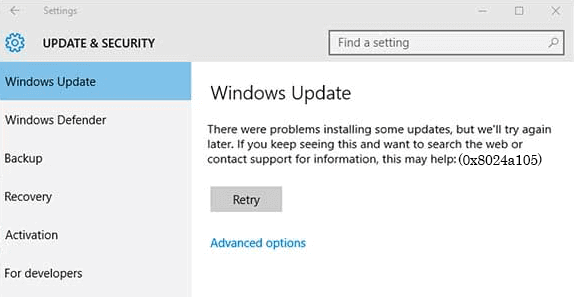
Updating your Windows 11 or 10 is a good step to take, but some errors might disrupt your day. One error you may encounter is 0x8024a105 which stops the Windows Update processing. Each time you click on Check for updates the issue re-appears with Retry button instantly.
Here we will present a few methods that will help you to get rid of this annoying issue.
Table of Contents
Workarounds for 0x8024a105 Windows 11 and 10 Error Found During Updates Installation
It is important to know that there are 5 essential methods to deal with 0x8024a105 Windows 11 or 10 Error During Updates Installation. The workarounds include running the Windows Update Troubleshooter, purging the Windows Update component and agent, and ultimately customizing few Update & Security settings. The methods listed in this article have worked on all computers. Before we begin, a couple of the tweaks listed here needs a command line which is shown below, I am sure you are at ease with this.
Run the Windows 10 Windows Update Troubleshooter
An operating system such as Windows 11 or 10 has better versions of troubleshooters. Although, using Windows 10 Windows Update Troubleshooter is the least intrusive solution for Microsoft error code 0x8024a105. But this chance may help you so follow –
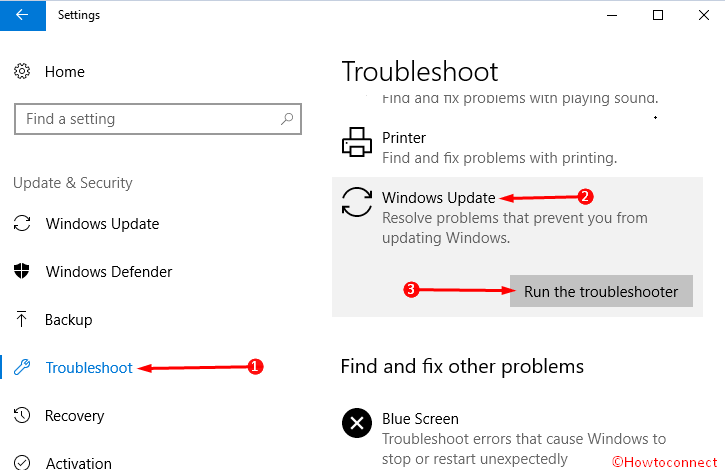
Step 1 – Either you can take help of this article How to Get at Troubleshooters On Windows 10 to Resolve Issues or Click the Window key on your keyboard, type “troubleshoot” and then press Enter.
Step 2 – Look for Windows Update in the right pane and click on it to expand. After the expansion, select Run the troubleshooter. It will start scanning immediately for problems that occur on your system, follow onscreen instructions till the end.

Once all these steps are done, your Windows Update Troubleshooter might tell you there is nothing found or wrong. If this is the case for you, reset Windows Update. If there is nothing found again, all you need to do is go to the next method.
Reset the Windows Update component
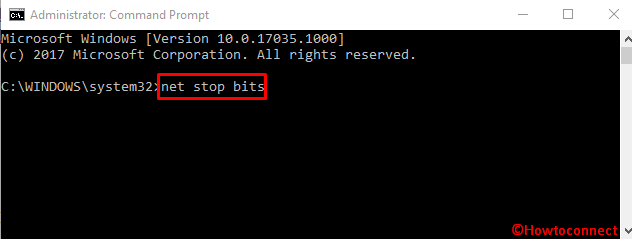
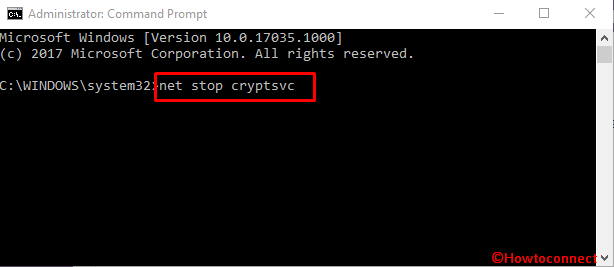
Step 1 – Open the elevated command prompt and type in commands which will be listed below. Please note that you need to click on Enter after copy-paste each command.
net stop bits
net stop wuauserv
net stop appidsvc
net stop cryptsvc

Step 2 – Now go to C:\Windows\SoftwareDistribution\Download and delete all the items available here.
Step 3 – Return back to the command prompt, paste the following commands one after another furthermore each time press Enter.
net start wuauserv
net start appidsvc
net start cryptsvc
When you are done executing each command, all you need to do is to reboot your device or computer for the changes to be effective. Go to Update & Security, and click Check for updates to see if the 0x8024a105 Windows 11 or 10 Error occurs again. If it’s then follow the next method.
Run Windows Update Agent tool
When you reset Windows Update Agent it purges and repairs all registry keys including components associated with WU, identifies corrupt files, replaces, settles down malfunctioning system image, reset Winsock plus a lot more.
Step 1 – Download Reset Windows Update Agent from the Technet page, extract, right-click on it and choose Run as Administrator.
Step 2 – After Windows update agent prompts, press Y on the keyboard to complete its execution. Reboot your system and see whether check 0x8024a105 Windows 10 or 11 Error During Updates Installation is fixed.
Reset Catroot2 folder
Catroot and Catroot2 are responsible to save the signatures of WU Package furthermore also help computer to install updates. The error 0x8024a105 in Window 10 might be caused by Catroot folders. So follow the way ahead –
Step 1 – Launch the elevated Command prompt and type or copy-paste each one in sequence then press Enter every time –
net stop cryptsvc
md %systemroot%\system32\catroot2.old
xcopy %systemroot%\system32\catroot2 %systemroot%\system32\catroot2.old /s

Step 2 – Now go to C:\WINDOWS\System32\catroot2 and delete all the items from here. In the Command prompt, copy-paste the underneath command then press Enter.
net start cryptsvc
Reboot your system and hopefully, you will not find the error anymore in the Windows update.
Customize Windows update settings
In order to fix 0x8024a105 Windows 10 or11 Error, sometimes you need to change settings in Update & Security section. This is a trick and works like charm for many users. So follow –
Step 1 – Browse Settings=>Update & Security=>Advanced options and check the box before Give me updates for other Microsoft products when I update Windows.
Step 2 – If you are on a local network then click on Delivery optimization from the bottom of this settings page. Toggle the option Allow downloads from other PCs to turn it on.
Now Check for updates and wait until it starts working. Cheer up!
Final words
Windows update problem 0x8024a105 is toughest the issue to deal with and many users complain that after hard work they can’t fix it. But here are few promising workarounds finally leading to a triumph. So follow and let me know if you are getting a problem in the middle.

sunita
says:Hello Dvir, Run the troubleshoot once more, if the update is pending, the downloading will start.
dvir
says:hey,
after the “Reset the Windows Update component” and the reboot, i have no new updates to install, is that ok?
thanks alot!