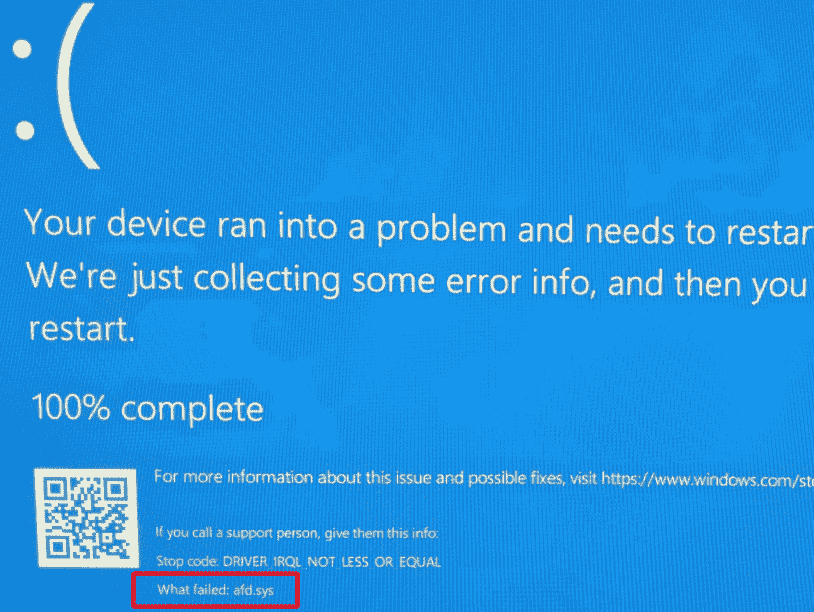
Blue Screen Error related to the afd.sys mainly causes network connectivity issues which prevent users from accessing internet connection. The stop code might disappear once you restart the computer but that’s temporary almost always. Once encountered, the error keeps emerging at regular intervals when playing a game, using a program, and sometimes out of nowhere. Such Blue screen of death can be caused by various reasons such as corrupted drivers, outdated OS, newly installed hardware, and software conflict. Since What failed: afd.sys Blue Screen Error BSOD is network-related in most cases, updating LAN driver does the trick to fix the issue. If not, you might need to take corresponding measures.
afd.sys is a system driver file associated with the Windows Sockets API (Application Programming Interface). Primary task of this file is to allow applications to create, send, and receive data packets over TCP/IP-based networks. Besides providing support for applications that use TCP/IP, it also ensures underlying functionality for network communication. As it is a crucial system file of Windows, tampering with or deleting it may end up causing network-related issues or system instability such as afd.sys BSOD. Therefore, leave this kind of system files untouched unless you have a specific reason and knowledge to modify them.
Table of Contents
afd.sys Blue Screen Error BSOD in Windows (Top 10)
Here is how to fix afd.sys Blue Screen Error BSOD in Windows –
Method-1: Make network driver updated
Updating network drivers not only helps in resolving network-related issues but also improves performance, and ensures compatibility with the latest software and hardware. To update your network driver, you can follow these steps –
- Press Windows + X.
- Select Device Manager.
- From newly appeared window, double-click Networks adapters.
- Right-click the item you want to be up-to-date and choose Update driver.
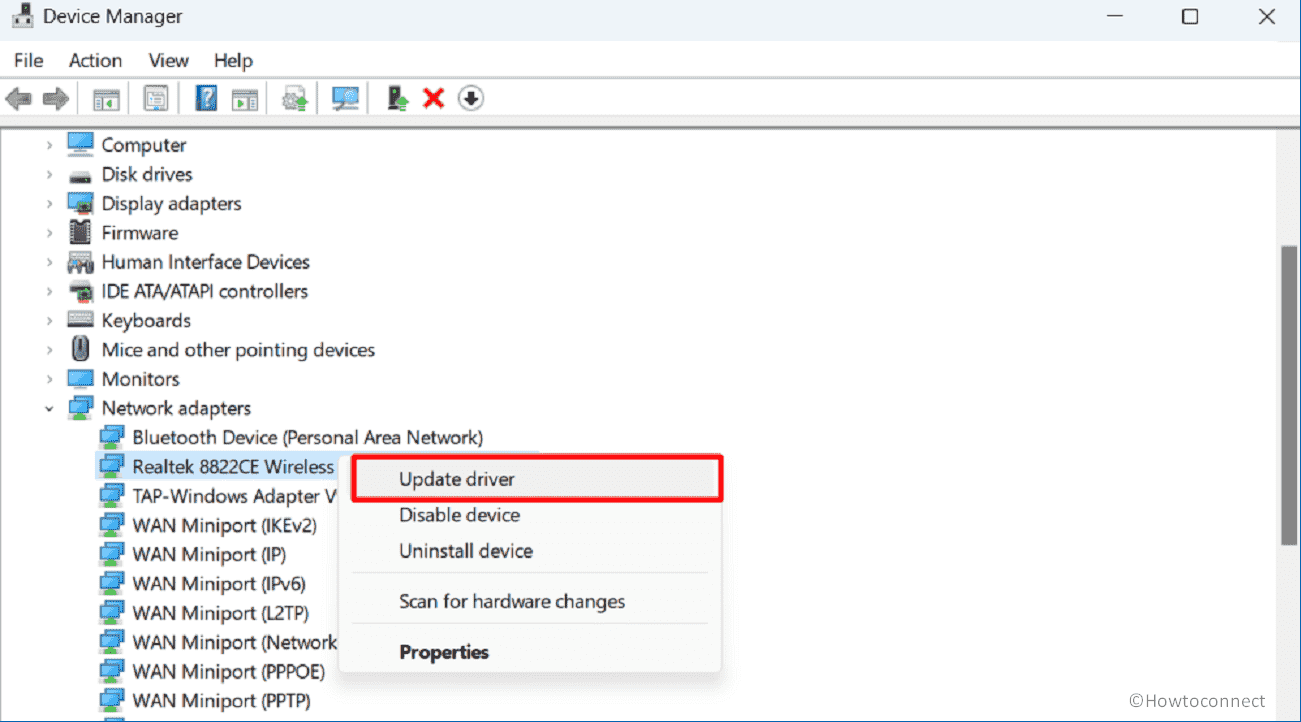
- Select Search Automatically for drivers.
- Now, Windows will start looking for updated drivers over internet.
- Once found, the newer version will be downloaded and installed automatically.
- After installation, reboot Windows to make the changes effective.
If Device Manager fails to find a newer version for the network driver, you will be notified with a message. In such a case, you can look for the latest device driver manually. For that –
- Visit the manufacturer’s website of your network adapter.
- Navigate to the Support or Downloads section.
- Look for a search or browse function that allows you to find drivers based on the model or name of your network adapter.
- Locate the appropriate driver for your network adapter model and download the latest version. Ensure that you choose the driver compatible with your operating system (e.g., Windows version, system type).
- Once the download is complete, locate the downloaded file and run the installer file.
- Follow the on-screen instructions to install the driver. It may involve extracting files, accepting license agreements, or restarting your computer.
- Restart your computer.
Method-2: Reinstall network driver
If the version of network driver installed on your Windows doesn’t go with the system configuration, afd.sys Blue Screen Error may rise up. Therefore, you need to ensure compatibility whether it’s backdated or updated.
Since device drivers usually get up-to-date with Windows updates, there is a huge chance that your system has received a conflicting version lately. If so, reinstalling the network driver can help to resolve the issue by restoring its functionality.
- Press Windows + R.
- Type devmgmt.msc in the Run dialog box and click OK.
- When Device Manager turns up, double-click Network adapters.
- Right-click the item you want to remove and then select Uninstall device.
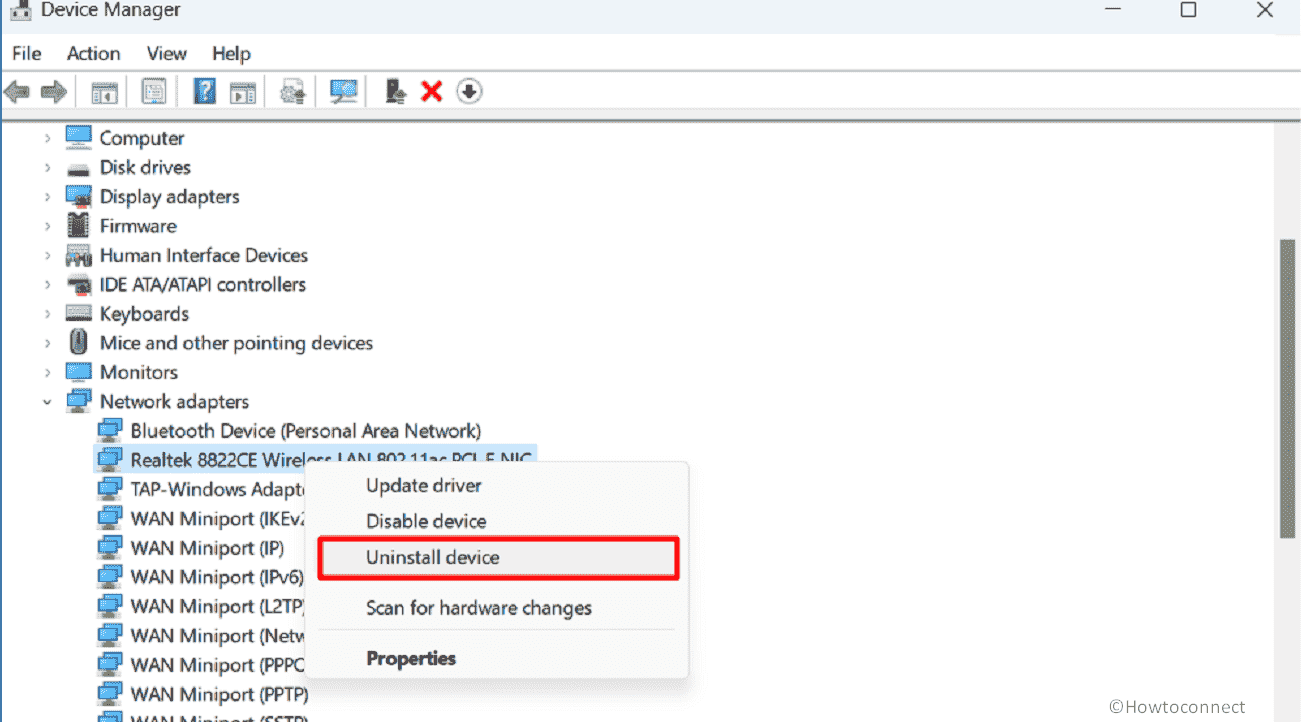
- In the confirmation prompt, check the box that says Delete the driver software for this device.
- Click Uninstall.
- After successfully uninstalling the network driver, reboot your PC to ensure that any remaining traces of the old driver are removed from the system.
- Once the computer starts, the system will automatically install default version of the uninstalled driver.
Method-3: Roll back network driver
What failed: afd.sys appears accompanied by “DRIVER_IRQL_NOT_LESS_OR_EQUAL, KMODE Exception Not Handled, System Service Exception, and some other bug checks.
If you’re still experiencing Blue Screen error afd.sys in Windows after updating and reinstalling the network driver, rolling back to the earlier version may help. Here are the steps to follow –
- Open Device Manager.
- Expand Network adapters category.
- Right-click on the network adapter for which you want to roll back the driver.
- Select Properties from the context menu.
- Once network adapter properties wizard turns up, shift to the Driver tab.
- Click Roll Back Driver button.
- If you are asked to provide a reason for rolling back the driver, either give a brief explanation or leave it blank.
- Click Yes to confirm the rollback.
- Windows will now uninstall the current driver and reinstall the previously installed version.
- The process may take a few moments, and your screen may temporarily freeze or go blank.
- After the rollback process is complete, restart Windows.
Note – Not all driver updates have a previous version available for rollback. If the “Roll Back Driver” button is inactive or unavailable, it means there is no previous version to restore. In such cases, consider other troubleshooting options to fix the triggered blue screen error.
Method-4: Download recent Windows update
Windows Update is one of the vital features as it allows you to download and install updates, patches, and drivers provided by Microsoft. These updates help to improve the security, stability, and performance of your system.
Recent patches also include bug fixes that eliminate unwanted issues users are conflicting every now and then. That’s why it’s important to regularly check for and install available updates to ensure the best performance and protection for your computer.
Windows 11
- Press Windows + I.
- From left column of Settings app, select Windows Update.
- Move to right and then click Check for update.
- System will start checking for newer updates over internet.
- If found, it will be displayed in the Windows Update settings window.
- Click Download button to initiate the downloading and installing process.
- Wait patiently as the downloading process will take some time depending on the size and number.
- Once the updates are installed, Windows will prompt you to restart your computer. Click Restart now button to finish the update process.
Windows 10
- Open the Settings app by pressing Windows key + I.
- Select Update & Security.
- Click Check for updates button present in right pane.
Method-5: Check for malware
Malware refers to malicious software designed for breaking the system’s security in order to harm or exploit Windows OS and its users. Windows operating systems can be vulnerable to various types of malware, for example, viruses, worms, Trojans, ransomware, spyware, and adware. That’s why Microsoft built powerful Windows Security which is also known as Windows Security.
This built-in feature provides a range of security tools and features to protect your computer against various threats and malicious activities. Also, the utility takes all preventive measures beforehand to block the entrance of vulnerable threats.
Though Windows Defender ensures utmost protection, oftentimes malware manages to enter the system and try to damage or corrupt sensitive components. BSOD afd.sys can be a result of this mischief. If so, scan your system for malware and remove it in case there is any.
- Press Windows + R.
- In the Run Dialog box, type windowsdefender: (Note: don’t forget to copy colon along with).
- Click OK.
- Choose Virus & threat protection.
- From right column, click the link says Scan options.
- Select the radio button present before Full scan.
- Click Scan now.
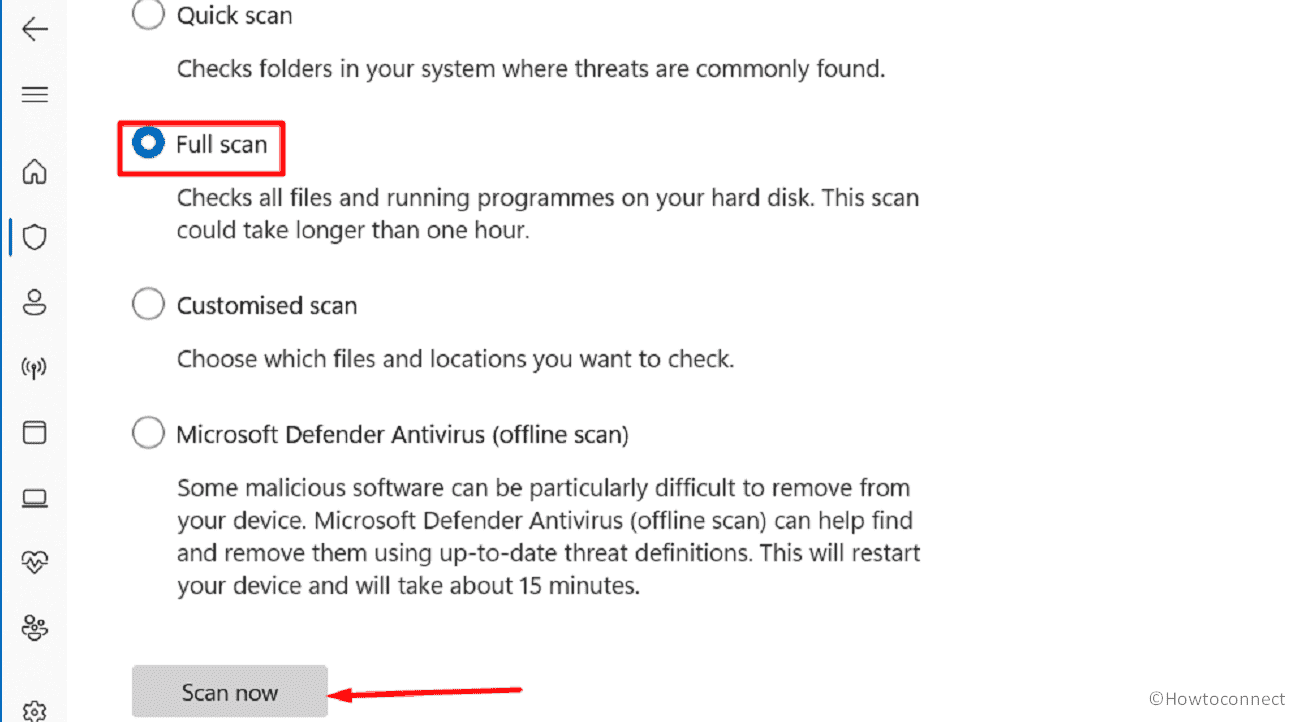
The process may take a significant amount of time as this scan will examine all files and directories on your computer thoroughly. However, you can continue using the machine during the scan but it may impact system performance by slowing down.
Once the process finishes, Windows Security will display any detected threats. You can take action on the same, such as quarantining or removing them, based on the options provided by Windows Security.
Method-6: Restore corrupted system files
System files in a Windows operating system are pretty significant as they ensure proper functioning of the OS and its associated applications. These files include essential components, configurations, and libraries that let the system operate smoothly.
Modifying or deleting these files can potentially cause system instability or even prevent Windows from functioning correctly. Therefore, it’s crucial to handle system files with caution and only make changes when necessary and with proper knowledge.
If you are encountering afd.sys error in Windows due to system files, running sfc scan may resolve the issue. System File Checker (SFC) is a built-in Windows utility that helps to scan and restore corrupted or missing system components. It verifies the integrity of essential files and attempts to repair or replace any items that are found to be damaged or wrongly modified. Here’s how you can use the System File Checker tool –
- Press Windows key.
- Type cmd.exe.
- Press Ctrl + Shift + Enter.
- To allow User Account Control, click Yes.
- In the elevated Command Prompt window, type
sfc /scannowand press Enter. - The System File Checker will now start scanning for corrupted system files. This process may take some time to complete.
- Once the scan is finished, restart the device.
Method-7: Disable Driver verifier
Driver Verifier is a built-in Windows tool that is used for driver testing and debugging to troubleshoot related issues. It helps to identify problematic drivers that may be causing system instability, crashes, or other issues like afd.sys Blue Screen Error.
When enabled, the utility puts additional stress and checks on drivers, which usually helps to uncover flaws or bugs that might go unnoticed during normal system operation. Sometimes, it can cause conflict too. So, disable the tool temporarily and check if it helps to resolve BSOD error you are confronting.
- Press Windows key.
- Type cmd.exe.
- Choose Run as administrator.
- For appearing User Account Control, click Yes.
- In Command Prompt, type verifier /reset
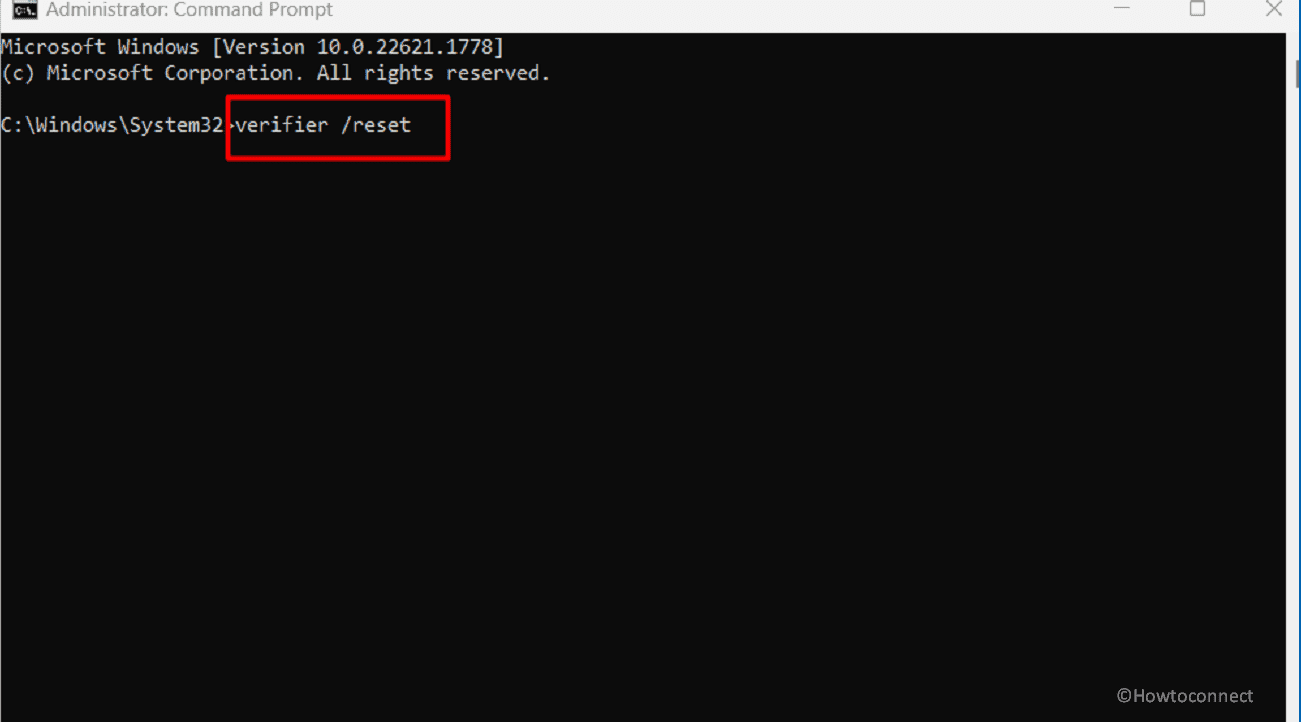
- Hit Enter key.
- The Driver Verifier will now be reset, and all verification settings will be cleared.
- Restart your computer for the changes to take effect.
Method-8: Reinstall conflicting apps
If you suspect that a specific application is causing conflicts and triggering afd.sys BSOD error, try uninstalling that particular app to resolve the issue. However, you can reinstall the application later on.
- Open Run Dialog box.
- Type appwiz.cpl
- Hit Enter.
- From available list of applications, look for the one that is causing trouble. For example – Microsoft Office.
- Right-click the same and choose Uninstall.
- Next steps may vary depending on different applications. So, follow further instructions appearing on the screen.
Method-9: Perform clean boot
Performing a clean boot can be a helpful troubleshooting step to identify software conflicts, but it may not resolve the afd.sys BSOD error if it’s caused by other factors such as hardware issues or system file corruption.
It basically allows you to start your Windows with a minimal set of drivers and startup programs, which helps to identify and isolate any software clashes that may be triggering unexpected issues.
- Press Windows key + R.
- In the Run box, type msconfig.
- Hit Enter.
- In the System Configuration window, go to the Services tab.
- Check the box that says Hide all Microsoft services to prevent disabling essential Windows services.
- Click Disable all button to turn off all non-Microsoft services.
- Go to Startup tab.
- Click Open Task Manager link.
- When the dedicated app rises up, turn off all the listed startup items by right-clicking on each one and selecting Disable.
- Close the Task Manager.
- Go back to the System Configuration window.
- Click Apply followed by OK.
After applying the changes, you will be asked to restart your computer. Upon reboot, your PC will start with a clean boot configuration. Now, observe your system for a while and check if afd.sys Blue screen error persists. If the error no longer occurs, it indicates that a third-party service or startup program was causing the conflict.
You can then follow a process of elimination to identify the specific service or program responsible by selectively enabling services and startup items until the issue reoccurs. Once resolved, revert to the normal boot configuration following steps –
- Press Windows + S.
- Type msconfig and press Enter.
- Now System Configuration window will prompt with General tab selected.
- Check the box that says Normal startup.
- Click Apply and then OK.
- Restart your computer.
Method-10: Restore an earlier error-free state
Going back to a previous state of Windows can be useful if you’re experiencing persistent issues or errors, including afd.sys Ble Screen error. Doing so will revert your system back to a known working state where there was no error.
- Right-click Start button and choose Run.
- Type rstrui and hit Enter.
- In the System Restore wizard, click on Next to proceed.
- You will see a list of available restore points. Select a restore point that predates the occurrence of the afd.sys BSOD error.
- Click Next and then Finish to begin the restoration process.
- Your computer will reboot and initiate the System Restore process. Follow the on-screen instructions if any.
- Once the restoration is complete, your computer will restart again.
- After powering up, check if the error is resolved.
Methods:
Method-1: Make network driver updated
Method-2: Reinstall network driver
Method-3: Roll back network driver
Method-4: Download recent Windows update
Method-5: Check for malware
Method-6: Restore corrupted system files
Method-7: Disable Driver verifier
Method-8: Reinstall conflicting apps
Method-9: Perform clean boot
Method-10: Restore an earlier error-free state
That’s all!!
