How to Enable 2 Factor Authentication on Windows 10 – Security has been escalating as the extremely crucial topic in the recent past and people are preceding every precautionary measure to tighten and overcome it.
But users have also got different solutions on different occasions to strengthen the defense of the user’s account to the next level from concerned organizations.
Table of Contents
How to Enable 2 Factor Authentication on Windows 10
Step 1 – The first task is to navigate to this page, input the particulars of your account in respective fields, and click Sign in button.
Step 2 – On the next web page, click on the menu Security & Privacy.

Step 3 – Few links are present beneath this tab, click or hit the one labeled as More security settings.
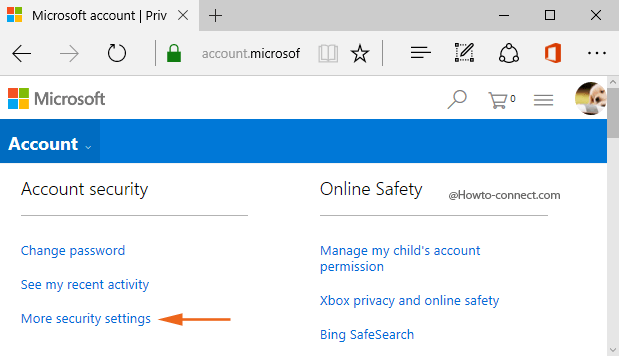
Step 4 – Now, in the resultant screen, scroll little down and click or hit the link that is entitled as Set up two-step verification.
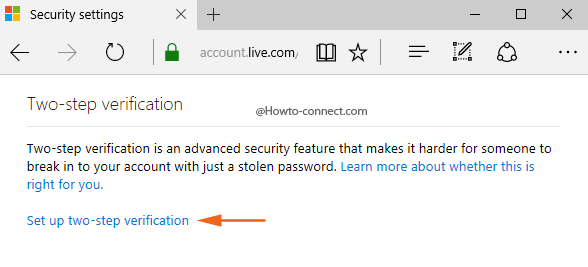
Step 5 – You see the clarification about the help you will experience after Enabling 2 Factor Authentication, read all the points, and click or hit the Next button to proceed further.
Step 6 – In the next arrived page, click or hit the drop-down menu under the heading Verify my identity with.
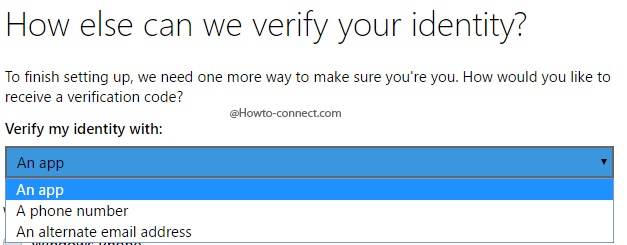
Step 7 – The menu will list out three options – 1. An app, 2. A phone number and, 3. An alternate email address.
In the coming paragraphs, we are elaborating on the methods to Enable 2 Factor Authentication in Windows 10 with the assistance of the three choices separately.
An app
If you choose to Enable 2 Factor Authentication on Windows 10 via an app you can add Android, iOS, or Windows using applications located at respective stores to hinder others from peeping to your account.
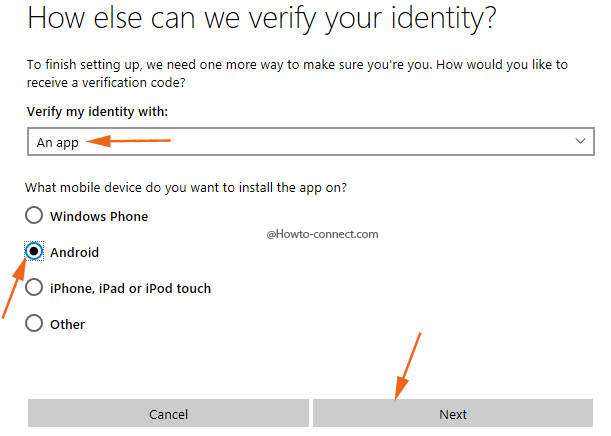
Step 1 – Click or tap the choice An app.
Step 2 – In the succeeding heading, you notice four options to select the type of your device where the app will get installed, hence, click or hit the appropriate cell followed by Next.
Step 3 – On the consequent page, click or hit the link that reads as Install the app from the Google Play Store. See the name of the app and search the same in the concerned on App Store on your Android, iOS, or Windows Phone.
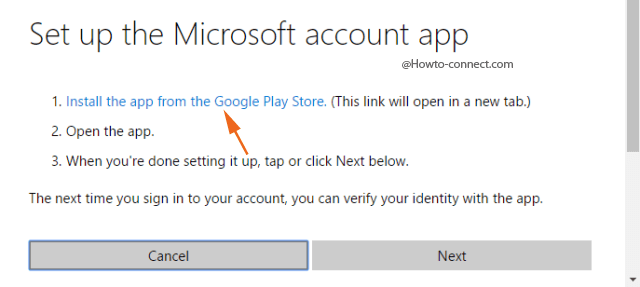
Step 4 – Here, you can notice the details of Microsoft Account app and all its reviews and functionalities, hence, to grab it, click or hit the Install button.

Step 5 – An overlapped tiny box will arrive, click or hit the Sign in button to go ahead.
Step 6 – The succeeding box will ask you to furnish the particulars of your Google Play so that the download can take place on your mobile.
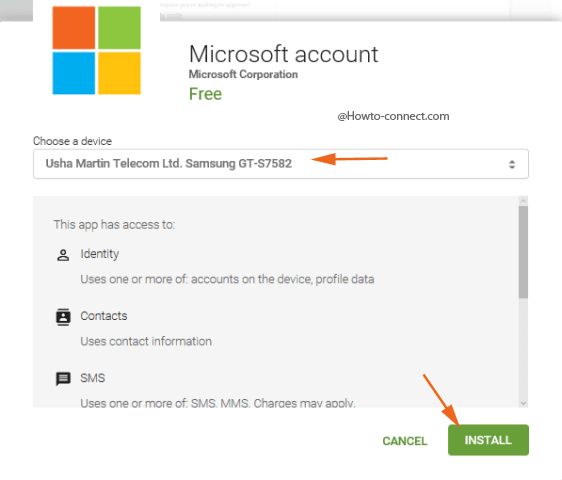
Step 7 – Check and affirm your device on the next screen and then click or hit Install button.
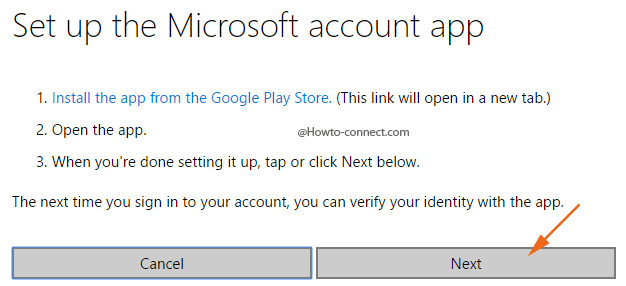
Step 8 – Once the app is installed on your mobile device, click or hit Next button, and wrap up the procedure.
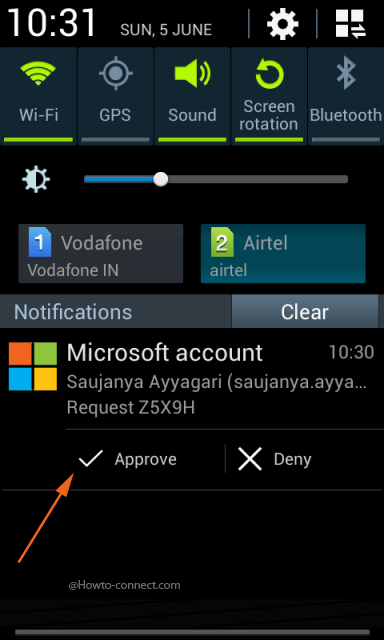
Now onwards, whenever there is a need of proving your identification, you will acquire notification from this app on your mobile. All you need to do is to click or hit the Approve button and thus, get rid of proving your account and individuality through text codes.
Note – The steps might slightly differ for Windows and Apple users.
A Phone Number
Step 1 – Click or tap the middle option, A phone number.
Step 2 – Write down your mobile number in the field provided and underneath the heading Verify my identity with you will notice two round cells – Text and Call, pick up the desired one and click or hit Next button.
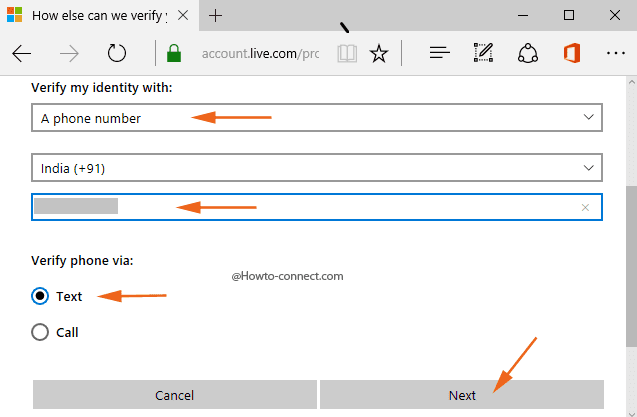
If you go with Text, a code will be directed to your number or if you want an automated call, go with the Call option.
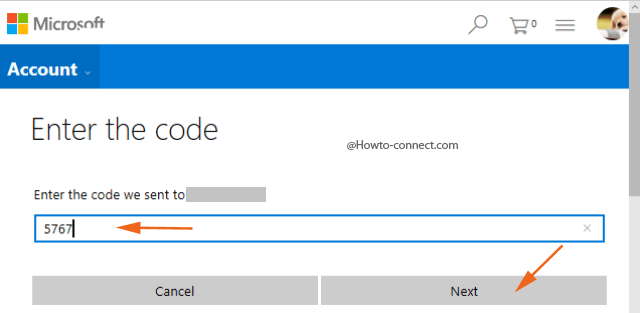
Step 3 – In the next interface, you will be asked to Enter the code, so write down the code that was sent to your mobile number and click Next to proceed further.
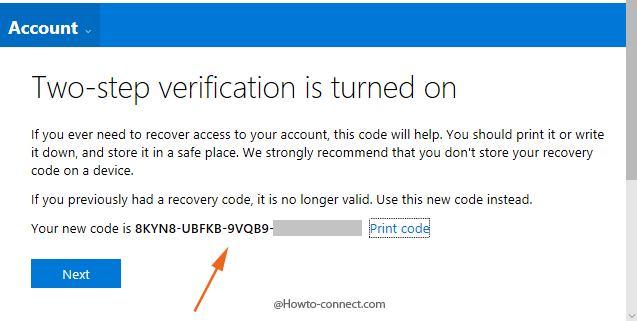
Step 4 – You are successful to Enable 2 Factor Authentication in Windows 10 and thus, you will be bestowed with a code that will help you in recovering your account in future, and thus, either take a print out of the code or record it in a safe place. Click or hit Next.
Step 5 – There are few apps and devices that refuse to acquire the security codes and thus it is suggested to sync your Outlook.com email with your phone and depending on the type of phone, follow the links given on the next screen.
An alternate email address
Step 1 – Click or hit the choice An alternate email address, the third one and then write down the distinct email id in the field provided for and click or hit Next.
Step 2 – Check the substitute email address and you will receive a code from the Microsoft team, write down the code in the subsequent interface, and click or hit Next.
Step 3 – As all apps or devices do not acquire a code, pursue the onscreen guidelines of sync, depending on the type of your mobile.