Methods to Enable and Disable Save Prompt on Microsoft Edge Download Windows 10 with steps. – Save prompt is a pop-up that appears at the bottom of Edge when you attempt to Download an item. This feature helps in deciding whether you want to save the item to its default location or somewhere else. Pursue a similar guide – How to Open Download Location from Edge in Windows 10.
Every user of Windows 10 holds different opinions on this feature of Microsoft Edge. Users who want to save items at different locations, want to enable Save Prompt. In contrast, users who prefer the default Download folder, want to disable it.

Table of Contents
Ways to Enable and Disable Save Prompt on Microsoft Edge Download Windows 10
Method 1 – Advanced Settings of Edge
Step 1 – Open Microsoft Edge by clicking its icon that displays on the taskbar.
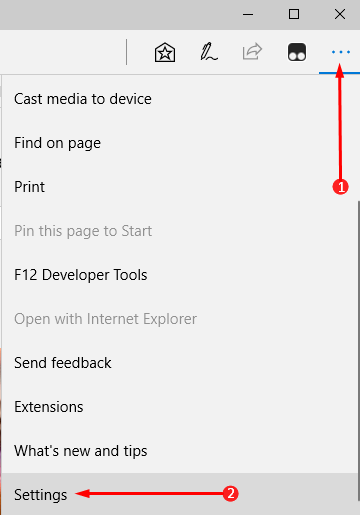
Step 2 – Click Settings and more icon (the 3 dots) on the far right end of the Edge browser. From the list of options that open up, click Settings.
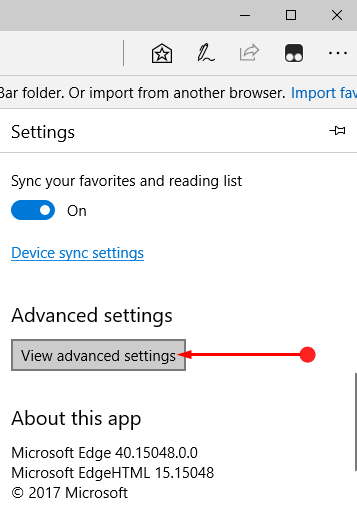
Step 3 – Moving ahead, on the Settings panel, find and click View advanced settings button.
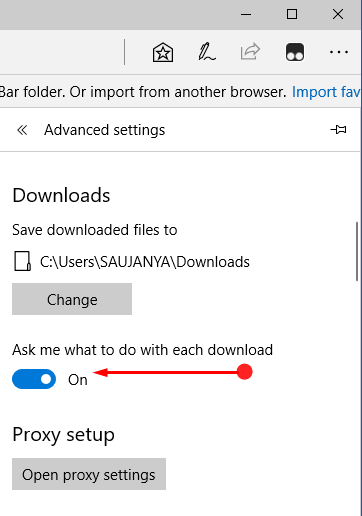
Step 4 – Now, the advanced settings related to the browser will become visible. So, underneath the Download section, locate a setting Ask me what to do with each download.
Enable Save Prompt on Microsoft Edge Download
Step 5 – Keep the toggle into On position and enable Save prompt feature.
Note – Now onwards, whenever you attempt a download, Edge will show up the Save prompt at the bottom of the browser.
Disable Save Prompt on Microsoft Edge Download
Step 6 – Put the slider of Ask me what to do with each download into Off position and disable the save prompt feature.
Method 2 – Registry Editor
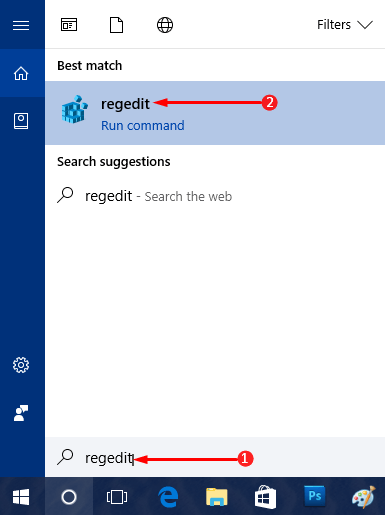
Step 1 – Open Cortana, type Regedit and you will notice the same Regedit command as the final result, click on it.
Get more ways for the same from this guide – How to Access Registry Editor in Windows 10 – 5 Simple Tips.
Step 2 – UAC prompt showing the details of the Registry will come up on the screen. Click Yes button on the prompt and allow Registry Editor to appear on the screen.
Step 3 – Now, navigate to the below-mentioned path on the left side-bar of Registry Editor.
HKEY_CURRENT_USER\SOFTWARE\Classes\Local Settings\Software\Microsoft\Windows\CurrentVersion\AppContainer\Storage\microsoft.microsoftedge_8wekyb3d8bbwe\MicrosoftEdge\Download
Note – In case, Download key doesn’t exist, then right-click on MicrosoftEdge key and then hover on New, followed by a click on the Option Key. Name this key as Download.
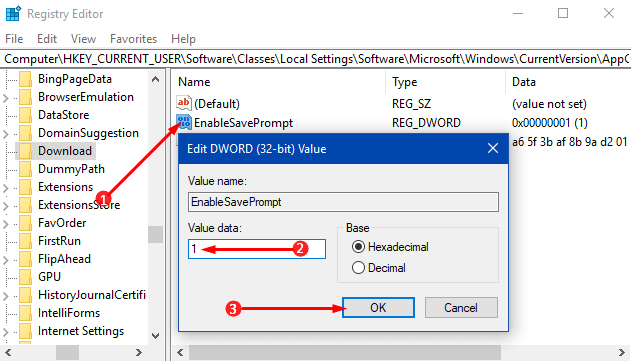
Step 4 – After creating the Download key, select it and move to its right pane. Perform a right-click inside that right-pane and hover on the option New. The submenu pop-up few more options, click on DWORD (32-bit) Value. Assign a name to this DWORD Value as EnableSavePrompt and follow the below directions.
Enable Save Prompt on Microsoft Edge Download
Step 6 – Next, make a double-click on EnableSavePrompt and input 1 as its Value. Finally, click OK to implement the changes on Edge browser.
Disable Save Prompt on Microsoft Edge Download
Step 7 – Open the Edit box of EnableSavePrompt by double-clicking its DWORD and set 0 in the Value field. Lastly, click OK and the changes on the browser will take place. Instead of changing the value to 0, you can also delete the Download key.
Conclusion
So, the guide for How to Enable and Disable Save Prompt on Microsoft Edge Download Windows 10 will lessen your annoyance on the browser. Once you turn the prompt off you will download items nonstop from the web.