This fatal code points out the system has come across either an inconsistent handle table entry state or a faulty device driver. There are plenty of probable reasons to brings forward such an issue but most of the time presence of old device drive, malware infection, and missing system components found to be guilty.
As there is no particular reason to work on, you might need to deploy several workarounds to Fix BAD EXHANDLE BSOD Error in Windows 10.
Table of Contents
BAD EXHANDLE
Here is how to fix BAD EXHANDLE BSOD Error in Windows 10 –
While trying to apply workarounds, there is a high chance that the system will force automatic restart time and again. This happens in order to prevent the loss of data and further damages. That being the case, turn off auto shutdown option right after you started getting bug check code 0x000000A7. Here are the steps you need to follow –
- Press Win+D hotkey together to arrive at desktop area.
- Right-click on This PC and select Properties.
- Click Advanced system settings placed in the left pane.
- Hover the mouse pointer to Startup and Recovery and hit Settings button lying beneath the same.
- Move down to System failure section and uncheck the box set for Automatically restart.
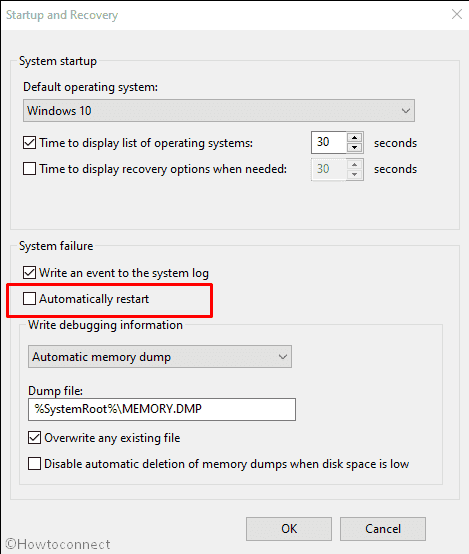
- Lastly, click the OK button so that you can get ample chance to move ahead with the plausible workarounds.
1] Update Device drivers
Device drivers play a crucial role to make your hardware run properly and when something wrong eventuates with the same, Windows 10 becomes slow moreover sluggish. There is a time when computer crashes due to overload and try to warn us about the upcoming issue. Most of the time we not only neglect the deterrent but also force the system to restart as a resolution which makes the situation much worse. In such cases, damaged and outdated drivers end up causing unexpected error codes such as BAD_EXHANDLE from which it’s hard to recover. Therefore, ensuring up-to-date drivers should be a part of your regular computer maintenance in order to keep up a healthy device. Here are the steps you can follow update device drivers –
- Click on taskbar search and type devmgmt.msc.
- Press Enter key when you see Device Manager at the top of appearing result.
- Decide on which drivers are bringing forth bug check code 0x000000A7.
- Reach out to that device and expand the same by double-clicking.
- Right-click on the suspicious driver and choose Update driver.
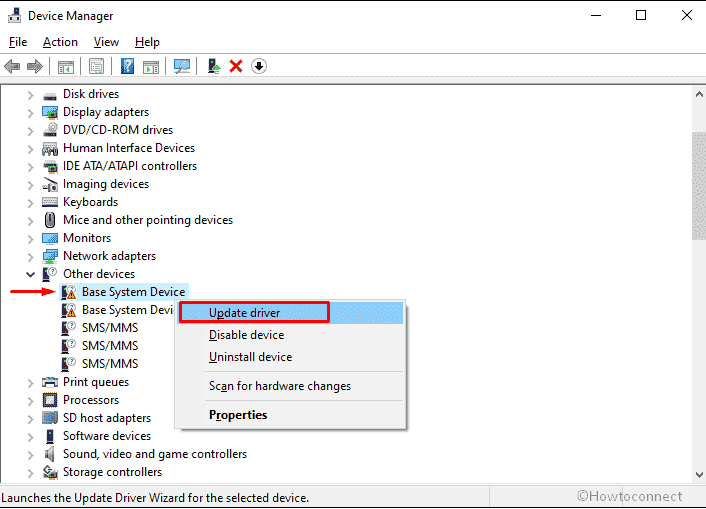
- Pick the option named Search automatically for updated driver software.
- When the online serach finishes, do accordingly the system suggests.
- Repeat the same process for all drivers that seem outdated to you.
Alternatively, go to the manufacturer website of device drivers and search for the item you want to update. After getting the same, install it manually, thereafter, restart Windows 10.
2] Do virus scan with Windows security
Common symptoms of virus attack are lagging performance, data loss, and system crashes which hint blue screen error too. Like human bodies, Windows 10 devices are very much prone to get affected by viruses. Once a malware makes a way out to enter into the system, it starts replicating itself to spread more. Often those viruses manage to remain hidden behind a genuine Microsoft item so that they can continue the augmentation process without being noticed. When they do so much howler into the system, you come across improbable issues like BAD EXHANDLE blue screen error. To clear those threats, go through the below process –
- Press Win+I hotkey at once and select Update & Security.
- Opt for Windows Security from the left-hand side and pass the mouse pointer to right.
- Pick Virus & threat protection.
- Click Scan options link from the right surface of Windows security page.
- Hit the radio button ascribed to Full scan eventually click Scan now button.
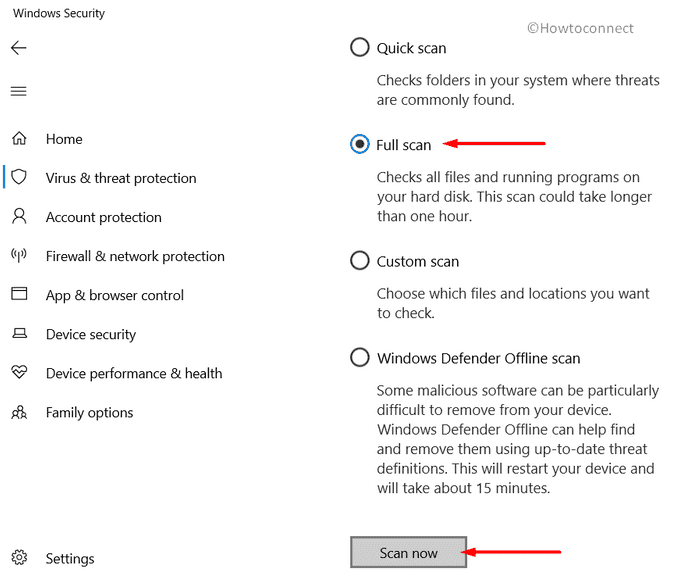
- After completion of the scanning process, if the system traces any danger, click Clean threats button to remove the virus.
- In case of detecting the virus and know more about the same, click See threat details link.
3] Run system file checker
System files are the core component of Windows as they let the system operate without any hitch. Though there is no way to delete those items mistakenly even through the use of permissions, system files may get misplaced or corrupted somehow and cause Windows 10 blue screen error BAD EXHANDLE. Power outage, bad sectors in memory, malware infection and unexpected shutdown are mostly responsible behind this. To recover those critical system files that are very much needed to run OS, sfc /scannow command utility comes handy. System File Checker and Windows Resource Protection are combined with each other so that they become a whole package in order to protect registry keys, folders, and crucial system components. Once you run the federated command, the utility starts working to restore the corrupted ones from a cached copy to Windows folder itself.
- Press Win and R keyboard shortcut to open Run command.
- Type cmd.exe in the dialog box followed by pressing Ctrl+Shift+Enter altogether.
- Click Yes button for appearing UAC.
- Insert
Sfc /scannowcommand after blinking cursor and then hit Enter.
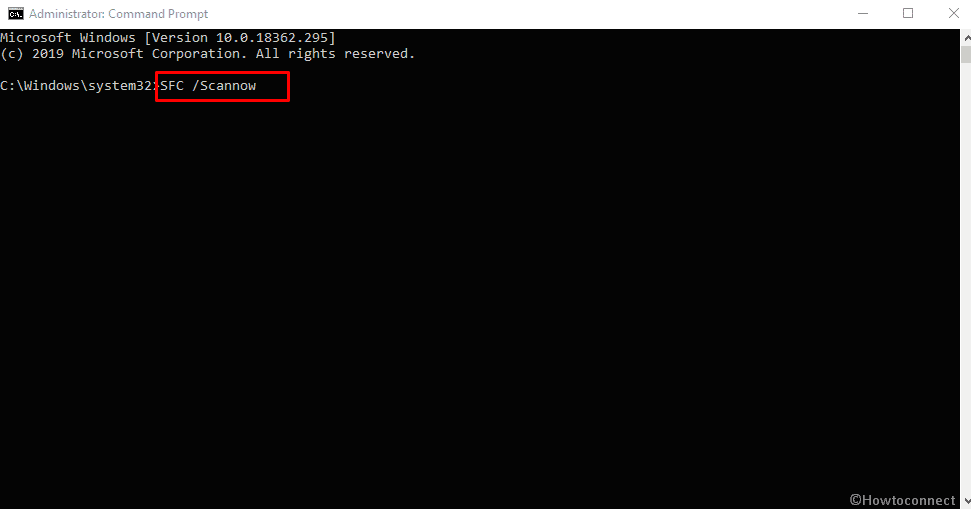
- Let the procedure hit 100% without interrupting in between.
- See the report properly thereafter take necessary steps to fix BAD_EXHANDLE.
4] Boot Windows 10 in Safe Mode
After coming across BAD EXHANDLE, Windows may fail to start normally thus making you unable to try out any workaround to fix the issue. As a result, you left with no choice rather than entering into Safe mode. Doing so will help to eradicate Blue Screen of Death caused by software as accessing troubleshooting tools will be easier in this particular state. Safe mode mainly lets Windows 10 loads with minimal user interface moreover essential services and drivers which are compulsory to make the device function properly. There are several ways to boot Windows 10 into Safe mode, let’s see the most convenient among all –
- Press Win+S and type control panel in the search bar.
- Hit Enter after viewing the same in result.
- Set the View by option of Control Panel to small icons.
- Opt for Administrative Tools from the available links.
- Double-click on System Configuration.
- Switch to Boot tab.
- Move down to reach Boot options segment and check the box against Safe boot.
- Click the radio button set for Minimal.
- Hit Apply button first and then OK to make the changes effective.
- Next, right-click on Start icon and choose Shut down or sign out => Restart.
- When the system powers up, continuously press F8 key until the next page shows up.
- Thereafter, select the Safe Mode option.
- Boot into Safe Mode on the subsequent move.
5] Get latest Windows update to fix BAD EXHANDLE
Microsoft keeps releasing cumulative updates quite frequently which mostly includes improvements not to mention fixes for reported issues. These patches not only settle upon blue screen error but also vanquish other stop codes that Windows 10 meets up. That’s why installing Windows update is a good habit to carry on with a healthy PC. Though the procedure of providing updates is autonomous, often it gets stuck in between due to poor internet connection or other reasons. This unfinished installation errs the system and force to generate BAD EXHANDLE BSOD error. Hence, finish the process by updating Windows manually. Here’s how –
- Press Windows and I keyboard shortcut followed by selecting Update & Security.
- Pass to the right pane and hit Check for updates button even though the page shows You’re up to date.
- Hit Download button if any patch is available.
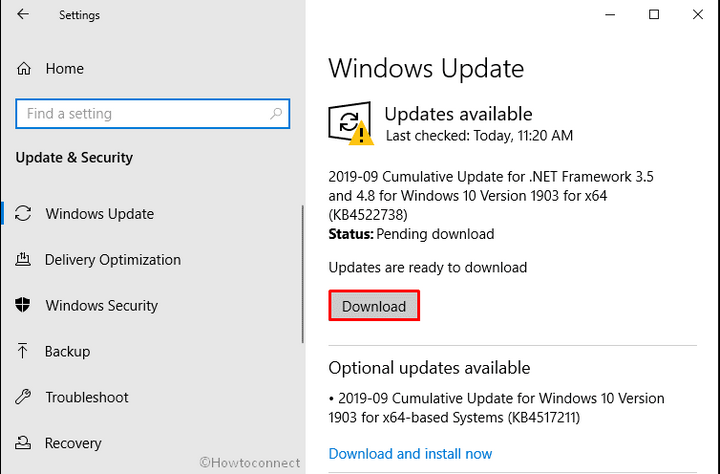
- Stay in front of the device until the installation process is done as system may ask to restart Windows 10 several times.
6] Run Deployment Image Servicing and Management
Even though system file checker detects the corruption exists in the device, often blue screen error BAD_EXHANDLE is incurable with the same. In such a case, Deployment Image Servicing and Management command comes as a rescue. Unlike, system file checker, DISM takes direct action to fix the issue found while scanning. Steps to run DISM are as followed –
- Click on taskbar search and type cmd.exe.
- Opt for Run as administrator option once you view Command Prompt in the result.
- Hit Yes if a UAC comes up for consent.
- Copy the following command and paste the same after winking C:\Windows\system32> –
DISM.exe /Online /Cleanup-image /Restorehealth
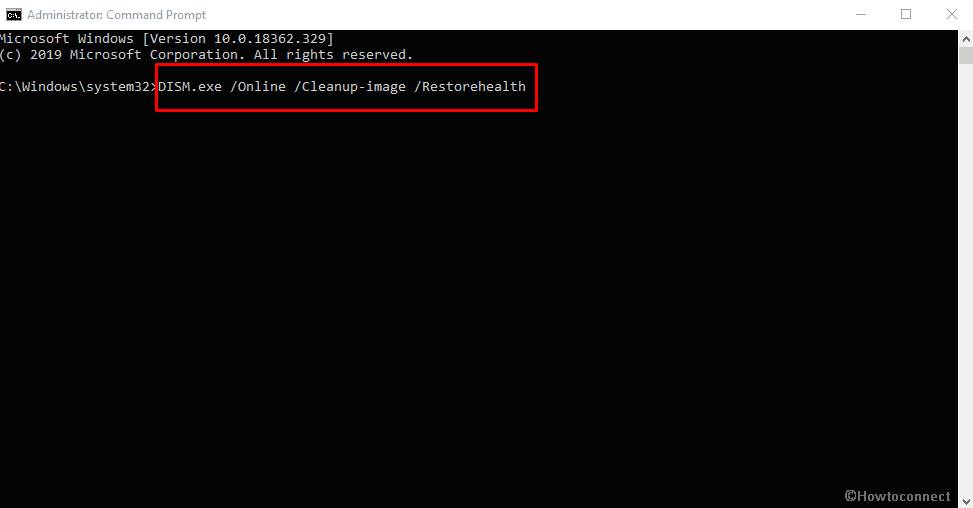
- Press Enter key to execute the command.
7] Clean up your Disk
Temporary files are being formed when a program becomes unable to share out enough memory for the tasks it needs to perform. Though they do serve a very necessary purpose, often temp files slow down Windows 10 and generate blue screen error especially when the folder gets larger. To be frank, it will be unfair if we inculpate just only temporary files for similar incidents, there are bunch of other culprits such as large browser cache size, old and unused programs et cetera. Deleting them gradually can be quite time-intensive therefore take help of Disk cleanup utility to wipe out all unwanted files in one go. Doing so will surely speed up and improve the performance of the hard drive moreover fix BAD EXHANDLE.
- Right-click on Start icon and select Run.
- Write down, cleanmgr and hit Enter.
- Click on OK where C: driver is selected by default.
- Hit the option entititled Clean up system files from the bottom.
- Again, click the OK button for Driver selection pop up.
- Check all the options lying beneath Files to delete.
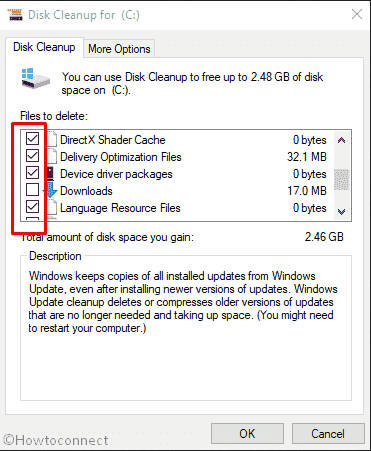
Note – Beware of Downloads and Recycle Bin moreover make sure there are no important files that exist there. In case of having any, leave the options unchecked.
- Lastly, click OK button to initiate the cleaning process.
8] Fix bad RAM
Defective Random access memory can cause all sorts of problems such as freezing desktop, abrupt shutdowns and last but not least blue screen of death. But that doesn’t mean it’s a sure one. Remember the time when you come across BAD EXHANDLE, if it was during the use of a memory-intensive application or game, bad RAM is a very likely culprit. As there is no certainty, test RAM stability first to find out if there any bad form exists and to do so bring Windows memory diagnostic tool into the play. Steps are as followed –
- Press Windows key and type memory in the search bar.
- Select Windows memory diagnostic once you see it.
- Click on Restart now and check for the problems (recommended).
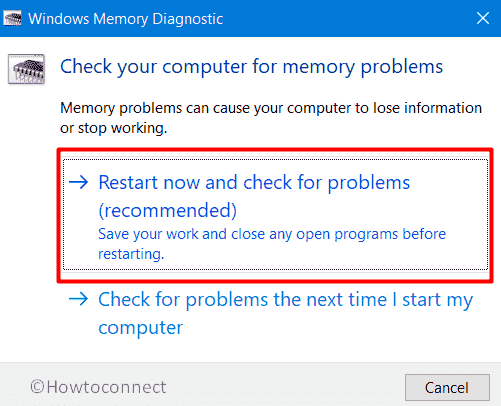
- Now the system will prepare itself for 1st cycle of rebooting.
- When it powers up, you will see a blue screen detecting memory issues.
- After completion of 100 percent, the device will reboot once again.
- Once you sign-in, a pop-up will eventually appear showing the results.
In case of not viewing any diagnosis report in System tray of the notification area, don’t freak out as you can manually get them through Event viewer. For that –
- Open Run Dialog box and type eventvwr.msc.
- Click the OK button.
- Once Event Viewer shows up, navigate to Windows Logs => System.
- To get quick access, click the Find option from right pane.
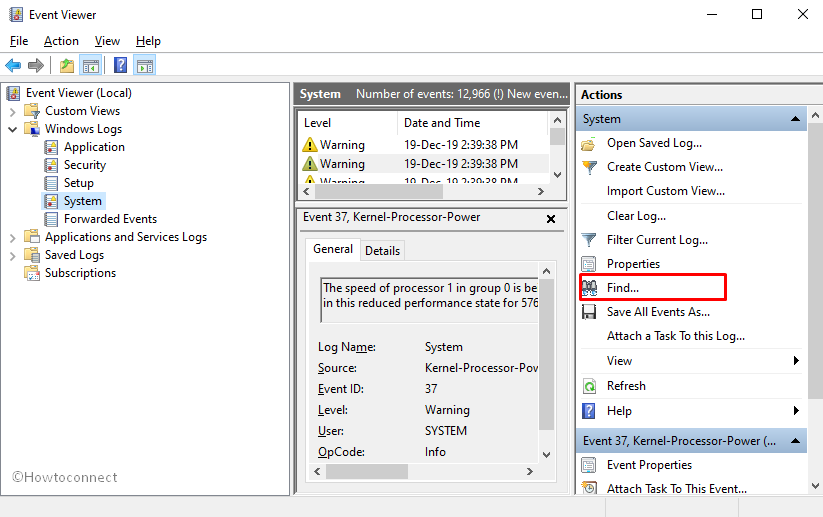
- Type MemoryDiagnostic into the text field followed by clicking Find Next button.
9] Clean boot Windows 10 to fix BAD EXHANDLE
Clean boot lets Windows start with fundamental files and services that are required to run the OS. This booting procedure is designed to identify the issue and troubleshoot as well. Clean boot troubleshooting not only isolates performance issues but also software conflicts finally yet importantly blue screen errors. The time you clean boot Windows 10, usual functions and other optional features become limited so that the system can diagnose the problem easily. Once the issue you are trying to troubleshoot i.e BAD_EXHANDLE is resolved, Windows will get back to normal environment by bringing back all functionality and features.
- Invoke taskbar search by pressing Windows key and Q at one go.
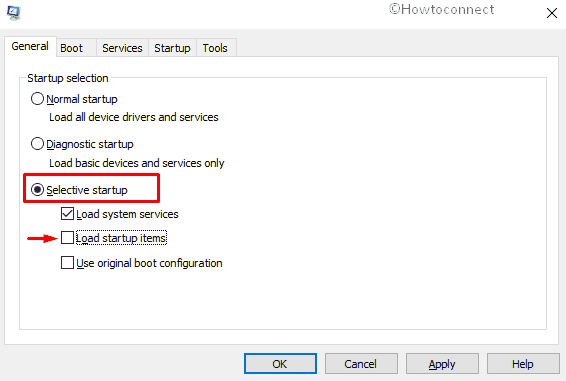
- Type msconfig and hit Enter.
- Opt for the radio button set for Selective startup and untick the box against Load startup items.
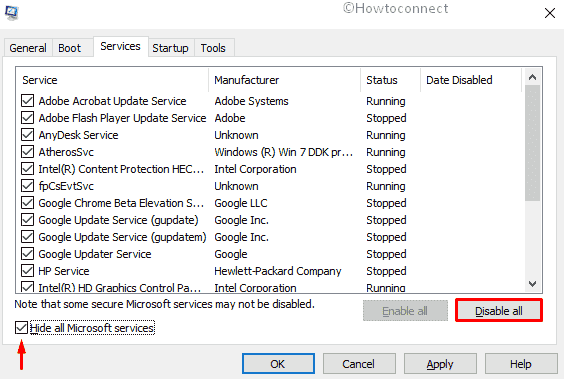
- Shift to Services tab and click the checkbox assigned for Hide all Microsoft services.
- Hit Disable all button.
- Jump into the Startup tab and click on the link Open Task Manager.
- Right-click on each program listed here one after another and choose Disable for all.
- Recuperate System Configuration window and click on Apply followed by OK.
10] Uninstall third-party antivirus program
Thousands are viruses are wandering on the web and trying to find a way to enter your system. To block or defend them, so many antivirus programs are available in the market and it’s pretty hard to choose a specific one. As a result, you end up installing more than one software which later conflicts with each other since they all attempt to perform same task so that your Windows 10 stays protected. In the process of impingement, antimalware programs lost their important element likewise essential component of the system what is one of the causes to generate BAD EXHANDLE. By keeping these consequences in mind, Microsoft came up with Windows Security that is more than enough to actualize the demand of remaining safe from threats. Therefore, uninstall antivirus programs installed on Windows 10 to avoid further damages –
- Press Win+X and choose Run.
- Type appwiz.cpl in the dialog box and click the OK button.
- Locate installed third-party antivirus program and select the same.
- Hit Uninstall option from the top ribbon eventually follow on-screen guidelines.
11] Prepare Windows for automatic repair to fix BAD EXHANDLE
Automatic repair by default gets launched at the third boot when Windows generates startup errors like BAD EXHANDLE blue screen of death. This tool runs multiple diagnostic tests during the session to detect furthermore repair bug check code 0x000000A7. Though Automatic repair is designed to troubleshoot issues, instead of doing so often the same takes you through an unexpected loop that is hard to carry one. As a result, most of us keep the feature turned off so that system doesn’t start the repairing tool automatically. Hence, to make the utility run again you need to set it up manually by following below steps –
- Open Windows Settings and pick out Update & Security.
- Select Recovery option from the left surface.
- Pass to the right and click Restart now button located beneath Advanced startup.
- Once Windows 10 powers up, select Troubleshoot =>Advanced options => Startup Repair severally.
- When Automatic Repair page shows up, provide credentials of your account.
- Click Continue to initiate the repairing process.
12] Deport external accessories connected to your device
Computer peripherals like printer, mouse, keyboard, extra hard drive, and scanner are pretty much needed nowadays. Unfortunately, when you connect one of these external accessories to your device, BAD EXHANDLE may appear which prevents Windows from functioning properly. Reason behind such an incident could be incompatible or outdated drivers. To track out the real culprit, unplug all peripherals one at a time and then put it back in the same way meanwhile check which hardware is causing BAD_EXHANDLE blue screen error.
13] Get rid of apps having similar congruence
Apps that are designed to serve same functions are prone to clash with each other. In such a process, they wipe out system elements which later cause BAD EXHANDLE. To avoid certain situation, it’s pretty much necessary to uninstall unwanted apps you hardly use –
- Press Win+X hotkey and select Apps and Features from the top.
- Move to right pane and locate the applications you want to remove.
- Once found, click on the same and hit Uninstall from the extended tray.
- If a UAC prompts, select Yes.
- Keep following the on-screen guidelines to delete the application completely.
- Perform the same for each app that may create conflict.
- Lastly, Reboot the PC.
14] Check for errors in hard disk
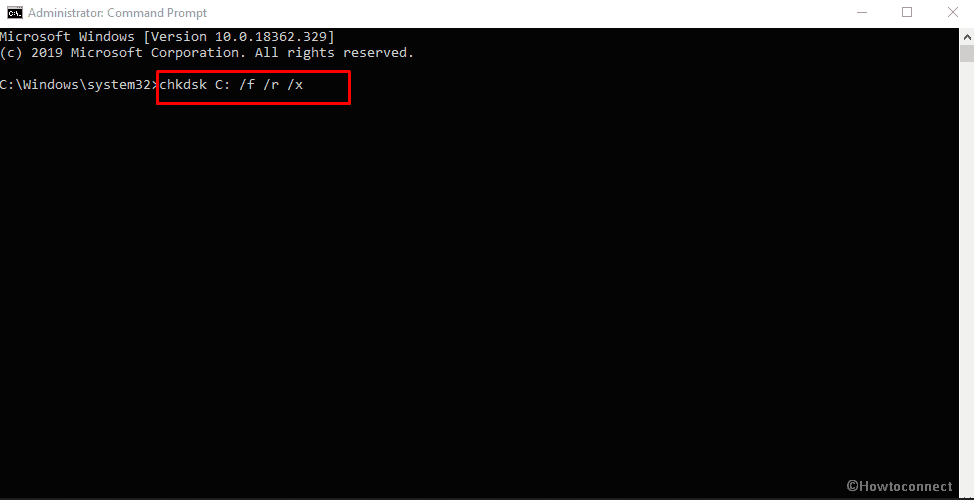
Symptoms you come across after getting affected by BAD EXHANDLE blue screen error mostly occur due to bad sectors of hard disk. Poor system maintenance, software as well as hardware failures, are mainly responsible for corrupt disk drive. To settle upon such an issue, take help of disk checking utility as the same will look into the specified disk and recover data on the drive if necessary. Moreover, chkdsk points out damaged or malfunctioning sectors on the hard drive as bad and restore any information still undamaged. To run the command, go through the below process –
- Click on Start icon and type cmd.
- Press Ctrl+Shift+Enter simultaneously to bring forth Command prompt with admin privilege.
- Click on Yes when a User Account Control asks for permission.
- Type the following command and then hit Enter key –
chkdsk C: /f /r /x
15] Remove faulty Windows Update Files to fix BAD EXHANDLE
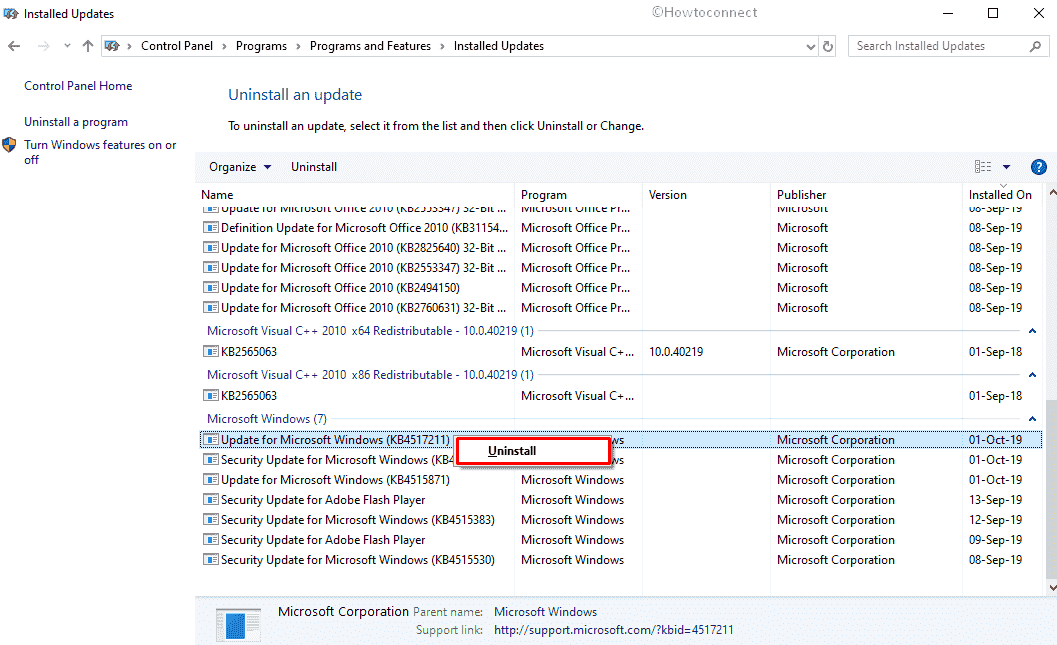
Some patches Microsoft provides are buggy and faulty as well. BAD_EXHANDLE can be repercussion of the same. Generally, after getting hints about the occurred issue, Microsoft immediately starts working to settle upon the error and after completion, they release a fresh update. As the procedure takes good amount of time, delete downloaded Windows update right away rather than waiting for the new patch.
- Right-click on Start button and choose Settings.
- Click on Update & Security.
- Hover the mouse pointer to right surface and hit the option View Update history.
- Click Uninstall updates link.
- Select the most recent received patch and right-click on the same followed by choosing Uninstall.
16] Make use of online Blue Screen Troubleshooter
Since when blue screen errors started spreading faster, Microsoft came out with a built-in app to abolish the error. The tool is known as Blue Screen Troubleshooter and it made its way out Fall Creators Update version. Previously, you were able to access the tool directly through Windows Settings app but right now you the same is available in Control Panel.
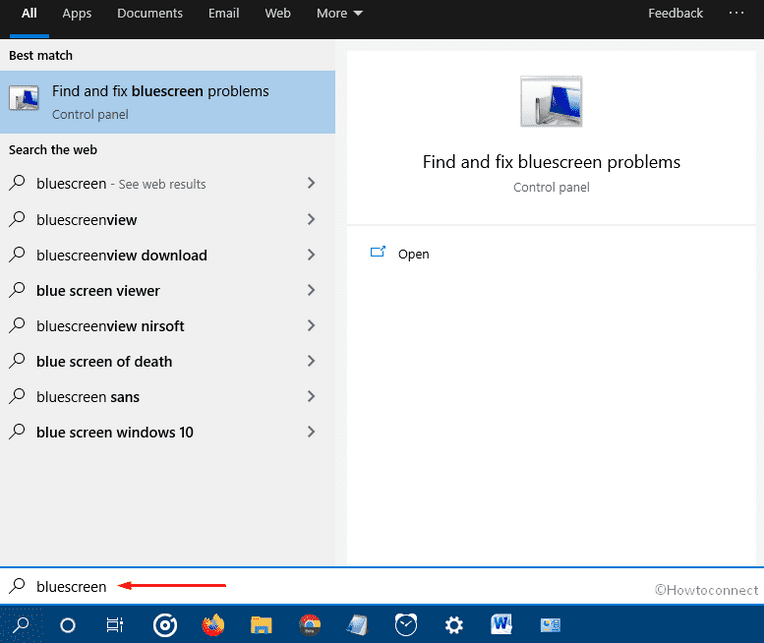
- Press Windows key and S altogether and write in bluescreen.
- Opt for Find and fix bluescreen problems option once the result shows up.
- Troubleshooting wizard will start detecting the issue related to BAD EXHANDLE.
- After completion, take necessary steps suggested by the tool to fix blue screen error.
17] Turn off fast boot
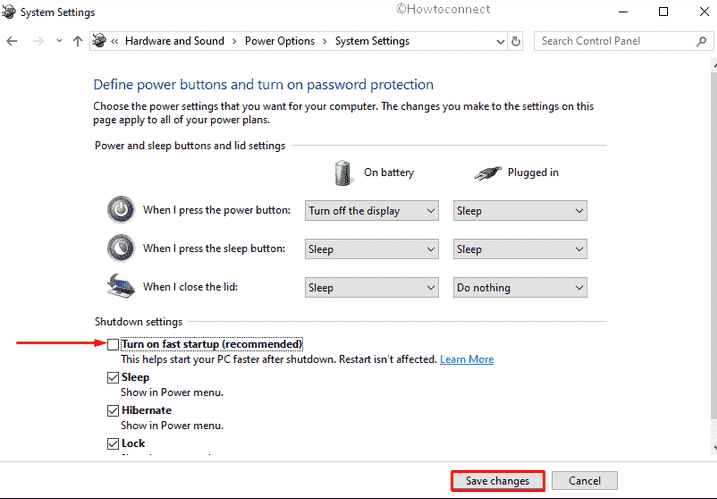
Fast Startup is an amalgamation of usual shutdown and hibernate feature that stores the internal information of your system in memory when you turn the OS off. The setting saves inside information and helps Windows 10 to load faster when you power it up next time. There is a high chance that the info about this BAD EXHANDLE blue screen error is being saved in the memory which is making a loop of the same issue. Hence, disable fast startup and see if it helps –
- Right-click on the battery icon from Taskbar and choose Power Options.
- Select Choose what the power buttons do link located in the left column.
- Click Change settings that are currently unavailable to unveil the hidden options.
- Move down and uncheck the box set for Turn on fast startup (recommended).
- Ultimately, click Save Changes button so that the alterations can take place.
18] Update BIOS version to fix BAD EXHANDLE
BIOS plays an important role to make your system run when you turn it on also assist the hardware to initialize during the booting process. The same also provides runtime services for Windows and programs moreover manage data flow with attached devices. Once the BIOS becomes outdated, generates different kinds of startup errors and BAD EXHANDLE is one of the among.
- Press Win+X and choose Run.
- Type msinfo32 in the text box eventually hit Enter key.
- When System Information page rolls out, type BIOS version in its search bar and click the Find button.
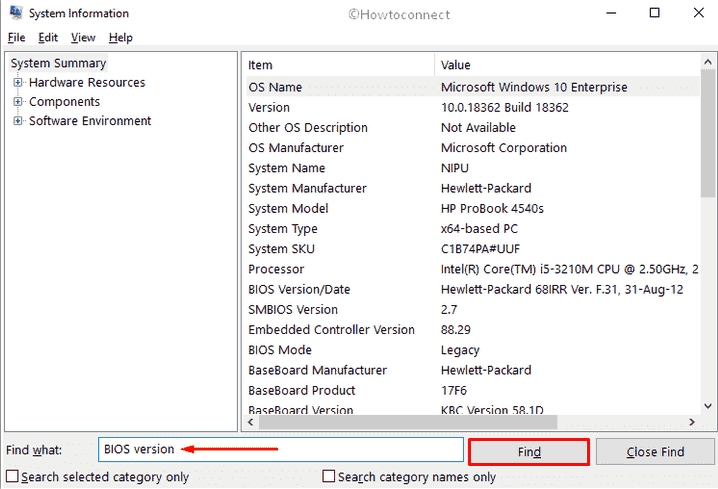
- Note down the information you get here and close the window.
- Later on, open a web browser and visit the manufacturer’s website for your BIOS.
- In the end, download the update files and install them as well.
19] Revert to the error-free state using System Restore
Making changes in settings and software is pretty common but if it is done inappropriately, bug check code 0x000000A7 may arrive. Fortunately, there is a way to come out of this condition and revert back to the error-free state. Here is how to proceed –
- Press Windows key and type rstrui.
- Hit Enter after viewing the result.
- Once the System Restore wizard becomes visible, click on Next.
- Opt for the last restore point and again hit Next.
- In the end, hit Finish button to go back to the previous state.
Methods:
1] Update Device drivers
2] Do virus scan with Windows security
3] Run system file checker
4] Boot Windows 10 in Safe Mode
5] Get latest Windows update
6] Run Deployment Image Servicing and Management
7] Clean up your Disk
8] Fix bad RAM
9] Clean boot Windows 10
10] Uninstall third-party antivirus program
11] Prepare Windows for automatic repair
12] Deport external accessories connected to your device
13] Get rid of apps having similar congruence
14] Check for errors in hard disk
15] Remove faulty Windows Update Files
16] Make use of online Blue Screen Troubleshooter
17] Turn off fast boot
18] Update BIOS version
19] Revert to the error-free state using System Restore
That’s all!!
