BGI DETECTED VIOLATION in Windows 10 often occurs with system crash followed by automatic restart of computer. This is an annoying BSOD error that starts with bug checking and its code is 0x000000B1. When this problem occurs, the system fails to work, sometimes gets stuck in a restart loop it is hard to recover to the normal condition.
BGI_DETECTED_VIOLATION Blue Screen Error can yet occur due to a faulty Windows update, obsolete drivers or BIOS, problems with peripherals, malware, and corrupted system files. This post describes some solutions to help you identify the cause and fix this error in Windows 10 or 11.
BGI DETECTED VIOLATION
Here is how to Fix BGI DETECTED VIOLATION BSOD Blue Screen Error In Windows 10 or 11 –
Way-1: Update the BIOS
BIOS is the prime reason when BGI_DETECTED_VIOLATION bugcheck occurs in Windows. Updating the Basic Input Output System aka firmware will repair this blue screen of death issue so follow the method –
- Press Windows + R.
- Type msinfo32.
- Click OK.
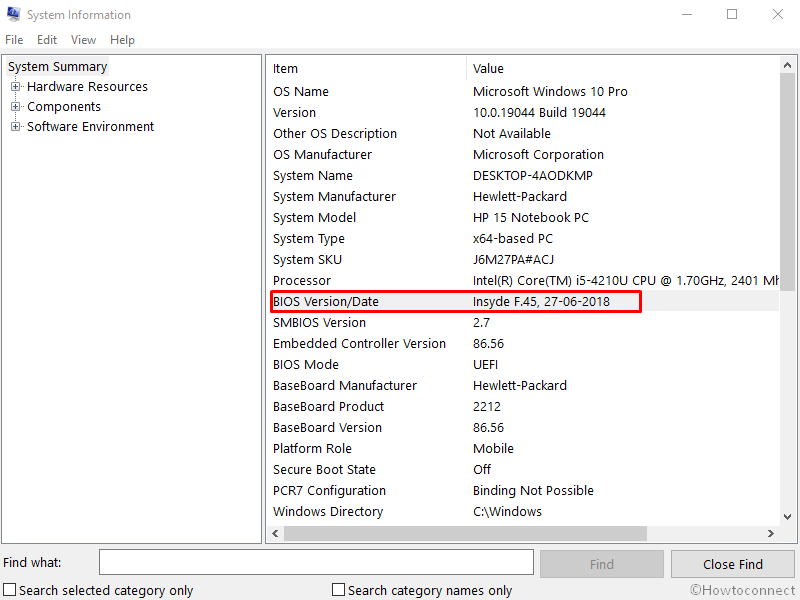
- When the System information window appears, find the BIOS version.

- Now go to the manufacturer’s website of your device.
- See the current BIOS version there. If it is higher than the one you have seen on the System information window then download the BIOS and install it.
Way-2: Disconnect External Hard Disk, DVD Drive
Several people experience BGI_DETECTED_VIOLATION BSOD error in Windows 10 after they connect a DVD drive or another hard drive in the system. Healing is so easy!
As can be seen from the analysis, the problem is solved simply by disconnecting the peripherals for a while. Let’s follow the instructions below and offer these items a short break:
- Remove the DVD drive or other peripherals connected to the computer.
- Store it carefully in a safe and easily accessible place.
- Restart the machine.
- Check the BGI DETECTED VIOLATION BSOD Blue Screen Error after rebooting.
- If the error is resolved, reconnect the device.
- If the Blue screen appears again, trace out the device that causes the issue.
- Start Microsoft Edge and visit the manufacturer’s website of the device.
- Then download and install the updated driver.
Way-3: Arrange extra disk space
Temporary files remain on the disk and take up a lot of space even when the volume is large. If the disk space runs short, problems like BGI DETECTED VIOLATION error will occur.
You need to free up the space by cleaning the Recycle Bin and running Disk Cleanup to stop the fatal result. Here’s how to do this –
- Press the – Windows.
- Type – cleanmgr.
- Press – Enter.
- Once a small pop-up window appears, select (C 🙂.
- Select – OK.
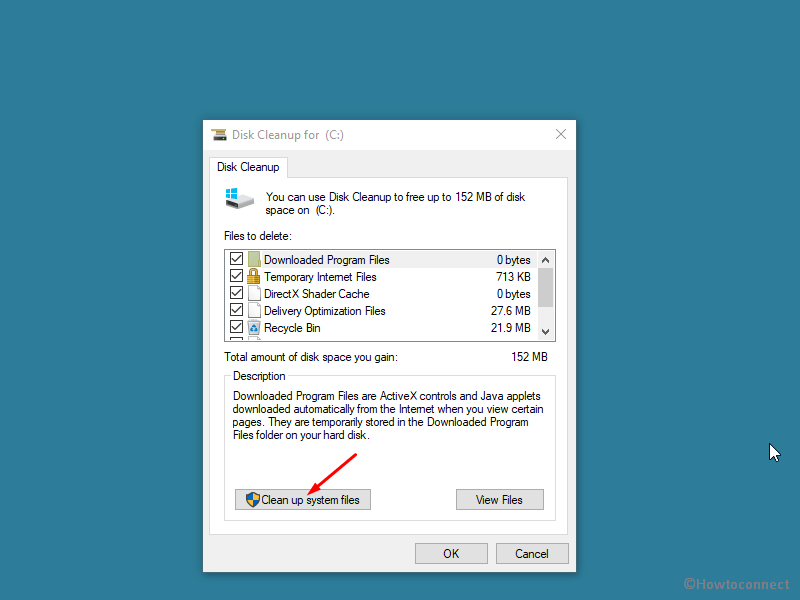
- The tool will figure out the amount of space it can recover and show a window.
- Click – Clean up system files.

- Once more select – (C 🙂
- Hit – Enter.
- Next, check all the boxes in the Files to delete the section.
- Click the – OK.
- Click – Delete.
Way-4: Fix bad disk area
Due to long-term use, bad areas often appear on the hard disk and as a result, Windows 10 crashes with a driver lock. However, disk Check saves the situation when a command-line runs. To run the tool, continue with the following steps –
- Open Command prompt as administrator.
- Type the following command –
chkdsk /f /r /x. - When you press Enter, Disk Checker automatically corrects the bad sector.
- After the operation, the PC restarts in the usual way. Please check your BSOD before returning.
Way-5: Remove third-party programs
If two or more similar programs remain in Windows 10, they will often conflict, losing valuable data from the operating system. With missing resources and files, Windows 10 BSOD error has occurred. To extract these files using the steps below:
- Right-click the Start.
- Select – Run.
- Type – appwiz.cpl.
- Hit – Enter.
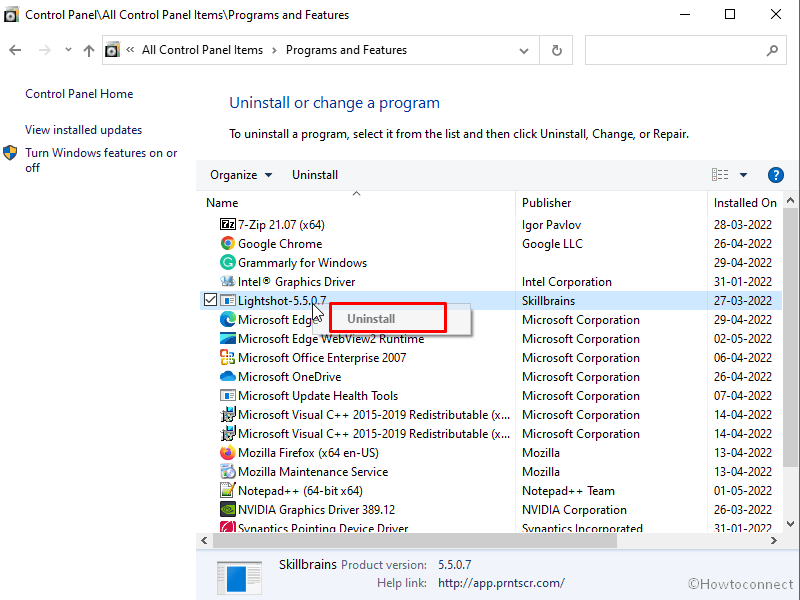
- When the Programs and Features window appears, look at the list of installed applications.
- The arrival of third-party applications installed on the system will cause a Bgi Detected Violation error.
- Right-click on each of them and select – Uninstall.

- Follow the steps below and follow the on-screen instructions to erase it.
Way-6: Correct Windows image
Windows image files are susceptible to corruption and often become victims of software conflict. Thankfully, DISM tool is here to deal with the .WIM or VHD to resolve BGI_DETECTED_VIOLATION BSOD. To use the utility, you must follow the instructions below:
- Press – Win+S.
- Type – cmd.
- Click – Run as administrator.
- Enter the following text –
DISM.exe /Online /Cleanup-image /Restorehealth. - DISM will start the repair after pressing Enter.
- When done, restart the device and check for an annoying blue screen.
Way-7: Perform System Restore
If you install, uninstall, or change programs, this task will record the task work in the registry. This registry when anyhow gets corrupted can cause blue screen error BGI DETECTED VIOLATION. You can quickly correct this error by moving the system back to the previous point. System Restore returns Windows to an earlier state when it was in good condition.
So, follow the instructions below to perform a system restore:
- Press the Windows key.
- Type – rstrui.
- Hit Enter and run the System Restore Wizard.
- Check option – Choose a different restore point.
- Click ‘Next’ to continue.
- In the next window, select Show more restore points.
- Highlight one by clicking when the blue screen error did not appear.
- Click, Next.
- Now click Finish to start the recovery process.
- Choose Yes on the warning pop-up.
Way-8: Uninstall third-party antivirus
Many more users opt to use anti-malware programs than those who use Windows Security, the powerful built-in tool in Windows 10 or 11. The solutions are generally free for basic features but they carry several loopholes and even vulnerabilities.
Because Windows 10 itself has the highest quality anti-malware tool, you no longer need them. In addition, using third-party programs can be dangerous and can sometimes cause BSOD errors as well.
Removing the program is easy if you follow the instructions below:
- Press – “Win + I“.
- Select – Apps.
- Find and click on the installed third-party antivirus program in the list.
- Select – Uninstall.
- Click on “Uninstall” again.
- Follow the instructions on the screen to completely erase the device.
Way-9: Prevent the Windows from restarting automatically
If Windows restarts without warning, you will have little time to try the solution. This is the most annoying thing when the device is diagnosed with a BGI_DETECTED_VIOLATION BSOD error in Windows 10 or 11.
Therefore you will have to deactivate the automatic restart setting as it will provide a chance to deploy the fixes without any hassle. Let’s look at the process below:
- Click on Search.
- Type – Advanced system settings.
- Hit – Enter.
- When on System Properties, go to – Startup and Recovery.
- Click on – Settings.
- A wizard opens; scroll to the System Failure field and clear the box for Restart automatically.
- Then click – OK.
- The computer will not reboot during error checking if these changes are saved. Well, you can use these solutions successfully from now onwards.
Way-10: Uninstall Windows update
Usually, a Windows update contains fixes for significant issues, oppositely the buggy one may cause errors. BSOD, full form Blue Screen of Death, might be a result of the Windows update you recently installed. The easiest solution of this problem is to remove the patch by following these steps –
- Press the Winkey and I.
- Choose – Updates and security.
- Select-View update history.
- Click – Uninstall updates.
- Please navigate the recently received fix in the list and right-click on it on the newly open window.
- Select – Uninstall.
- Confirm by clicking Yes.
Way-11: Use the SFC Scan Tool
Oftentimes system files having extensions .exe, .dll, .sys, etc are somehow become corrupted or lost. This consequence is BSOD in common cases. However, System File Checker, pretty helpful to deal with these files, repairs corruption, and brings them back to a normal state. This fix it tool generally solves any error of this nature if you run its command line. Follow these steps –
- Right-click on – Start.
- Type –cmd.
- Select – Run as administrator.
- On the UAC prompt, click – Yes.
- On command prompt, type –
SFC /Scannow. - Press – Enter.
- Reboot Windows when the task is complete.
Way-12: Update device drivers
Stop errors, such as Bgi Detected Violation, are often caused by outdated, corrupt, and broken device drivers. These types vulnerable drivers cause conflict with system files in all circumstances.
Nevertheless, Device Manager dramatically simplifies the task of updating or installing drivers. You will experience problematic drivers with a yellow warning sign indicating that they need to be updated. Follow these steps to do so –
- Press Win+X.
- Click on – Device Manager.
- In Device Manager, double click on the devices to expand and look for the yellow warning mark one by one.
- After found, right-click on the driver and select – Update driver.
- In the next window, click – Automatically search for drivers.
- Reboot the computer and after completing the instructions on the screen, the BSOD error may disappear.
See – How to update drivers in Windows 11 (Best ways)
Way-13: Install the pending updates
Because the cumulative updates carry bug fixes, don’t bother because there may be something that can troubleshoot Bgi Detected Violation error.
So allow the Operative system to install updates without any questions or doubts. Before you begin using this method, make sure that you have an active high-speed Internet connection so that there may not be any interference during the installation of the update. Prefer using an Ethernet cable over WiFi and if you’re using mobile data, make sure you don’t prioritize a metered connection, otherwise, the download may fail.
- Click the Search from the taskbar.
- Type – updates.
- Hit – Enter.
- Next, click – Check for updates from the Settings app.
- If they are waiting for repairs, they will be downloaded. 6. Restart the computer to complete the installation.
Way-14: Perform a full threat scan
If you try to repair BGI_DETECTED_VIOLATION, you should necessarily check for malware. While random codes enter the system after visiting a less reliable website or clicking on a link in a spam mail, they hack the system. To rescue this, you need to use Windows Security, the standard anti-malware for the operating system, and remove or quarantine it.
- Press – Win+S.
- Enter – Windows security.
- Hit – Enter.
- Click Virus and Threat Protection on the Security app.
- Select – Scan Options.
- Choose Full Scan.
- Now, click – Scan now.
- When scanning is complete, the result will be displayed through Notification. If malware is found, click Clean Threats.
- To kill threats, select Remove.
- Then click Run Actions.
Way-15: Repair bad disk areas
Because of long-term use, bad areas often take place on the hard disk, consequently, Windows 10 crashes with a driver lock. The Check disk tool saves the situation when its command-line runs therefore continue with the following steps –
- Click on Start.
- Type CMD.
- Select – Run as administrator.
- Type the following command –
CHKDSK /F /R /X. - Press Enter.
- The tool will ask you to check the disk when the computer will restart next time. Give you your approval by clicking on Yes.
- When the operation is complete, restart the computer as usual.
- Check your BSOD for an error before returning.
Methods list:
Way11: Update the BIOS
Way-2: Disconnect External Hard Disk, DVD Drive
Way-3: Arrange extra space
Way-4: Fix bad disk area
Way-5: Remove third-party programs
Way-6: Correct the Windows image
Way-7: Perform System Restore
Way-8: Uninstall third-party antivirus
Way-9: Prevent the Windows from restarting automatically
Way-10: Uninstall Windows update
Way-11: Use the SFC Scan Tool
Way-12: Update device drivers
Way-13: Install the pending updates
Way-14: Perform a full threat scan
Way-15: Repair bad disk areas
That’s all!!
