Corrupted Mouse Driver in Windows 10 is one of the most nagging issues that you might have encountered. Usually, the computer stops recognizing the mouse whether it is wired or Wireless Bluetooth. In some cases, users complain that the Device Manager displays yellow exclamation mark next to the mice driver. Because of the faulty driver, the mouse either gets stuck or its cursor goes missing.
In addition, mouse lagging issue in April Update 1803 has also become a common problem for many. To resolve the corruption, you need to go perform certain troubleshooting methods such as you have to ensure that it is not physically damaged, check its connection. Moreover, you can also update its driver or reinstall it to make it operable again. So, let us advance to the workarounds in details and see how to bypass this problem of corrupted mouse driver in Windows 10.
Table of Contents
Corrupted Mouse Driver in Windows 10 Solutions
Here is How to Fix Corrupted Mouse Driver in Windows 10 –
Check the Mouse connection
Before going to any of the processes, you need to check the mouse connection properly to avoid the corrupt driver issue. Unplug the cord and then plug it back in order to ensure that the USB ports are working properly. If you cannot detect the mouse, then immediately test its cable. Also, make sure whether it is connected to the correct port or not.
Note: If you are using a wireless peripheral, change the battery and follow the manufacturer guidelines on how to connect it. Finally, see if the Corrupted Mouse Driver in Windows 10 issue disappears or not.
Examine Mouse
There is a possibility that your mouse is physically damaged. You can counter check your present mice with another working one. If that second mouse is also not working then the problem is something else. But if it is operating perfectly on your computer, then exchange the problematic one with a new mouse.
Change Mouse Properties
As your mouse pointer is not working effectively making you unable to click on anything on the Desktop, therefore you need to use the keyboard instead. If you are having a touchscreen, then there is nothing to worry.
For those who can’t access their mice, they can use the Tab Key, the Arrow keys and the Enter key to control. If you want to use numeric keypad as the pointing device, use shortcut keys like “left Alt+ left Shift+ Numlock” to open the Mouse Keys dialog box and then hit Yes.
Press Win+I shortcut keys in order to open Windows Settings, the built-in application.
Next press tab to highlight and go to Devices category using Arrow keys and then hit Enter.
Here press tab and down arrow to select Mouse on the left sidebar of the subsequent page. Now, to switch to the adjacent pane, keep hitting tab until you select Additional Mouse options. Once you select it, hit Enter to get access to the Mouse Properties.
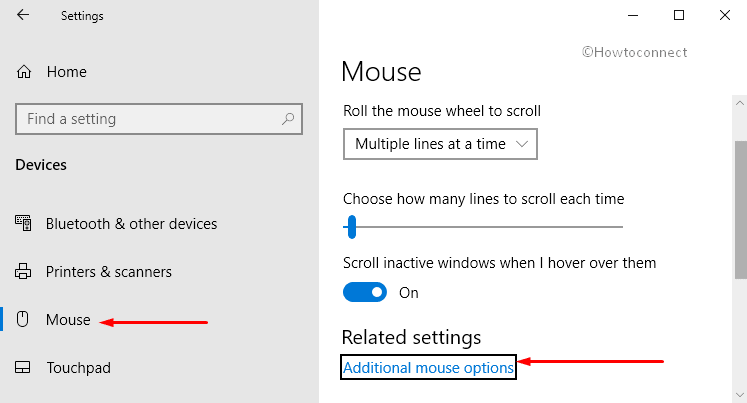
Now using tab key move to the ELAN tab. Thereafter select your device and hit Enter on the Enable Device option.
Following the above-explained method will solve the no mouse pointer issue in no time.
Start Human Interface Device Service
Even after trying the above methods, Corrupted Mouse Driver issue persists, you can try this fix to avoid the HID-compliant mouse trouble.
Go to Cortana search box and type services. The Best match displays the same, click on it to open its Desktop app.
Locate Human Interface Device Service in the right pane and perform a double-click on it to check its current status.
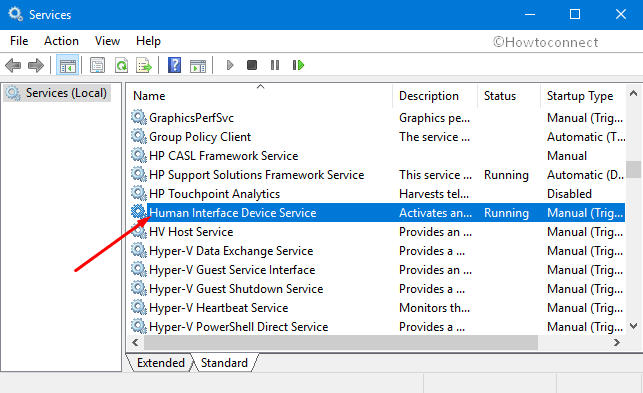
Be on the General tab, modify the Startup type of HID to Automatic.
Moving ahead, click the Start button as shown in the below screenshot. Finally, click on Apply as well as OK buttons to implement the modifications.
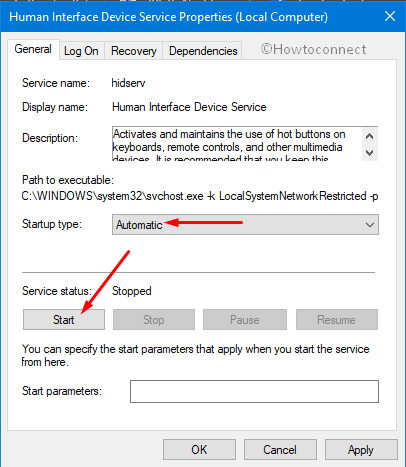
Lastly, close all the active windows and Restart Windows 10 PC.
Once the system reboots, connect the problematic mouse to the computer and check its working condition.
Reinstall Mouse driver
For many users, the promising way to bypass Corrupted Mouse Driver in Windows 10 is by reinstalling the driver.
At first, right-click on the Start icon that appears at the left bottom of the desktop. When the Win+X Menu shows up, select Device Manager.
Go to the Mice and other pointing devices and make a click on the plus symbol to expand it. Here execute a right-click on the mouse driver.
Now, choose the Uninstall device option and then confirm the uninstalling process by clicking OK on the pop-up menu.
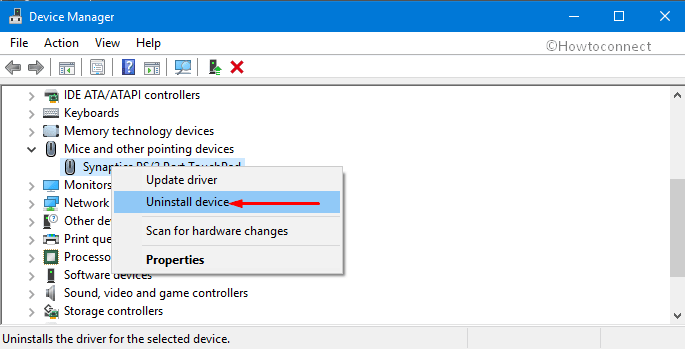
Lastly, Reboot the device and let Windows reinstall the driver all by itself.
Use proprietary software
Using proprietary software is always good for the smooth functioning of different components of PC. These drivers often come with the CD which accompanied your Mouse. However, you can also get the mouse driver from the brand manufacturer’s official website. Just visit its webpage, download and run the driver as mentioned in their guidelines.
Note: Sometimes the wrong driver which is downloaded and installed on a computer might harm your device. So it is necessary to install the latest driver from official website only. You can also use third-party website which is approved by Microsoft and Norton to automatically download all the outdated drivers on your PC.
Run Hardware and Devices troubleshooter
There is an inbuilt tool to detect and fix most of the incorrect settings and error which causes the issue with hardware. You need to create a shortcut to launch as well as run Hardware and Devices troubleshooter.
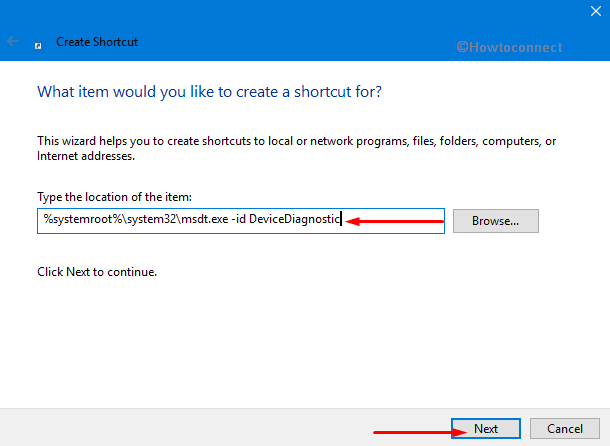
Go to the desktop and conduct a right-click on a blank space. From the context menu, hover over New followed by a click on Shortcut.
Type in or copy-paste the below-given path in the provided text field and click Next.
%systemroot%\system32\msdt.exe -id DeviceDiagnostic
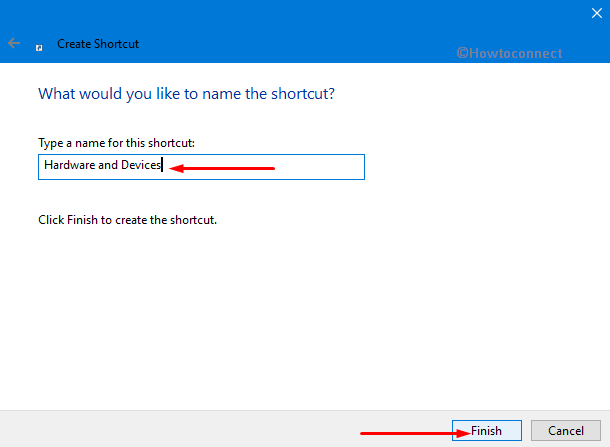
On the following screen of the wizard, provide a name to the shortcut such as Hardware and Devices and followed by a hit on Finish.
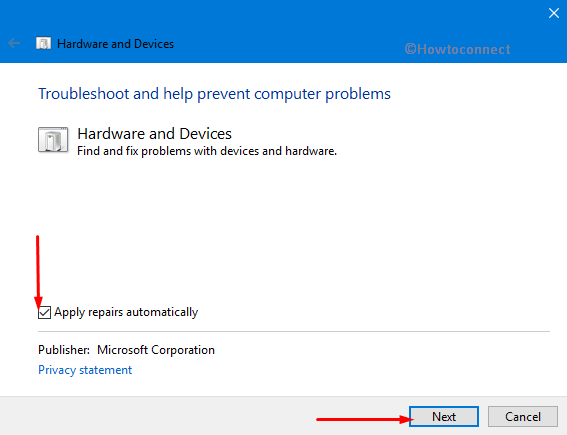
Now, head to desktop and do a double-click on the shortcut to launch the troubleshooter. Once the wizard shows up on the PC screen, choose the option namely Apply repairs automatically and hit Next.
Wait for it to complete the scan and repair the faulty areas all by itself. After the scan gets over, it will display you the results.
Install Mouse Driver in Compatibility Mode
First of all, navigate the manufacturer’s website of your mouse and download the latest driver version for your PC. Once the download gets over, make a right-click on the setup file of the driver and select Properties.
On the Properties dialog, switch to the Compatibility tab.
Here, tickmark the box against the option namely “Run this program in compatibility mode for“.
Moving ahead, click the drop-down that appears just underneath the above-mentioned option and then select the version of Windows you are currently using.
Finally, make the compatibility changes effective by click Apply and OK buttons.
Perform a Registry Tweak
Even after trying out the above solutions, if you are still facing Corrupted Mouse Driver issue on Windows 10, give an attempt to the registry. You need to increase the horizontal scrollbar of the mouse and then give a shot to the operation of your mouse.
Note: Before carrying out any modifications in the Registry, do create a backup of your important files and folders. This is necessary as incorrect changes in Registry may lead to data loss as well as the corruption of entire Windows OS. Moreover, also ensure to import and export Registry to avoid further accidental damages.
At first, make a hit on Win+R hotkeys together in order to open the Run dialog box.
Type “regedit” in the void box and hit Enter to continue.
Here navigate to the following path on the left side pane of the Registry Editor.
HKEY_CURRENT_USER\Control Panel\Desktop
Now, shift to the right pane, locate and double-click the DWORD WheelScrollLines.
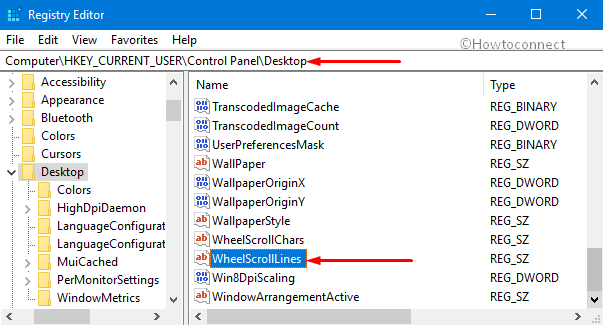
A new window will pop up in front of you, just change the Value data to 3 then press OK button.
Once you do the changes, reboot the computer. Now, check the disappearance of corrupt mouse driver issue.
Do System File Checker
Most of the time, executing a system file checker dig out the deeply rooted faulty drivers or files on the system. Once expiscates, it makes an attempt to resolve them as well.
On Cortana search field, type “CMD” and keep hold on Ctrl and do a hit on Shift + Enter keys. Click Yes on the prompt of UAC.
Once the elevated Command Prompt shows up, type in or copy-paste the below-given command and hit Enter to execute it.
sfc /scannow
Wait for the scan to finish and repair the fix automatically.
Read SFC /Scannow, DISM.Exe, CHKDSK Windows 10.
That’s all.