BSOD DRIVER_POWER_STATE_FAILURE in Windows 10. forces Windows to go in sleep mode from running condition while a user is working along. The error appears when Windows sends a wake signal to the machine whenever necessary and it doesn’t really respond to the call at all. For the occurrence, Power Settings in the system or problematic device drivers are found to be responsible. The drawback comes up with an error message having bug check code of 0x0000009F indicating the driver has trapped in an inconsistent or invalid power condition.
Blue Screen error is usually devastating in nature and causes severe damage to the system. It starts with showing bunch of error messages on display while a user attempts to run a new program. Desktop area freezes periodically making working difficult and the situation gets worse when the Windows starts rebooting automatically. The setback has a history of getting fixed easily using software-based workarounds if deployed perfectly. The following section comprises of resolution processes with a brief discussion to their implementation process, have look on the list –
DRIVER_POWER_STATE_FAILURE
As mentioned before, Windows after being diagnosed with Blue Screen error with bug check code 0x0000009F will reboot all on a sudden automatically. This happens when the system tries to save the internal data from being damaged which will make the Windows state unstable. Therefore before we proceed to deploy these workarounds, we need to disable the Automatic Restarting of Windows 10 first. Here are the guidelines to accomplish this task –
- Opt for saving all the running processes and then close them.
- Transfer to the Desktop area first, you can press Win+D keys together for that.
- Here, make a right-click on This PC icon
- Select Properties option from appearing menu bar.
- A new System Window will open up immediately where, click on the Advanced system settings lying on the left pane.
- Another popup window will be displayed soon, head out to its Advanced tab.
- Make a click on Settings located in Startup and Recovery area in the current tab.
- From the new window coming on, reach to the System failure area.
- Remove the tick mark from checkbox reads as “Automatically restart”.
- Finally, hit the Ok button at the bottom end to save these changes.
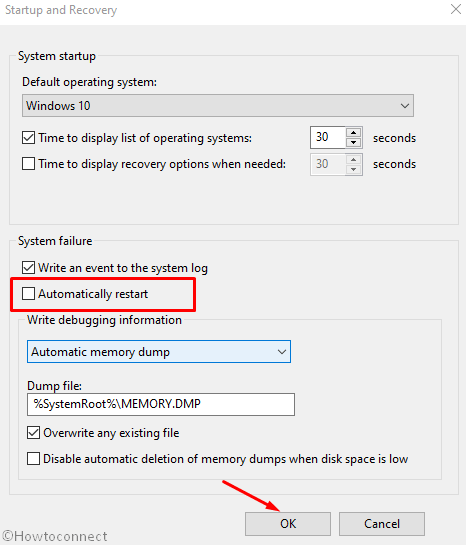
Once the above changes are made already, windows will no more reboot automatically and you will have enough time to deploy the following workarounds. Hope you have a favorable environment now and let’s proceed to the resolution processes one by one.
1] Update the Display Driver
One of the most popular reasons to cause a DRIVER_POWER_STATE_FAILURE in Windows 10 is an outdated Display driver or Graphics Card Driver. With the initial, Wi-Fi Card Drivers are often found to cause the same. In fact, whenever, there are any outdated drivers in the system, they will cause something devastating to the system.
Drivers are the components maintaining communication between compute bus and a selective Hardware accessory. We cannot let these important parts to run in outdated condition and by means that, system encountering BSODs. Therefore, step up to update Graphics Card Driver and all other outdated ones using the Windows Device Manager platform. Here are the guidelines –
- Open Taskbar Search by pressing Win+Q hotkeys at once.
- Type device manager in the blank text area
- Select the Device Manager app from the visible list
- When moved to the app accessible area, reach to Display adapter and click on the same to reveal driver list.
- Now, right click on the same and select Update driver option.
- This process needs your attention and might be necessary to complete a couple of tasks onwards.
- Comply with the guidelines shown and complete the task.
- For other outdated drivers, reach to the devices having the mark of exclamation beside them.
- Click on each to stretch the driver list.
- Do a right click on the ones having yellow indication and select Update driver option.
- Once finished updating, restart the Windows to make the changes effective.
2] Roll Back Graphics Card Driver and rectify DRIVER_POWER_STATE_FAILURE
DRIVER_POWER_STATE_FAILURE in Windows 10 is protruding when a display driver is defective or something wrong happens while updating it. After Microsoft made the updating system of drivers autonomous, these problems are coming now and then. We can avoid such kind of dreadful device only by rolling back to their default. For that, move with the below guidelines –
- Press Win+R hotkeys together to open Run dialog.
- Type devmgmt.msc in the empty search box and eventually click OK button from the wizard.
- When the Device Manager launches on display, reach out to Display adapter device.
- Click the same and when the drivers are out, do right click on the same.
- Choose Properties option from the displayed menu.
- When a new popup window opens, enter into the Driver tab.
- Following the progress, click Roll Back Driver option from there.
- From here onwards, go with the displayed instructions to complete the process.
- Finally, reboot Windows 10 and save all the changes.
3] Remove External Hardware devices temporarily
While working on the computer, we need a lot of accessories besides for serving various purposes. Whenever you need a handout, a printer is necessary. Besides, for usual working, mouse and keyboards are part and parcels. In fact, Hardware accessories are inseparable parts of a system and we cannot really work along in absence of these. It’s quite unfortunate that some people have already come across Blue Screen Error with bug check code 0x0000009F while using these hardware items.
Tech forums are evident that this drawback resolves easily by disconnecting the accessories for a little while. A big group of people have already found the tip very much effective and fixed BSODs from their systems. For your case, try de-porting them with caution and place gently without damaging. Later on, we recommend performing a restart to windows and at the beginning of the new session, connect all the accessories if the error resolves.
4] Run System File Checker tool
System components in Windows may sometimes get corrupted by the infection from malicious codes. Another dangerous vulnerability called Software collision for having duplicate applications in the system causes a few of the necessary files to be erased. These two major reasons cause DRIVER_POWER_STATE_FAILURE in Windows 10.
Hence, to fix the error, we need to rectify the corrupted components first and for that, System File Checker tool comes at the top of all. You need to activate this utility in Elevated Command Prompt going through following way –
- Open the Power user menu pressing Win+X hotkeys at once.
- Select Run option from the list to launch this wizard.
- Write cmd in the search box provided in Run
- Press Ctrl+Shift+Enter keys together
- When the UAC asks for permission, click Yes to proceed on
- When in the black window, enter following command –
Sfc /scannow
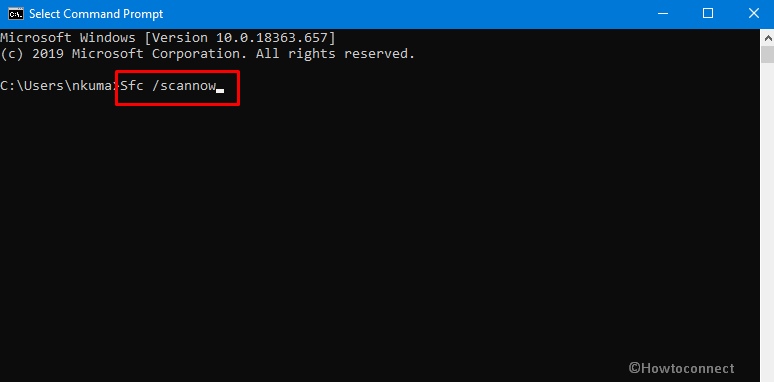
- Press Enter key to activate System File Checker tool here.
- The tool will detect the corrupted as well as missing system components and provide necessary measures to fix them.
- Once the process finishes, Restart the Windows 10 to make the changes saved.
5] Uninstall Problematic drivers
After the updating process of drivers made autonomous, often this task happens while the device is unattended. Therefore, some dreadful update files get installed in the system causing Blue Screen error with code 0x0000009F. In order to avoid this setback, we have to uninstall that driver from the system. The task is easier if you follow the below steps –
- Open Device Manager following guidelines provided before.
- Opt out to the Device driver that you want to uninstall.
- Click on the same once reached and reveal the driver list.
- Do right click on the same and select Uninstall device option from appearing menu.
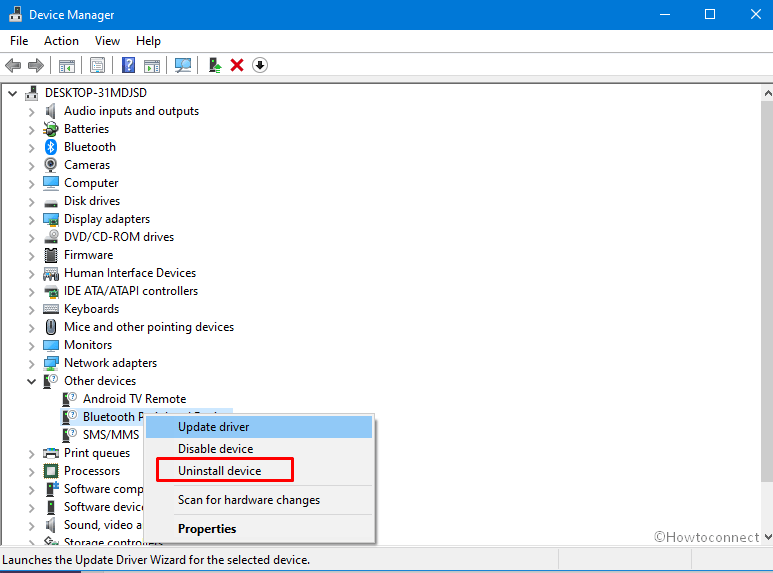
- Follow the provided guidelines on-screen to finish up the process completely.
- Finally, restart the system and on powering up the desktop in next session, check if the error resolved.
6] Boot Windows 10 in the Safe Mode
Safe Mode is a special type of startup method that powers up a system loading only basic application and settings. After booting, usually, DRIVER_POWER_STATE_FAILURE in Windows 10 resolves. This workaround is very much popular among the users in every single trouble happening to Windows right after starting its journey.
If the BSOD error doesn’t resolve after you boot Windows 10 into safe mode, you can still be benefited indirectly. It provides assurance that no default program or setting is causing the issue and you can move for resolving it accordingly. Here is how to proceed for this mode –
- Before we opt for this operation, save and close all the running applications, processes and close them eventually.
- Now, move to the Desktop area pressing Win+D hotkeys together.
- Now, press Alt+F4 keys at once to invoke Shit down menu.
- Select Restart clicking the drop-down list located under What do you want the computer to do?
- The device will go for the first cycle of rebooting and after coming to new session, you see a blue screen holding few options, Choose Troubleshoot.
- From this menu, select Advanced options followed by clicking Startup Settings in the process.
- Now, make a click on Power cog. from the right bottom end of Desktop.
- Choose Restart to let Windows 10 reboot for the second time.
- After the second reboot, click on the Boot in Safe Mode in the startup menu to enter into this Start up method.
7] Disable Power Saving Option and resolve DRIVER_POWER_STATE_FAILURE
Blue Screen Error with bug check code 0x0000009F happens mostly from power incompatibilities usually. Therefore, tweaking Power options and disabling the Power Saving mode will help in fixing the vulnerability. To accomplish the task, follow the below guidelines –
- Hover the cursor to the bottom rightmost corner of the Desktop and make a right click on the Battery icon.
- Select the Power Options from available menu.
- On the upcoming window, click the Change plan settings link beside Balanced (recommended).
- From the next page, select the link adhered to Change advanced power settings.
- When a new window is displayed, click on the Wireless Adapter Settings
- When splits up, do a click on Power Saving Mode
- Once the options spread up, Click the dropdown menu beside On battery and select Maximum Performance.
- In a similar fashion, select Maximum Performance clicking dropdown menu beside Plugged in option.
- Once done, select Apply first and then Ok to save these changes.
8] Uninstall third party security solution
Security on the internet is the real challenge nowadays as malware are available everywhere. These bugs have replicating characters and they can encrypt data easily to cause massive damage to the system files. To safeguard the security and protect the system components, we need an anti-virus program. Microsoft launched Windows Security for this purpose giving the robust construction and feature to provide real time protection against malware.
Yet, some other third party programs have a good reputation as well. Keeping both the programs can be risky as they will involve in collision and cause system files to remove. The aftermath is a DRIVER_POWER_STATE_FAILURE in Windows 10 that nobody opts for. Hence, we have to continue with only one security solution and preferably uninstall the third party one. The guidelines to accomplish this task is as follows –
- Launch the Run dialog pressing Win+R hotkeys together.
- Type appwiz.cpl in the text space of the wizard and press Enter button.
- When the Program and Features window opens, opt for the third party anti-malware program.
- When reached, select the same and click Uninstall option from the top ribbon.
- Click Yes when User Account Control prompts up.
- Finish the process by complying with the on-screen guidelines.
- Later on, restart the windows to save all these changes.
9] Change Power Settings to fix DRIVER_POWER_STATE_FAILURE
Often the DRIVER_POWER_STATE_FAILURE in Windows 10 occurs only from the Power Settings options. In usual set up, many devices may turn down to save more power and you face these errors. To resolve the case, follow the below guidelines –
- Open the Taskbar Search by pressing Win+S hotkeys at once.
- Type Control Panel in the text space and select the app from appearing result.
- Moving on to the Control Panel Window, select Small icons option beside View by.
- When the page is readjusted, click on Power Options from the middle column.
- Moving on to the succeeding window, click the Change plan settings link beside Balanced (recommended).
- From the following page, select the link with option Change advanced power settings.
- After a new window hits on display, click + before on Sleep option.
- Select Never from dropdown menu beside On battery and Plugged in
- Proceeding forward, click the Hibernate after option and select Never beside On battery and Plugged options.
- Move ahead in the list and split the hidden options for Power buttons and lid.
- Split the Power button action and select Do nothing from drop down menu beside On battery and Plugged in.
- Finally click Apply followed by hitting Ok to save all the changes.
10] Use the Default Blue Screen Troubleshooter
Blue Screen errors are usually dangerous in their actions and found to be causing permanent damages to the system to some extent. To resolve this drawback, Microsoft added a new default utility with Windows 10 named Blue Screen Troubleshooter.
The tool made its way out first with Windows 10 Fall Creators Update edition in Settings app. Before, it was available in the Conrol panel but, depending on public demand, shifted to Settings. You can also take direct Online help from using this tool if using the latest edition of Windows. The guidelines to use this utility is as follows –
From Direct Online Process –
- Open a web browser from the device and visit this link for Microsoft’s online troubleshooting.
- On the following page, reach out to When did you get the error? Section.
- Click on any the radio button from here based on your case. After a new page unveils, it will show stepwise tasks to resolve existing issue.
- Follow the guidelines to the point and fix the error eventually.
Troubleshooting from Control Panel –
- Press Win+S hotkeys at once and invoke Taskbar Search.
- Type “Control Panel” in the text space
- Select the App from search results.
- Once shifted to a new window, click the dropdown menu beside View by option.
- Choose Small icons from there to readjust the page.
- Once done, select Troubleshooting from the last row.
- Heading up to the next page, choose View all option from left pane
- When the consequent page unveils, double click the Blue Screen option from second place.
- Once the Troubleshooter wizard is displayed, click Advanced link fro left bottom corner of this page.
- From the succeeding page, put a tick mark on the little box before Apply repairs automatically
- Finally, select Next button to initiate the process.
- In case vulnerability is found out, the tool will repair it automatically.
11] Turn Off Fast Boot option
Fast Startup or Fast Boot is a combined Power option of usual Shutting down and Hibernate. The feature helps to boot the device faster by collecting most of the information from the previous session.
For the operation, it will try keeping the data from a previous session intact including DRIVER_POWER_STATE_FAILURE BSOD and carry over to another startup. Thus, the plausibility to fix the issue reduces drastically. Therefore, we need to disable this feature moving through below step –
- Take the cursor to the bottom of Desktop and make a Right-click on the battery icon.
- Select Power Options from the menu is displayed.
- Coming to the new window, select What the power buttons do link from left column.
- Once the following page is loaded, Click on Change settings that are currently unavailable to unveil the hidden options.
- Hover downward; uncheck the box set for Turn on fast startup (recommended).
- Lastly, hit the Save Changes button from the bottom.
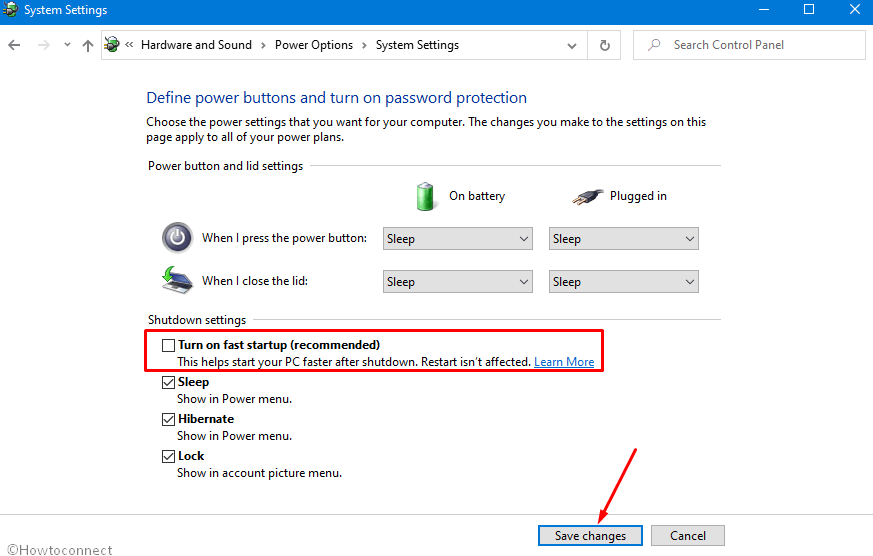
12] Update BIOS to solve DRIVER_POWER_STATE_FAILURE
Basic Input/Output Service often called BIOS is actually a firmware and it runs first when you start a device after buying it from store. It provides Hardware initialization and also runtime services for the programs installed and Windows itself.
When BIOS of a system goes outdated, DRIVER_POWER_STATE_FAILURE may prompt up. The best way to resolve this issue is to update the BIOS using below guidelines –
- Press Windows key and type msinfo32 in the blank field.
- Press Enter key to invoke the System Information window.
- Type BIOS in the search box provided here and click the Find button.
- Collect the information provided before BIOS Version/Date and note them down.
- Now leave this window as well as launch a web browser in windows.
- Visit the manufacturer website following the information you collected before.
- Finally, Download the compatible files from there and install them into the system.
13] Perform System Restore
DRIVER_POWER_STATE_FAILURE BSOD may arise after installing a new program or removing another. In that case, you can be confirmed that there is an invalid entry in Windows Registry. To resolve the issue, we can perform System Restore which loads back the previous status of Windows. The guidelines are as follows –
- Open Run and type rstrui in the provided text area on wizard.
- Click Ok button from there and invoke the System Restore window.
- Hit the Show more restore points option from wizard.
- Select the latest point and hit the Next option in the process
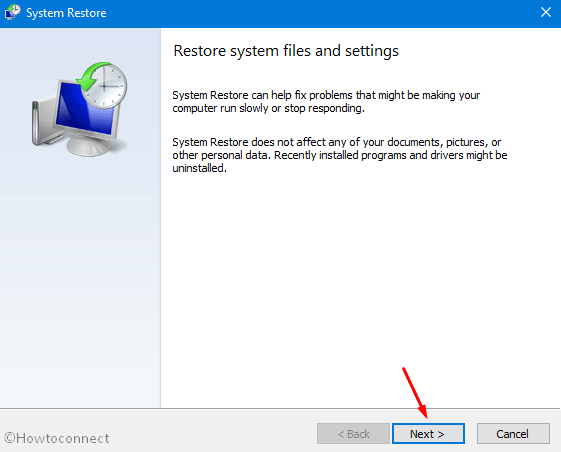
- Lastly, hit the Finish from the next page and start the restoring process.
Methods:
1] Update the Display Driver
2] Roll Back Graphics Card Driver
3] Remove External Hardware devices temporarily
4] Run System File Checker tool
5] Uninstall Problematic drivers
6] Boot Windows 10 in the Safe Mode
7] Disable Power Saving Option
8] Uninstall third party security solution
9] Change Power Settings
10] Use the Default Blue Screen Troubleshooter:
11] Turn Off Fast Boot option
12] Update BIOS
13] Perform System Restore
That’s all!!
