EMPTY_THREAD_REAPER_LIST is one of the infrequent blue screen errors that generally makes an appearance after connecting new equipment with Windows 10 devices. Also, the same fatal code can take place while formatting removable drives. With bug check code 0x00000013, EMPTY THREAD REAPER LIST BSOD error mainly points out that the attached appliances are either corrupted or damaged.
Main reasons for this Blue Screen error are connected peripherals, 3rd party software, defective BIOS settings, and malware. You will get solutions for each successively ahead.
Table of Contents
EMPTY THREAD REAPER LIST
Here is how to fix EMPTY THREAD REAPER LIST error in Windows 10 –
1] Check the connected equipment
The main reason to bring forth EMPTY_THREAD_REAPER_LIST is the incompatibility of connected equipment with the motherboard or Windows 10. Therefore, call to mind the time when you started getting bug check code 0x00000013, if it’s when you connected external hardware then you should read the technical specifications for the device. Also, new or used equipment must be checked at other assemblies.
2] Make changes in recently installed software
Quite often, a newly installed software gives rise to EMPTY THREAD REAPER LIST. If the same happens with you, uninstall the culprit program at first instance thereafter download a fresh copy of same and install it as well. During this reinstallation process, make sure to keep the third-party antivirus program disabled.
After reinstalling the faulty program, if you are still confronting EMPTY_THREAD_REAPER_LIST, check out the compatibility issue. To do so –
- Right-click on the application icon and choose Properties.
- Shift to the Compatibility tab.
- Hover the mouse pointer to Compatibility mode segment and click the checkbox located beside Run this program in compatibility mode for:
- Hit the arrow icon set alongside the version of Windows and opt for your edition using the drop-down menu.
- Lastly, click on Apply followed by OK to make the changes effective.
There might in an instance when you will not get Windows 10 in the drop-down list as a version of OS, in such case try running compatibility troubleshooter. For that –
- Open Control Panel and set the applet as Small icons.
- Pick out Troubleshooting from available links.
- Move to the right surface of currently running page, hereafter, click Run programs made for previous versions of Windows link located beneath Programs.
- Hit Next button to let the troubleshooter detect potential issues with your apps.
- On the next wizard, select the program you are having problems with and click on Next.
- Opt for Try recommended settings as a troubleshooting option.
- Following that, click Test the program button. If the application shows up and functions correctly then go back to compatibility troubleshooter wizard eventually hit Next.
- In the end, choose the option labeled Yes, save these settings for this program.
- Once the system finishes applying settings, close the wizard and check if bug check code 0x00000013 still exists.
3] Do virus scan with Windows Security to fix EMPTY THREAD REAPER LIST
In this internet-based world, not getting affected with viruses are almost impossible as they exist everywhere from spam emails to invaded webpages. Just a wrong click and viruses are there to dodge the security blockage of Windows 10. Though all malware is not deleterious enough to mischief with the system components directly, still you shouldn’t take them lightly.
Once a malware enters into your system, it starts replicating moreover presents itself as original Windows core components to conceal its own identity. During the procedure, existing malware damages system files and the registry as well which later cause EMPTY THREAD REAPER LIST. To get rid of this Windows 10 blue screen error, take immediate action to remove virus that too without installing any third-party antimalware. Steps are as followed –
- Open Windows Settings app by hitting “Win+I” hotkey.
- Continue with Update & Security category.
- Choose Windows Security from the left column and then shift to the right pane.
- Click the option named Virus & threat protection.
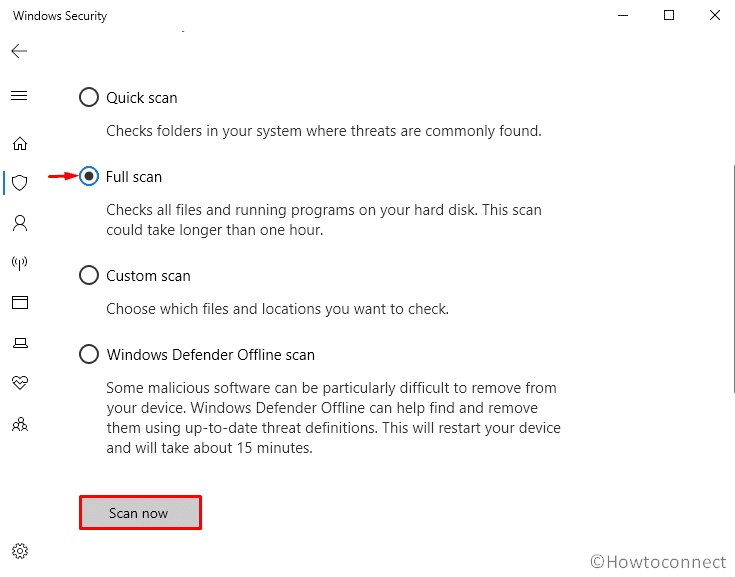
- When Windows Security turns up in a separate window, move to its right surface and click Scan options link.
- Click the radio button alongside Full scan and eventually hit Scan now button.

- The procedure may take longer time as the utility scans every corner of Windows 10, thus, don’t interrupt in between.
- Once the scan is over, if the built-in tool detects any malware, click Clean threats.
- Subsequently, select Remove first and then Start actions.
4] Get latest Windows 10 patch
Cumulative updates help Windows 10 to perform well as most of them contain fixes for bugs and issues; not to mention new features and settings. Generally, Microsoft provides updates automatically after a certain period of time but if you are coming across bug check code 0x00000013 time and again, don’t waste time by waiting. Check for any available updates immediately and grab the same. Here is the process –
- Right-click on the Start button and choose Settings.
- Select Update & Security.
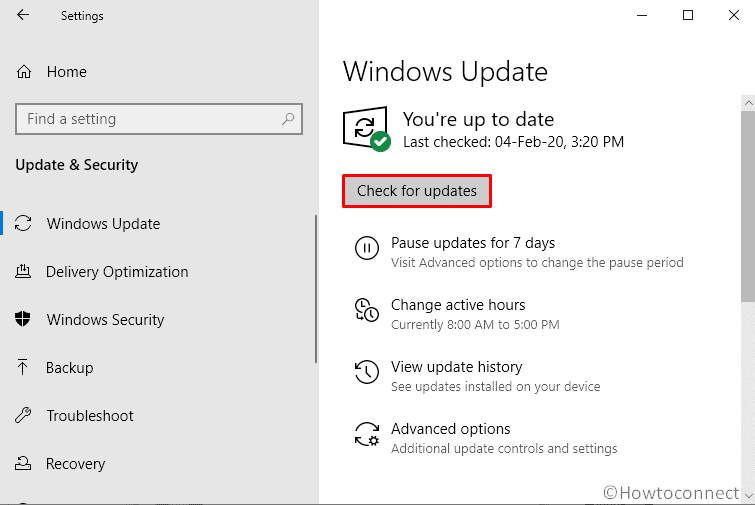
- Go to the right console and click the button Check for updates even though the page shows You’re up to date.

- Once the system finds any new patch, hit Download button.
- After being downloaded, system will start installing the updates.
Note – Make sure that you are present in front of desktop during the installation process because the system often asks permission to reboot Windows 10.
In most cases, EMPTY_THREAD_REAPER_LIST blue screen error goes away for always after installing the latest patch. If not, an outdated device driver might be the reason. Normally, while updating Windows, drivers get into a newer version automatically if you did not exclude Drivers from Updates purposely. In such a situation, get the most recent at the same time compatible drivers for your hardware from the manufacturer’s website.
5] Reset BIOS to default settings to fix EMPTY THREAD REAPER LIST
Check the settings in the BIOS as it is necessary to pay attention to the priority of loading media, as well as data that relate to voltage. If you previously overclocked the equipment, then you need to throw all the settings modified till now and go back to the default state. For that –
- Press Windows key and click the power icon followed by choosing Shut down.
- Power up your Windows 10 device and press the key that lets you enter the BIOS setup screen.
Note – Depending upon the device you are using, the key may vary, for example, F2 is utilized to open the BIOS on some Dells. Whereas F10 is applicable to HPs and F1 on Lenovo. In case of having a different brand of device, the info about the same prompt on the screen when you first turn it in, thus, look carefully.
- Use arrow keys to go through the BIOS setting to find the option to reset the computer to its default settings. Like previous steps, this one also varies for different computers. For instance, on HP computer, select File menu first and then choose Apply Defaults and Exit. On the other hand, if you use Lenovo, either press F9. Else, select Exit followed choosing Load Optimal Defaults. In case of using Dell, press Alt-F. Or else, check out the owner’s manual in order to find the exact procedure for your computer.
- Restart Windows 10 using any convenient menu.
- Pull the Battery and shut down the computer again.
- Following that, unplug it from the port.
- Henceforth, open the case cover of your device and take out the BIOS backup battery from its socket on the motherboard in case of having one.
Note – Some machines have removable batteries, while others don’t. Therefore, if you can’t take the battery out without forcing the same, don’t remove it.
- If you have removed the battery successfully, replace that one. But before doing so wait for at least five minutes to give the complementary metal-oxide-semiconductor memory chip time to forget the remembered settings.
- Finally, close the case and then plug the computer back in and turn the device on.
6] Rollback device to an earlier state
Using Windows 10 machine without making any changes in software and settings is nearly impossible. But unfortunately, many people reported that they came across EMPTY THREAD REAPER LIST right after making modifications in the system. Thus, going back to the previous state where everything was working fine will be wise. Steps to do so are as followed –
- Press Win+S hotkey together to bring forth taskbar search.
- Type in rstrui and hit Enter.
- When System Restore wizard shows up, hit Next to proceed.
- Following that, select Show more restore points to preview all previous ones.
- Opt for the latest point from the list, hereafter, click on the Next button.
- In the end, hit the Finish button to let the system start the restoring process.
Bonus tip
EMPTY THREAD REAPER LIST blue screen error may show up in your Windows 10 device due to various reasons thus resolving the same is hard. The methods we described above usually fix the BSOD but if none works for you, determine the culprit by analyzing small memory dump and then take the necessary steps. Here’s how –
- Proceed to desktop area by making combined press of Win+D.
- Right-click on This PC icon followed by choosing Properties.
- Click the link named Advanced system settings located on left column.
- Hit Settings button you will find beneath Startup and Recovery segment.
- Click the checkboxes set alongside ‘Write an event to the system log‘ and ‘Automatic restart‘ respectively.
- Hover the mouse pointer to Write debugging information section and choose Small memory dump (256KB) from the drop-down list.
- Following that, hit the OK button in order to save the changes.
- Later on, navigate the official page of the Windows Driver Kit and download compatible one.
- Visit the folder where the system saves downloaded files and then install the item by following on-screen direction.
- After that, and execute the below command to the Debugging Tools for Windows folder –
cd c:\program files\debugging tools for windows
- To load the dump file into a debugger, either of –
windbg -y SymbolPath -i ImagePath -z DumpFilePath
or,
kd -y SymbolPath -i ImagePath -z DumpFilePath
- Eventually, insert below command and hit Enter to save the file in C:\windows\minidump\minidump.dmp –
windbg -y srv*c:\symbols*http://msdl.microsoft.com/download/symbols -i c:\windows\i386 -z c:\windows\minidump\minidump.dmp
- Finally, you will be able to check the file to get the error information of bug check code 0x00000013. Once you get the root cause, explore the bugs in Google to resolve the same Windows 10 blue screen error.
Methods:
1] Check the connected equipment
2] Make changes in recently installed software
3] Do virus scan with Windows Security
4] Get latest Windows 10 patch
5] Reset BIOS to default settings
6] Rollback to an earlier state
That’s all!!!
