File Explorer is the central task executant in Windows operating system but Windows 11 users are facing a weird issue in it. You might encounter the same problem when trying to launch this application. Actually, File Explorer restarts automatically when opening the and then the application is loaded. Furthermore, despite running, the explorer closes and opens for no reason.
File Explorer restarting automatically is likely to occur because of corrupt user profile, broken system files, or malware. Damaged registration of applications and conflicts with third-party programs may also lead to this issue. Main culprit behind this scenario is Windows.UI.FileExplorer.dll which might be affected due to the mentioned factors. Solutions: How To Fix File Explorer not Responding in Windows 11
Table of Contents
File Explorer restarting autometically
Here is how to fix File Explorer restarting when opening in Windows 11:
Add a new user
Corrupt user profiles are the most potential reason for the File Explorer problem and several users report that adding a new user resolves this. Therefore, follow the steps:
- Press Winkey + I and select “Accounts”.
- Click on Add account for “Add other users”.
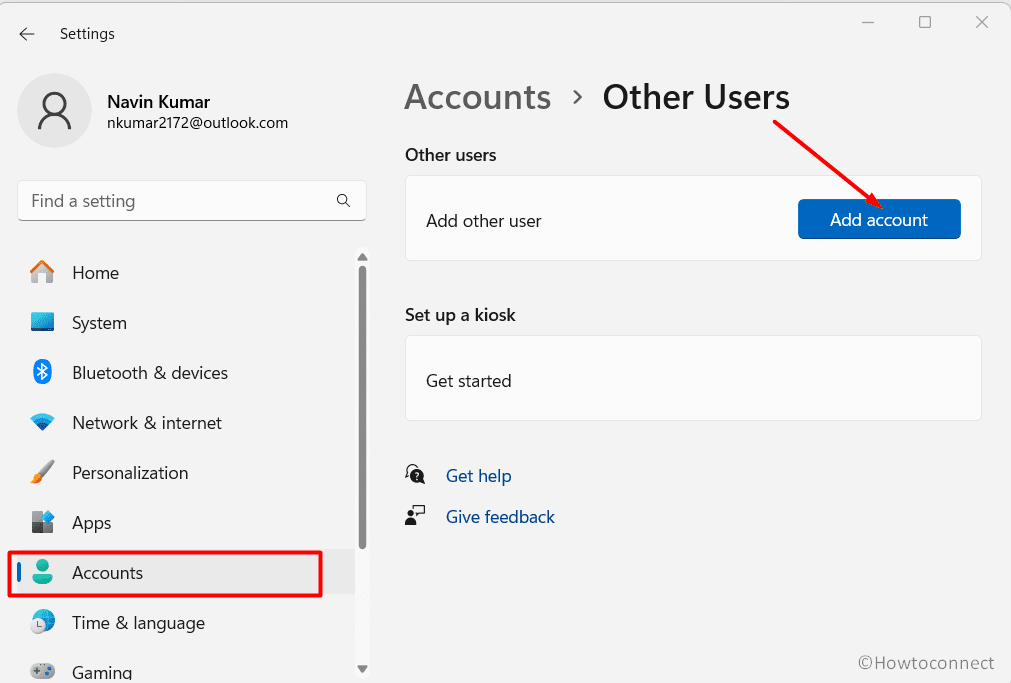
- Microsoft account window will load in just a few moments. Select “I don’t have this person’s sign-in information”.
- On the next page, click “Add a user without a Microsoft account”.
- Type a user name and make it secure by entering same password twice.
- Answer the 3 security questions and click Next.
- Then, click “Change account type”.
- Select “Administrator” from the drop-down.
- Close all the windows and restart your PC.
- Sign in using the newly added account.
- See if File Explorer behaves perfectly.
- You can now restart and log in with your old account by making it administrator.
Execute Clean boot
This File Explorer problem is seemingly occurs because of messes created by third-party applications, drivers, and services. Clean boot is the option to disable all of these and provide a way to run the explorer without any hindrance. Follow the steps:
- Press Windows key and R then type msconfig.
- Click on “OK” to launch the System Configuration window.
- Go to the “Services” tab and check the box for “Hide all Microsoft services”.
- Click “Disable all” and navigate to the “Startup” tab.
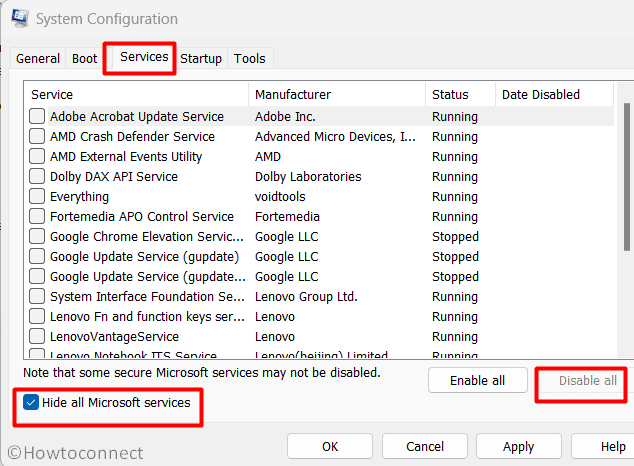
- Select the link saying “Open Task Manager”.
- Right-click on the enabled Startup apps and select Disable.
- Close the task manager and return to the System Configuration window.
- Click on “Apply” and “OK”.
- When a popup opens, select Restart.
Re-register File Explorer
Failed and corrupted registration of apps also triggers the File Explorer not working correctly problem. Thankfully, you can register the app simply using a Windows PowerShell cmdlet:
- Right click on “Start” and choose “Terminal (admin)”.
- On Windows PowerShell window, copy-paste the following command and hit Enter:
Get-AppXPackage -AllUsers | Foreach {Add-AppxPackage -DisableDevelopmentMode -Register "$($_.InstallLocation)\AppXManifest.xml"}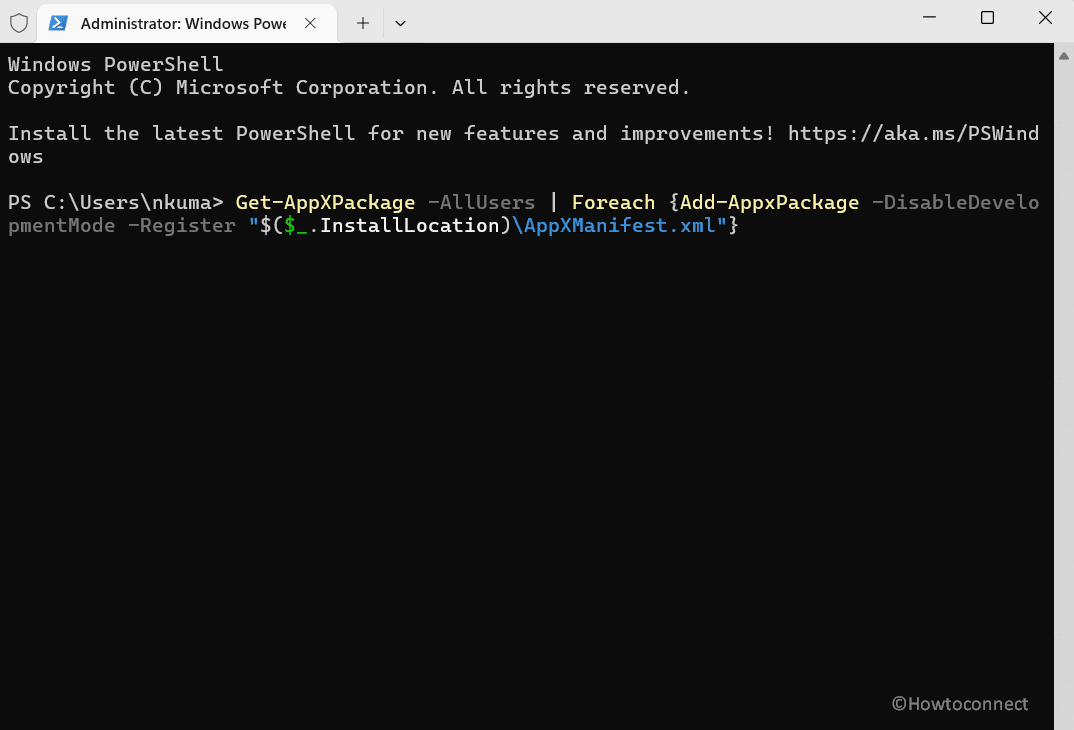
- Launch the File Explorer and see if it opens correctly.
See: Fix Duplicate Folders in File Explorer Quick Access in Windows 11
Perform System File Checking and run DISM
Broken System files integrity might be the prime reason for File Explorer restarting when opening. Furthermore, faulty Windows image in a WIM or VHD file may also cause this issue. Therefore, you need to use System File Checker and DISM to repair both of the potential flaws at a time”
- Click on “Start” and type “cmd.exe” without quotes.
- Select “Run as administrator” from the right search result pane.
- Once on the Administrator: Command Prompt, type
SFC /SCANNOWand press “Enter”. - The process will show “Beginning system scan. This process will take some time.
- Beginning verification phase of system scan.”
- Wait until integrity violations are checked and repaired and then restart the computer.
- See if File Explorer loads normally now.
- If the issue persists then launch the elevated command prompt following the 2 steps at the start of this method.
- Now run 3 lines of commands serially followed by pressing Enter after each line:
DISM /Online /Cleanup-Image /CheckHealth
DISM /Online /Cleanup-Image /ScanHealth
DISM /Online /Cleanup-Image /RestoreHealth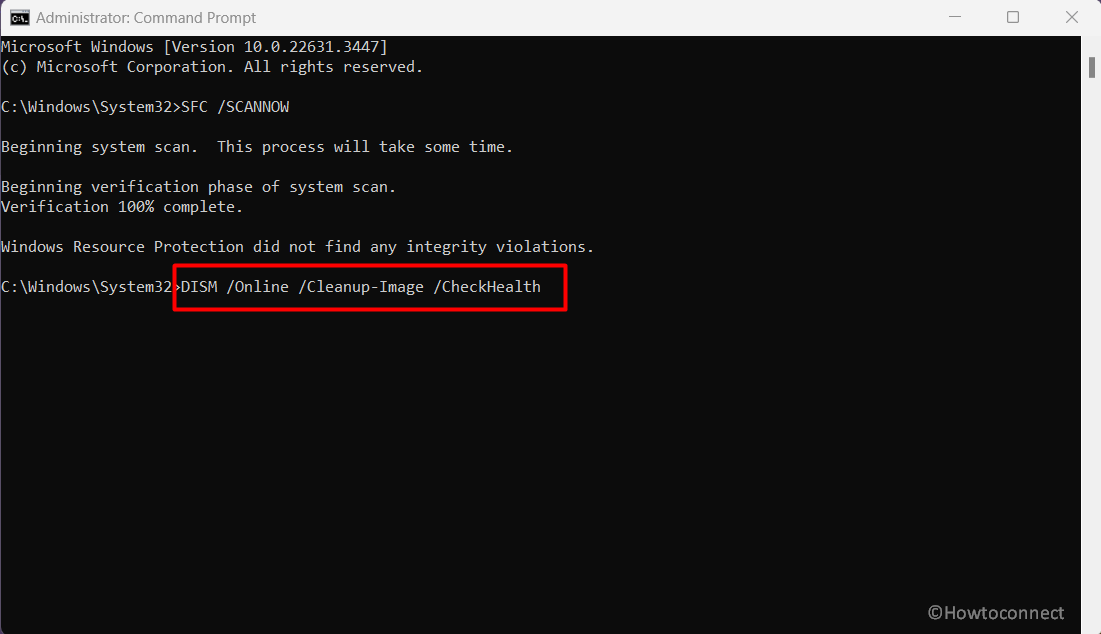
- After all the processes are completed, reboot the system and then this issue should be solved.
Run CHKDSK tool
Running check disk can also fix File Explorer restarting unnecessarily when opening or running the app. This will repair the File Structure of the hard drive and curate the issue so advance with the steps:
- Open the File Explorer (Windows+E) and go to “This PC” from left navigation pane.
- Right click on the C: drive (where windows is installed) and select “Properties”.
- Select “Tools” tab.
- In the “Error checking” section click on “Check”.
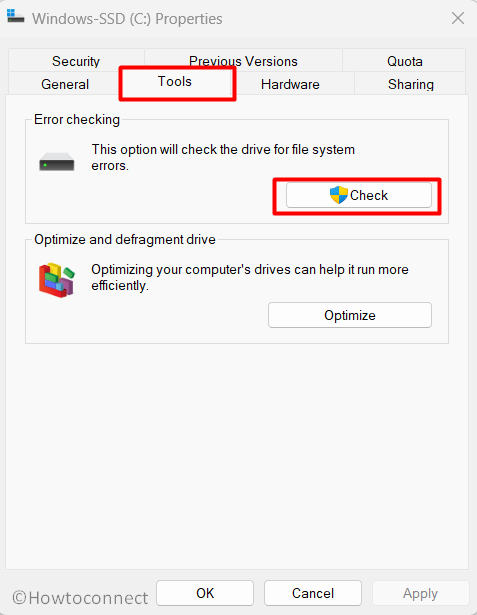
- If the checking process finds any error then follow the suggestions accordingly. Otherwise, restart your PC and see if the File Explorer issue is solved.
All in One Fix: File Explorer Windows 10 Issues
That’s all!!