While working, your computer might shut down unexpectedly and then you discover that it’s a reboot without issuing any warning message or similar stuff. You will find that the device is affected by MANUALLY_INITIATED_CRASH BSOD error when trying to figure out the cause. These types of Blue Screen Error come with bug check codes and in this case that is 0x000000E2. The issue clearly means a user has intentionally initiated a crash dump from either of the Keyboard or the Kernel Debugger.
MANUALLY INITIATED CRASH Blue Screen Error Windows 10 happens mostly because of some drawbacks in the Device drivers. Other reasons like an outdated OS, Bad areas in the Hard Disk, Defective Windows Image files or some corrupted system components may lead the error to show up. When encounters, you might come across frequent freezing of the desktop followed by abnormal rebooting. The issue is one of the most dangerous ones but not the invincible one, you can very well fix the same with the application of workarounds. Today, we are discussing some resolution processes to fix the Blue Screen Error with bug Check code 0x000000E2 in the below segment. Let’s hang on to the quick links of method list first listed below:
Table of Contents
MANUALLY INITIATED CRASH
Here is how to fix MANUALLY INITIATED CRASH Blue Screen Error Windows 10 –
1] Update drivers using Device Manager
Drivers provide software interference of a hardware accessory connected to the system with a computer Bus. Hence, this is a bit sensitive and using their latest version is always mandatory. When they are obsolete, MANUALLY INITIATED CRASH Blue Screen Error gets its first entry. Usually, the updating process is simple and autonomous along with Windows but not always it is helpful.
Sometimes, you may need to visit the Manufacturer’s website for the latest drivers and grab from there. Device manager is really a better platform to update these things and this is way safer being a built-in feature. We prefer using this platform for updating the drivers, the following guidelines will instruct you there –
- Right-click on Start menu and select Device Manager from visible list.
- Once the wizard shows up, reach out to the device having an exclamation mark.
- Select to split its driver list and make a right-click on driver having yellow indication only.
- Now, select the Update driver option from the appearing menu.
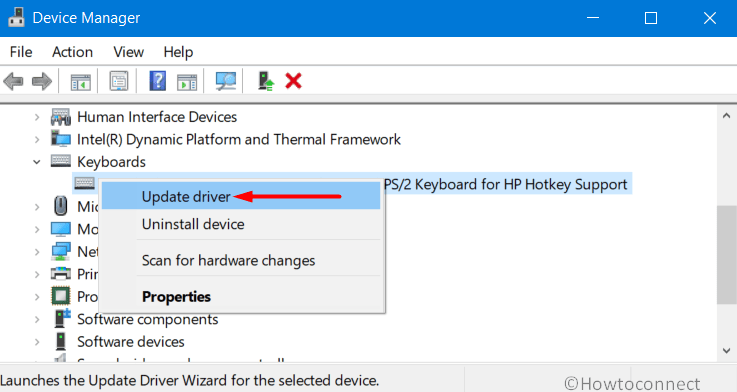
- Keep following the further guidelines coming up on display to update these drivers.
- Repeat the same process for all the devices having an exclamation mark in the console.
- Finally, reboot Windows to make these changes effective.
2] Rollback drivers
We have talked about how outdated drivers can call MANUALLY INITIATED CRASH Blue Screen Error in Windows 10. Well, not only the outdated ones, rather an incompatible or dreadful one will do the same. Such a drawback happens when you allow updating them automatically and some buggy ones pushed into the system.
Another reason is a poor internet connection that puts the process in an unexpected loop and few drivers are installed in a problematic state. If that happens on your case too, try getting the previous state of the drivers by rolling back them or disable defective ones through below instructions –
- Open Run dialog pressing Win+R hotkeys together.
- Type devmgmt.msc in the provided text space of the wizard. Hit Enter to open Device Manager.
- Now, opt for the device whose driver you want to disable or rollback.
- Stretch out its driver list by making a double click on the same.
- Do a Right-click on the suspicious driver, and select Properties.
- Upon opening a new wizard, jump into the Driver tab and click Disable from there.
- If you want to get back the same to its previous state, select Roll Back Driver.
- After the task finishes, Restart Windows in the usual way.
3] Update Windows 10 by installing all released patches
OS is never complete and that the reason, Microsoft releases cumulative updates at a regular interval. These Package files comprise of bug fixes of existing snags and also recent modifications. Outdated OS usually a weaker one with respect to strength and can be affected anytime with Blue Screen error having a bug check code of 0x000000E2.
Since the updating process is automatic, you don’t really think of it but the reality is little complex here. Sometimes due to internet connection or some similar stuff, the installation of update files are buggy. To avoid this, you can perform the task manually following below guidelines –
- Launch Windows Settings app pressing Windows key and I together.
- Click on the Update & Security tile and from appearing UI.
- When shifted to following page, choose Windows Update from left end.
- On the corresponding right, click on Check for updates.
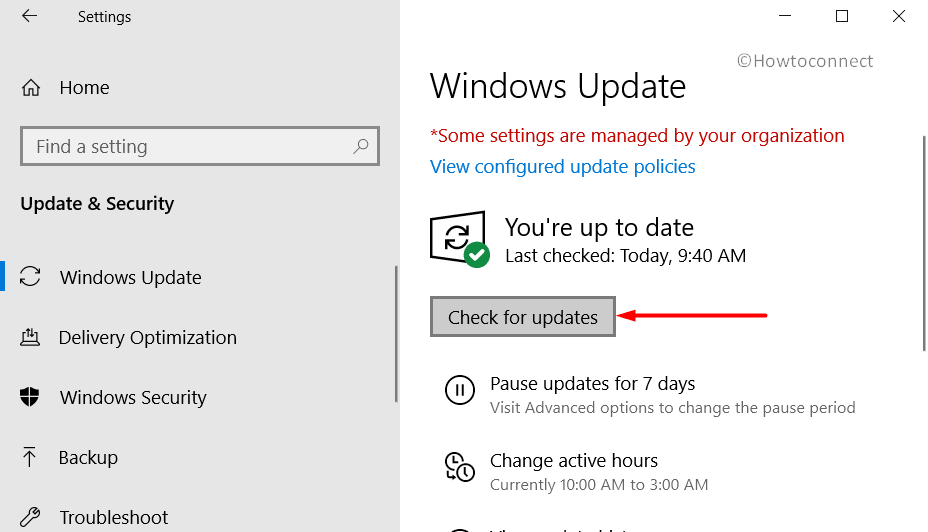
- When the list of patches is available, do click the Download option and start getting the files in the System.
- Installation will begin automatically after the process ends.
- Follow the further guidelines as asked by the device until the process finishes.
4] Detect and eliminate the malware
Malware is everywhere living in disguise especially when you are surfing on the internet. Anytime you can be an easy prey by clicking a link coming through email or while visiting a website. These bugs have a replication property and used basically for stealing sensitive data from a protected system. They can easily dodge the security shield of your system and gets inside to make the system files corrupted.
Not only they are harmful to your super-sensitive data but also due to the corruption in the system files, MANUALLY INITIATED CRASH Blue Screen Error will emerge. Windows 10 now provides its users with a security system which you can deploy to eliminate these bugs following through below guidelines –
- Open Taskbar Search and type Security in the blank text area.
- Choose Windows Security from appearing Result list.
- On the appearing App UI, click the Virus & threat protection option from the left overlay.
- Shift to the adjacent right side and choose Scan options link.
- Up next, hit the radio button of Full scan.
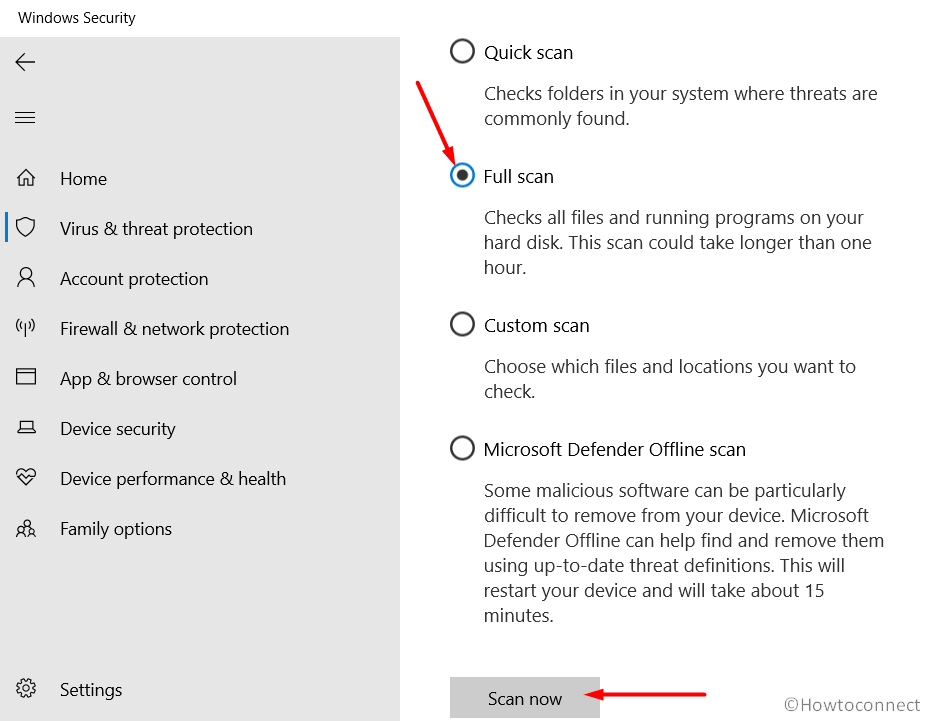
- Later on, click on Scan now option to initiate the process.
- Once the process ends normally and detects some bugs, select Clean threats option to dismiss them.
- On the consequent page, choose Remove first and then Start actions to clear them all.
5] Eliminate the risk of Software collision to fix MANUALLY INITIATED CRASH Blue Screen Error
Software applications help to do tasks easily as well saves lot of time that could go wasted in normal way. You may have a lot of such programs in the system including two or more from the same genre. When similar programs are present in the system, they may engage in a conflict resulting into a lot of system files go missing.
Such happening will also lead the system to Blue Screen error with bug check code 0x000000E2. You must not really let these programs to stay over and uninstall them using below guidelines –
- Press Win+X keys at once and choose Apps and Features option from its top.
- By default, you will be redirected to the Apps window opened from the Windows Settings app.
- Select Apps & features sitting in the left and jump to adjacent right.
- Reach out to the similar programs in list that you opt to remove.
- Click the same and hit Uninstall option from extended pane.
- If UAC prompts for consent, hit Yes to follow through.
- Once the installation finishes, Restart Windows 10 PC.
6] Rectify and recover missing files from System
Due to some malware infection or when a software conflict happens, many of the system core elements go missing while a lot becomes corrupted. These files from the Windows core part helps the system to run smoothly unless they are corrupted in an above-mentioned way. Well, there is an easy fix when such corruption happens and the tool is called System File Checker. This is a built-in Windows utility and you can avail the same in the Elevated Command Prompt going through following instructions –
- Press the Windows key and type cmd in the blank text space of Taskbar.
- When Command Prompt will be upfront, do right click on the same and also select Run as Administrator.
- When User Account Control prompts for permission, simply click Yes.
- On the next page upon appearing, insert following command tool and press Enter key –
Sfc /scannow
System File Checker will be activated and it will detect all the corrupted core components as well as fix eventually. You need to have little patience and wait until the process ends normally. Once finished, reboot the device and hope the MANUALLY INITIATED CRASH Blue Screen Error Windows 10 will be fixed afterward.
7] Perform System Restore
Windows Registry gets tweaked when you make some changes in the device, especially when installing new software. The same happens while removing existing programs and when these entries are invalid, there is a sharp chance of observing MANUALLY INITIATED CRASH Blue Screen Error in Windows 10. In case of such a scenario, you can easily ignore the issue by restoring the previous point of the Windows. The workaround is way too easy if you follow the below instructions –
- Press Win+R hotkeys and invoke Run dialog.
- In the open text field of this wizard, type rstrui and also hit Enter key.
- System Restore Wizard will pop out in a moment where you need to click Next from bottom.
- From the appearing page, choose the last restore point followed by clicking Next button.
- After the consequent window loads, choose Finish to start the restoring.
8] Check the Hardware for proper functionality
Hardware accessories can often get damaged and eventually you can suffer from Blue Screen error with bug check code 0x000000E2. Often a bad RAM, Motherboard or Hard Disk can be accused of this drawback. These things must be maintained in a perfect condition and replaced once damaged fully or partially.
In the present time, some people are also getting similar snags like BSOD in their system after connecting some Hardware accessories like a printer, speaker, keyboard or mouse. That’s unfortunate and alarming though, has got a pretty much easier fix. You can simply deport these accessories momentarily and then try rebooting the system hopefully the issue will resolve and you can have an error-free system afterward.
9] Fix Memory issues from Windows
Memory issues play a bigger role in causing MANUALLY INITIATED CRASH Blue Screen Error Windows 10 which primarily powers up from bad RAM usually. Such risks can be eliminated easily by detecting the drawbacks through running Windows Memory Diagnostic Tool. The guidelines are as follows –
- Press Win+S hotkeys and invoke the Taskbar Search.
- Type in Memory in the blank text field followed by pressing Enter key.
- The utility will prompt up where you need to select “Restart now and check for problems (recommended)”.
- The action will lead Windows to reboot once and after starting, a blue screen will be visible and it will detect memory issues.
- Once the progress touches 100%, windows will prompt to reboot for the second time.
- On subsequent startup, the result of the diagnostic will become visible in the System tray.
10] Boot the System in Safe Mode
Safe Mode is a special type of Startup method where Windows powers up with basic applications and settings only. Thus, vulnerabilities like MANUALLY INITIATED CRASH Blue Screen Error will resolve usually.\
If the drawback continues to appear in the system, you can be sure that the default application of settings is not responsible for the issue and later on apply fixes accordingly. For now, let’s Boot into Safe Mode using below instructions –
- Press Windows Key and then choose the Gear icon to launch Settings app.
- In the upcoming UI, click on Update & Security.
- When consequent page loads fully, choose Recovery option lying on left overlay.
- Select Restart now button under “Advanced Startup” area.
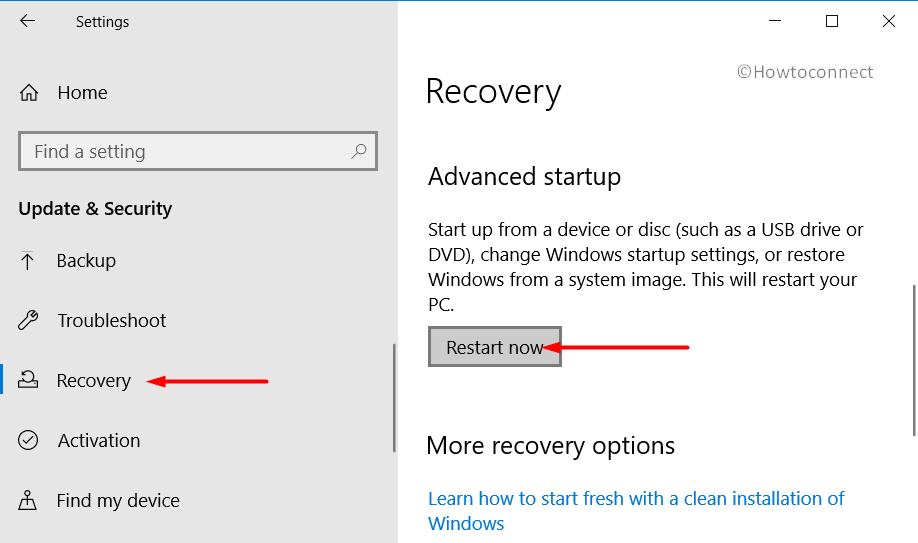
- On the forthcoming Startup, the system will ask you to select the next step.
- Choose Troubleshoot from appearing screen.
- Proceeding forward, execute a hit on Advanced options and then Startup Settings.
- Select “Enable Safe Mode“, click Restart to move ahead.
- On the next Startup while Windows is booting, press F4.
11] Reset Windows 10 fix MANUALLY INITIATED CRASH Blue Screen Error in Windows 10
Once you discover the MANUALLY INITIATED CRASH Blue Screen Error Windows 10 even after booting the OS in the Safe Mode, you can be sure a third party application is responsible for the snag. In that case, you can Reset Windows 10 and to be honest, that’s the best way system may offer.
Resetting comes with two options such as keeping the Files intact in the system or erasing them all. You can opt for either one based on the intensity of the problem present in the system. The process to perform a Reset to Windows 10 is as follows –
Note – For your acknowledgment before proceeding to the Workaround, the process erases all the files from your C partition, therefore, you might consider having a backup of it in a safe place. You will also need a Bootable Media like USB flash drive in order to accomplish the task. Once ready, proceed with the following –
- Open the Windows Settings app pressing Win+I hotkeys at once.
- On the layout, select Update & Security tile and load its consequent window.
- From the next page, select Recovery option lying on the left pane.
- Moving on to the right, select the Get started option lying under Reset this PC area.
- When the new window will be displayed, you will find two options to choose whether you want to remove everything from your device or keep the files intact. Choose any depending on your need and extent of the error.
- Next up, follow the instructions available on display or execute tasks you will be asked to do.
- In the end, Windows 10 will be reset and there will be no MANUALLY INITIATED CRASH Blue Screen Error in the system.
12] Remove and rectify bad areas in Hard Disk
When a Hard Disk is not maintained in good health despite using it for a prolonged period of time, bad areas can be formed in it. This part of the machine is considered as a soul and a bad area inside will bring Blue Screen Error with Bug Check code 0x000000E2 upfront. To rectify those areas easily, we have the Disk checking tool which actually activated in the Elevated Command Prompt. To deploy the Workaround, here is the guideline –
- First and foremost, Open Command Prompt as Administrator.
- After moving to the black window, enter following command followed by hitting Enter –
chkdsk C: /f /r /x
- In a moment, the Disk Checking Tool will be powered up and start detecting affected areas in HDD.
- After the process ends, reboot machine in usual way.
- When you get the Desktop back in the next startup, hopefully, there will be no trace of BSOD error in the system.
13] Run Built-in Blue Screen Troubleshooter
Microsoft introduced Windows Blue Screen Troubleshooter embedded in Fall Creators Update version as the BSOD error was very much prominent. Till now, the utility has got the best potential to fix such drawbacks from your loving machine. In the past, this was available in the Windows Settings app which has shifted to Control Panel coming to the latest edition. Here is how you can deploy the utility and fix MANUALLY INITIATED CRASH Blue Screen Error Windows 10 –
- Press the Windows key and open up Taskbar Search eventually.
- Write bluescreen in the open text area. Select Find and fix bluescreen problems option once visible.
- When shifted to the Troubleshooting wizard, the system will start detecting issues in your device.
- If found any, the troubleshooter will show stepwise tasks for your execution. Follow those and the MANUALLY INITIATED CRASH Blue Screen Error will resolve.
14] Fix Problematic Windows image files to fix MANUALLY INITIATED CRASH Blue Screen Error
Windows Image Files are the core components coming with ISO before any of the major updates of the OS. No way can they be corrupted unless something happens while downloading. When the image files are found with potential corruption, MANUALLY INITIATED CRASH Blue Screen Error will show up in the system.
To fix these files eventually the BSOD error, you can deploy the DISM tool. This top-notch inbuilt utility is active in the Elevated Command Prompt and the way to avail is as following –
- Open the Taskbar Search pressing Win+Q hotkeys together.
- In the empty text space, type “cmd.exe”.
- When Command Prompt is upfront in the result, right-click on this.
- Choose Runs as Administrator option from available pane followed by clicking Yes when UAC asks.
- Once moved to the dark window next, type the following command –
DISM.exe /Online /Cleanup-image /Restorehealth
- Now, the Deployment Image Servicing and Management (DISM) tool will be activated once you hit Enter.
- The utility will thereby detect the dreadful Windows image files in the system and take necessary actions accordingly. Since, the process may be a lengthy one, hold your patience till finishes.
- Finally, Restart the device once the process ends normally.
Another way out to fix the defective Windows image files is with the installation media. The way is as following –
- First of all, insert the Windows installation media at any of the ports.
- Get access to the Elevated Command Prompt using above instructions.
- When in the black window, type the following commands and press Enter after each.
dism /online /cleanup-image /scanhealth
dism /online /cleanup-image /restorehealth
- After completing, again insert the following command and hit Enter.
DISM /Online /Cleanup-Image /RestoreHealth /source:WIM:X:SourcesInstall.wim:1 /LimitAccess
- In the Command, please replace the X value with your drive for installation media you have inserted before.
- Once the procedure is over, reboot Windows 10 to save all these changes.
Methods:
1] Update drivers using Device Manager
2] Rollback drivers
3] Update Windows 10 by installing all released patches
4] Detect and eliminate the malware
5] Eliminate the risk of Software collision
6] Rectify and recover missing files from System
7] Perform System Restore
8] Check the Hardware for proper functionality
9] Fix Memory issues from Windows
10] Boot the System in Safe Mode
11] Reset Windows 10
12] Remove and rectify bad areas in Hard Disk
13] Run Built-in Blue Screen Troubleshooter
14] Fix Problematic Windows image files
That’s all!!
